
Lesson 70: Building a Dedicated Payment Page for Flipnzee Auctions

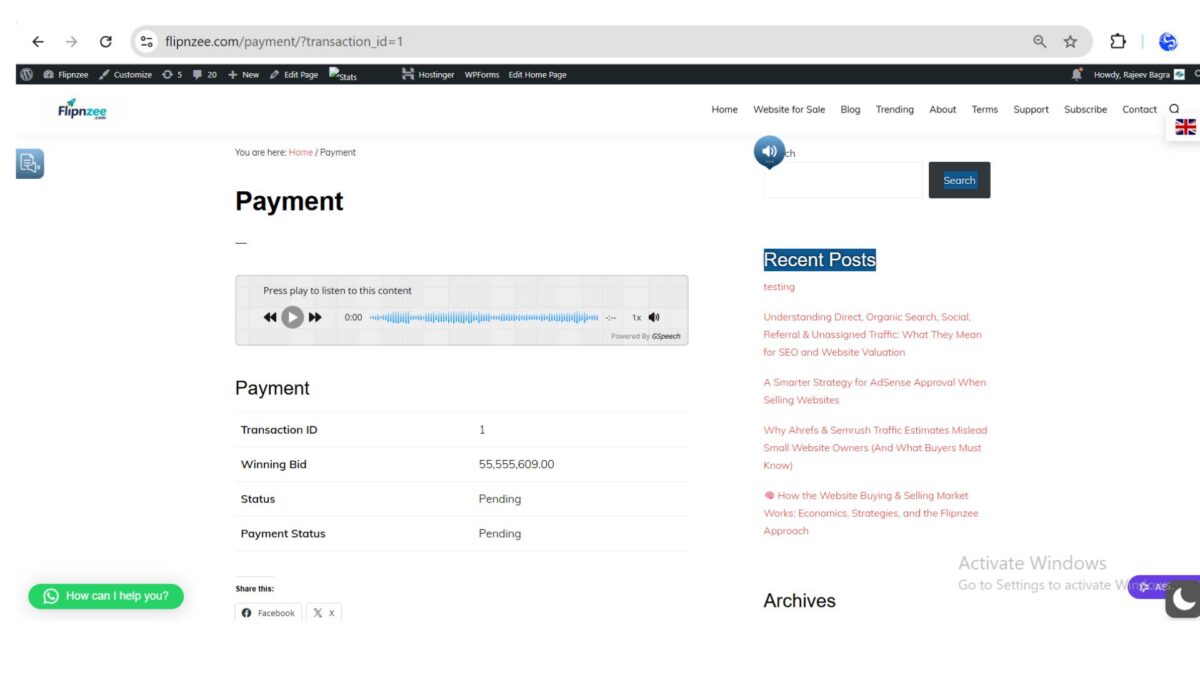
After completing the buyer purchase history and purchase details pages in the previous lesson, the next logical step was to create a dedicated payment page. Instead of redirecting buyers to a non-existent URL after clicking “Pay Now”, the plugin now provides a proper payment page that serves as the foundation for future payment gateway integration.
Although no payment gateway is connected yet, this lesson establishes the complete page architecture that future lessons will build upon.
Objective
The goal of this lesson was to:
- Create a dedicated payment page.
- Register a new shortcode for the payment page.
- Display transaction information securely.
- Ensure only logged-in users can access the page.
- Prepare the plugin for Stripe, PayPal and other payment integrations.
What We Built
The payment workflow now looks like this:
Completed Auction
        │
        ▼
Transaction Created
        │
        ▼
Buyer clicks "Pay Now"
        │
        ▼
/payment/?transaction_id=1
        │
        ▼
Payment Page
        │
        ▼
(Future)
Stripe / PayPal / Crypto Payment
Step 1 — Create a New Payment Page Class
A new file was created:
includes/class-payment-page.php
The file begins with the standard WordPress security check.
<?php

if ( ! defined( 'ABSPATH' ) ) {
    exit;
}

class Flipnzee_Payment_Page {

    public static function render() {

        if ( ! is_user_logged_in() ) {
            return '<p>Please log in to continue.</p>';
        }

        ob_start();

        $transaction_id = isset( $_GET['transaction_id'] )
            ? absint( $_GET['transaction_id'] )
            : 0;

        // Display payment information here.

        return ob_get_clean();
    }
}
Step 2 — Register a New Shortcode
The shortcode registry inside
includes/class-shortcodes.php
was extended with a new shortcode.
add_shortcode(
    'flipnzee_payment_page',
    array(
        'Flipnzee_Payment_Page',
        'render'
    )
);
This allows WordPress pages to render the payment interface using:
[flipnzee_payment_page]
Step 3 — Load the Payment Page Class
The plugin loader was updated so the new class becomes available throughout the plugin.
Example:
require_once FLIPNZEE_PLUGIN_PATH . 'includes/class-payment-page.php';
Without loading the class, WordPress would be unable to locate the shortcode callback.
Step 4 — Retrieve the Transaction ID
The page accepts the transaction through the URL.
Example:
/payment/?transaction_id=1
The transaction ID is safely extracted using:
$transaction_id = isset( $_GET['transaction_id'] )
    ? absint( $_GET['transaction_id'] )
    : 0;
Using absint() ensures only positive integer IDs are accepted.
Step 5 — Fetch Transaction Details
Using the transaction ID, the plugin queries the transaction table.
Example:
global $wpdb;

$table = $wpdb->prefix . 'flipnzee_transactions';

$transaction = $wpdb->get_row(
    $wpdb->prepare(
        "SELECT * FROM {$table} WHERE id = %d",
        $transaction_id
    )
);
This returns the complete transaction record for display.
Step 6 — Display Payment Information
The page currently displays essential information including:
- Transaction ID
- Winning Bid
- Transaction Status
- Payment Status
Example output:
Payment

Transaction ID     1
Winning Bid        ₹55,555,609
Status             Pending
Payment Status     Pending
This provides buyers with confirmation that the transaction exists before payment processing is added.
Step 7 — Create a WordPress Payment Page
A new WordPress page was created:
Payment
The page content contains only the shortcode:
[flipnzee_payment_page]
This keeps presentation separate from business logic, making the system easier to maintain.
Testing
The payment page was tested by visiting:
/payment/?transaction_id=1
The page correctly displayed:
- Transaction ID
- Winning Bid
- Pending Status
- Pending Payment Status
The previous 404 Not Found error was successfully resolved.
Files Modified
includes/class-payment-page.php (new)
includes/class-shortcodes.php
includes/class-loader.php (or plugin loader)
Download Source Code
Download the starting version of the plugin before the lesson:
Download the completed version after this lesson:
Lessons Learned
During implementation, several important WordPress plugin development concepts were reinforced:
- Create reusable functionality using dedicated classes.
- Register features using WordPress shortcodes.
- Load new classes through the plugin loader.
- Validate user input using
absint(). - Protect pages by requiring user authentication.
- Use output buffering (
ob_start()/ob_get_clean()) for shortcode rendering. - Keep page layout separate from business logic.
Current Workflow
Auction Ends
      │
      ▼
Winner Determined
      │
      ▼
Transaction Created
      │
      ▼
"My Purchases"
      │
      ▼
Pay Now
      │
      ▼
Payment Page
      │
      ▼
(Future)
Payment Gateway Integration
What’s Next?
With the payment page now in place, the plugin is ready for the next phase of development. Future lessons will focus on transforming this informational page into a fully functional checkout by adding payment gateway integration, order summaries, payment processing, status updates, and buyer/seller notifications.
Lesson 70 establishes the foundation that all future payment functionality will build upon.