
Lesson 64 Implementation: Creating the Transactions Admin Page in Flipnzee Auctions

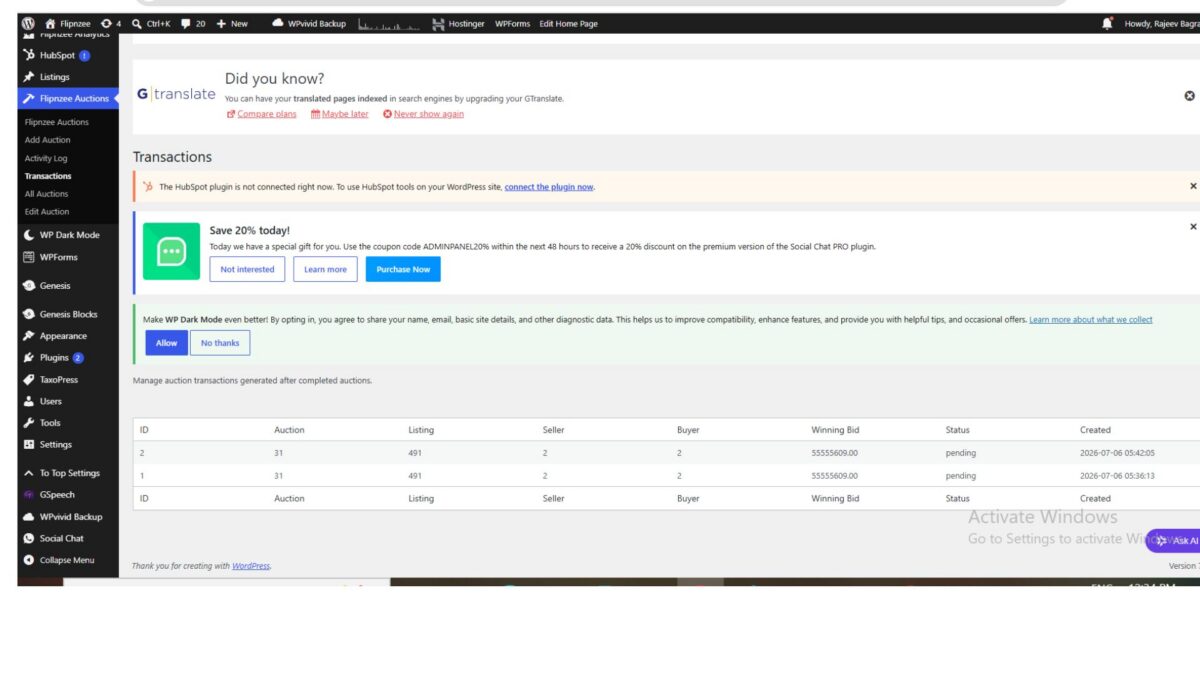
After completing automatic transaction generation in Lesson 63, the next step was to allow administrators to view all completed auction transactions directly from the WordPress dashboard.
In this lesson, we created a dedicated Transactions admin page that displays every transaction stored in the plugin’s custom database table. This gives administrators a centralized place to monitor completed sales and lays the groundwork for future payment processing, invoices, commissions, refunds, and reporting.
What We Built
By the end of this lesson, the plugin includes:
- A new Transactions submenu
- A custom admin page
- A WP_List_Table based transactions table
- Automatic loading of transaction records
- Display of important transaction information
- Professional WordPress admin interface
Step 1 — Create the Transactions Table Class
Inside the admin folder create:
admin/class-admin-transactions.php
This file is responsible for:
- Loading the transactions page
- Creating the transactions table
- Displaying all stored transactions
Step 2 — Create the Transactions List Table
Inside the same file create a class extending WP_List_Table.
Example:
class Flipnzee_Transactions_Table extends WP_List_Table {

}
This gives us the familiar WordPress admin table interface.
Step 3 — Define Table Columns
Create the columns method.
public function get_columns() {

    return array(
        'id'          => 'ID',
        'auction_id'  => 'Auction',
        'listing_id'  => 'Listing',
        'seller_id'   => 'Seller',
        'buyer_id'    => 'Buyer',
        'winning_bid' => 'Winning Bid',
        'status'      => 'Status',
        'created_at'  => 'Created',
    );
}
These columns match the structure of the custom transactions database table.
Step 4 — Load Transactions From Database
Inside prepare_items() we queried the database.
global $wpdb;

$table = $wpdb->prefix . 'flipnzee_transactions';

$this->items = $wpdb->get_results(
    "SELECT * FROM {$table} ORDER BY id DESC",
    ARRAY_A
);
The newest transactions now appear first.
Step 5 — Configure Table Headers
Still inside prepare_items() we configured the table headers.
$this->_column_headers = array(
    $columns,
    array(),
    array(),
    'id',
);
This tells WordPress which columns should appear.
Step 6 — Display Column Values
Next we created the default column renderer.
public function column_default( $item, $column_name ) {

    return isset( $item[ $column_name ] )
        ? esc_html( $item[ $column_name ] )
        : '';
}
This automatically outputs the correct value for each column.
Step 7 — Register the Transactions Menu
Inside class-admin.php we added another submenu.
add_submenu_page(
    'flipnzee-auctions',
    'Transactions',
    'Transactions',
    'manage_options',
    'flipnzee-transactions',
    array( $this, 'transactions_page' )
);
The new menu now appears beneath Flipnzee Auctions.
Step 8 — Create the Page Callback
The callback loads and displays the table.
Example:
$table = new Flipnzee_Transactions_Table();

$table->prepare_items();

$table->display();
This is all that’s required for WordPress to render the table.
Step 9 — Load the New Admin File
Inside the main plugin file we loaded the new class.
require_once FLIPNZEE_AUCTION_PATH .
    'admin/class-admin-transactions.php';
Without this step the Transactions page would never load.
Step 10 — Test the Feature
After activating the updated plugin we verified everything worked correctly.
The Transactions page displayed:
- Transaction ID
- Auction ID
- Listing ID
- Seller
- Buyer
- Winning Bid
- Status
- Created Date
Every automatically generated transaction appeared successfully.
Result
The Flipnzee Auctions plugin now provides a dedicated Transactions dashboard for administrators.
When an auction ends and a winner is determined, the plugin now has the ability to:
- Store the transaction
- Display it inside WordPress
- Allow administrators to monitor completed sales
This transforms the plugin from simply tracking auctions into managing the entire auction lifecycle.
What We Learned
In this lesson we learned how to:
- Create a custom WordPress admin page
- Use
WP_List_Table - Display custom database records
- Load transaction history
- Register new admin submenu pages
- Build a professional backend interface
Challenges Faced
During implementation we encountered a few issues that are common when building WordPress admin tables:
- A misplaced method inside
prepare_items()caused PHP syntax errors, which were resolved by movingget_table_classes()outside the method while keeping it inside the class. - Initially, the Transactions menu did not appear because the new admin file had not been included in the main plugin file.
- After everything worked, an extra header row appeared at the bottom of the table. This is a cosmetic behavior of the simplified
WP_List_Tableimplementation and does not affect functionality. It will be refined in a future lesson when we enhance sorting, pagination, and table styling.
Working through these issues reinforced the importance of careful class structure, proper file loading, and incremental testing during plugin development.
Download Source Code
Download the starting version of the plugin before the lesson:
Download the completed version after this lesson:
Final Outcome
By the end of Lesson 64, Flipnzee Auctions includes a fully functional Transactions management page that lists all automatically generated auction transactions. This provides administrators with immediate visibility into completed sales and establishes the foundation for future features such as payment integration, invoices, commissions, refunds, transaction status updates, and downloadable reports.