
Lesson 73 Implementation: Processing Payment Gateway Selection Securely in Flipnzee

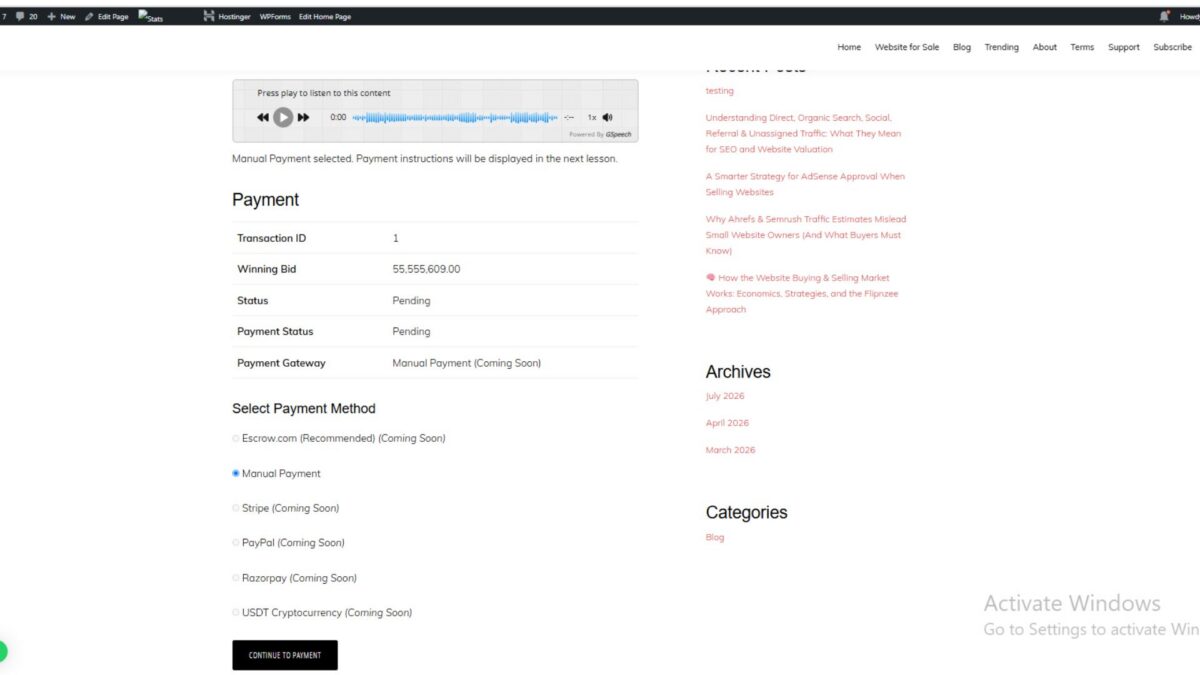
In the previous lesson, the payment page displayed multiple payment gateways dynamically. However, clicking Continue to Payment did not actually process the buyer’s selection.
In this lesson, the payment page was enhanced to securely process the selected payment gateway using WordPress security best practices. This establishes the routing architecture that future payment integrations such as Escrow.com, Stripe, PayPal, Razorpay, and USDT Cryptocurrency will use.
What Was Implemented
The payment page now:
- Processes the submitted payment form
- Verifies the WordPress nonce
- Sanitizes user input
- Validates the selected gateway
- Routes requests using a switch statement
- Displays gateway-specific responses
- Prepares the plugin for future payment integrations
This completes the payment gateway routing layer.
Step 1: Detect Form Submission
The payment page first checks whether the buyer has submitted the payment form.
if ( isset( $_POST['flipnzee_continue_payment'] ) ) {

    // Process payment

}
This ensures the processing code only runs after the buyer clicks Continue to Payment.
Step 2: Verify the WordPress Nonce
Before processing any submitted data, the request is verified using a WordPress nonce.
if (
    ! isset( $_POST['flipnzee_payment_nonce'] ) ||
    ! wp_verify_nonce(
        sanitize_text_field(
            wp_unslash( $_POST['flipnzee_payment_nonce'] )
        ),
        'flipnzee_payment_action'
    )
) {
    return '<p>Security check failed.</p>';
}
Why?
This protects the payment page from:
- CSRF attacks
- Forged form submissions
- External malicious requests
Using nonces is a standard WordPress security practice.
Step 3: Sanitize the Selected Gateway
The selected payment gateway is retrieved safely.
$selected_gateway = '';

if ( isset( $_POST['payment_gateway'] ) ) {

    $selected_gateway = sanitize_text_field(
        wp_unslash( $_POST['payment_gateway'] )
    );

}
This removes unsafe input before it reaches the application logic.
Step 4: Validate the Gateway
Before routing, the submitted gateway is checked against the list of available gateways.
if ( ! isset( $gateways[ $selected_gateway ] ) ) {

    return '<p>Invalid payment gateway selected.</p>';

}
This prevents invalid or manipulated gateway values from being processed.
Step 5: Route Using a Switch Statement
The payment gateway router directs each gateway to its own processing block.
switch ( $selected_gateway ) {

    case 'manual':
        ?>
        <div class="notice notice-success">
            <p>
                Manual Payment selected.
                Payment instructions will be displayed in the next lesson.
            </p>
        </div>
        <?php
        break;

    case 'escrow':
        ?>
        <div class="notice notice-info">
            <p>
                Escrow.com integration will be available in a future release.
            </p>
        </div>
        <?php
        break;

    case 'stripe':
    case 'paypal':
    case 'razorpay':
    case 'crypto':
        ?>
        <div class="notice notice-warning">
            <p>
                This payment gateway is not yet available.
            </p>
        </div>
        <?php
        break;

    default:
        ?>
        <div class="notice notice-error">
            <p>Unknown payment gateway.</p>
        </div>
        <?php
        break;
}
This routing structure keeps each payment provider isolated, making future integrations straightforward.
Testing the Implementation
After updating the payment page:
- Open the buyer payment page.
- Select Manual Payment.
- Click Continue to Payment.
The page now displays:
Manual Payment selected. Payment instructions will be displayed in the next lesson.
The transaction information remains visible, confirming that the form was processed successfully.
Why This Design Matters
Instead of embedding payment logic directly into the page, a routing layer has been introduced.
This provides several advantages:
- Cleaner code organization
- Easier maintenance
- Independent gateway implementations
- Better scalability
- Simpler testing
- Future extensibility
When additional gateways are implemented, each will simply receive its own case inside the existing router without affecting the others.
Lessons Learned
During implementation, several improvements were made:
- Used WordPress nonces to secure form submissions.
- Sanitized all user-submitted values before processing.
- Validated gateway IDs against the registered gateway list.
- Built a centralized gateway routing mechanism.
- Kept the payment architecture flexible for future integrations.
- Successfully tested Manual Payment routing without affecting existing transaction data.
Current Payment Flow
Buyer Opens Payment Page
           │
           ▼
Select Payment Gateway
           │
           ▼
Continue to Payment
           │
           ▼
Verify WordPress Nonce
           │
           ▼
Sanitize User Input
           │
           ▼
Validate Gateway
           │
           ▼
Gateway Router (switch)
           │
 ┌─────────┼───────────────┐
 │         │               │
 ▼         ▼               ▼
Manual   Escrow        Future Gateways
Payment  (Coming Soon) (Stripe, PayPal,
                         Razorpay, USDT)
Download Source Code
Download the starting version of the plugin before the lesson:
Download the completed version after this lesson:
Conclusion
Lesson 73 transformed the payment page from a static gateway selector into a secure routing system capable of processing buyer selections. By combining nonce verification, input sanitization, gateway validation, and switch-based routing, Flipnzee now has a solid payment processing foundation. Future lessons can build upon this architecture to implement real payment instructions, proof-of-payment submission, and live integrations with services such as Escrow.com, Stripe, PayPal, Razorpay, and USDT Cryptocurrency.