
Lesson 74: Manual Payment Instructions and Buyer Confirmation Workflow

Introduction
With the payment gateway routing architecture completed in the previous lessons, buyers can now securely select their preferred payment method. However, selecting Manual Payment currently only displays a placeholder message.
In this lesson, we’ll implement the first real payment workflow in Flipnzee Auctions by displaying manual payment instructions after the buyer selects the Manual Payment gateway.
Rather than integrating a live payment processor immediately, we’ll build a professional workflow that guides buyers through the payment process while preparing the plugin for future automation.
What We’ll Build
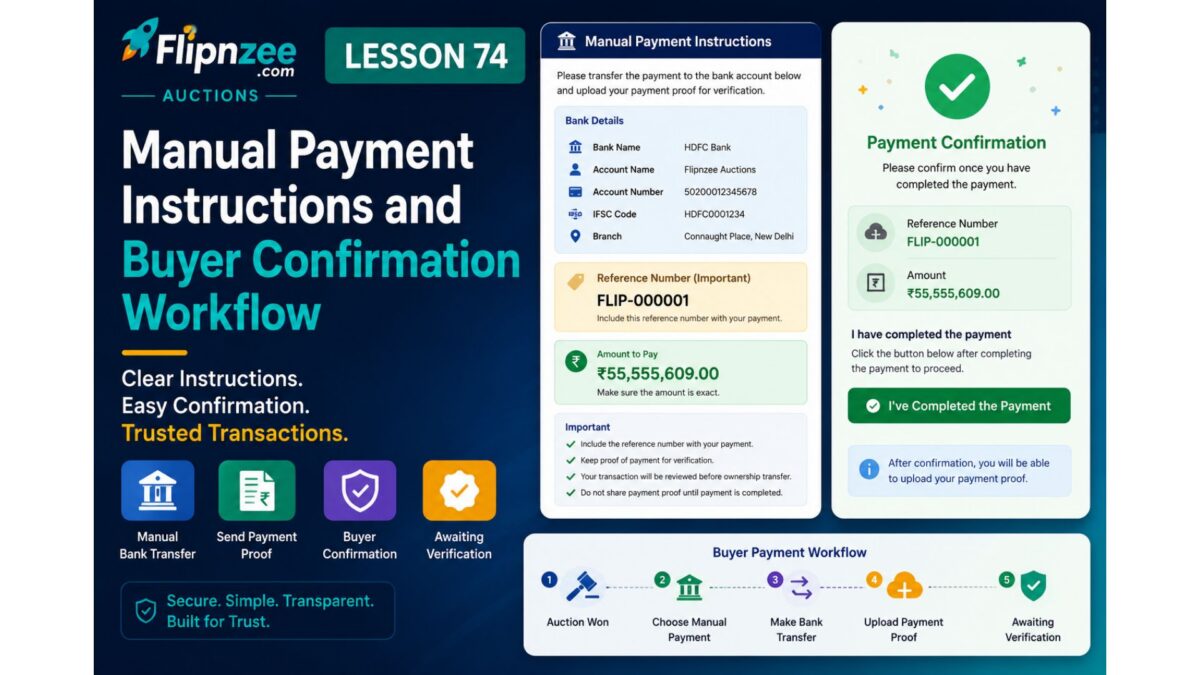
After selecting Manual Payment and clicking Continue to Payment, the buyer will see:
- A payment confirmation notice
- Transaction reference number
- Amount to be paid
- Payment instructions
- Placeholder bank/account details
- Buyer checklist
- “I’ve Completed Payment” button
- Architecture ready for payment verification in future lessons
Why This Matters
Many marketplace platforms begin with manual payments before integrating payment gateways.
This approach allows:
- Faster marketplace launch
- Manual verification by administrators
- Easy transition to automated gateways later
- Reusable payment workflow
The same workflow will later support:
- Escrow.com
- Stripe
- PayPal
- Razorpay
- USDT Cryptocurrency
Learning Objectives
By the end of this lesson you will:
- Display professional payment instructions
- Generate a transaction reference for buyers
- Show payment amount clearly
- Build a buyer payment confirmation interface
- Prepare the plugin for payment verification
- Create a reusable payment workflow
Planned User Experience
Instead of seeing only:
Manual Payment selected.
The buyer will see something similar to:
Manual Payment

Transaction Reference:
FLIP-000001

Amount:
₹55,555,609.00

Payment Instructions

✓ Transfer the exact amount.

✓ Use the reference number.

✓ Keep your payment receipt.

✓ Click "I've Completed Payment" after payment.

[ I've Completed Payment ]
What We’ll Implement
Step 1
Replace the temporary success message with a real payment instruction section.
Step 2
Generate a payment reference number using the transaction ID.
Example:
FLIP-000001
Step 3
Display the winning bid amount prominently.
Step 4
Display manual payment instructions.
Step 5
Add a buyer checklist before payment.
Step 6
Add an I’ve Completed Payment button.
Initially this button will not update the database.
It simply prepares the workflow for the next lesson.
Files We’ll Modify
Primary file:
includes/class-payment-page.php
Possible future updates:
includes/class-payment-manager.php
Skills You’ll Learn
- Building multi-step payment workflows
- Creating reusable payment interfaces
- Improving user experience
- Structuring payment pages
- Preparing for payment verification
- Designing scalable payment architecture
Expected Result
By the end of Lesson 74, buyers will experience a much more realistic payment process instead of a placeholder message. They’ll receive clear payment instructions, a unique transaction reference, the payment amount, and a confirmation button that prepares the marketplace for the payment verification workflow introduced in the next lesson.
Coming Next
Lesson 75: Recording Buyer Payment Confirmation and Updating Transaction Status
In the next lesson, clicking I’ve Completed Payment will begin updating the transaction status (for example, to Awaiting Verification) and lay the groundwork for seller/admin payment verification.