
Lesson 77 Implementation: Building the Administrator Payment Review Dashboard for Flipnzee Auctions

In the previous lesson, buyers were able to upload payment proof securely through the payment page, with uploaded receipts stored in the WordPress Media Library and linked to the corresponding transaction.
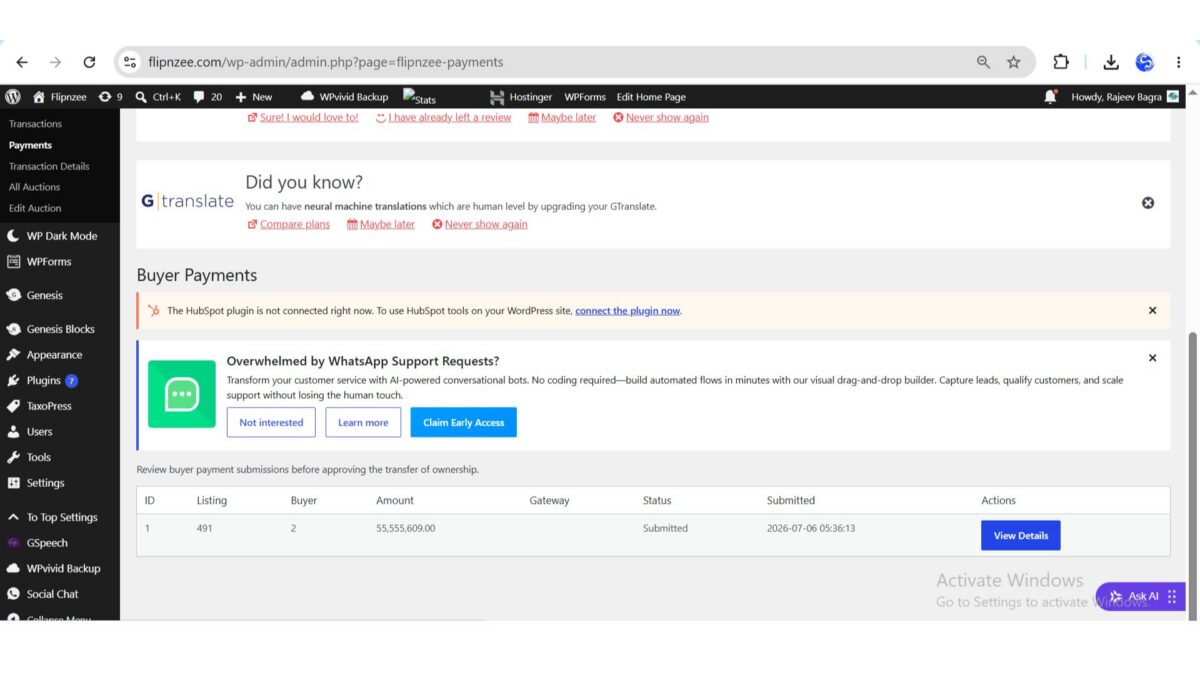
This lesson shifted focus from the buyer to the administrator by introducing a dedicated payment review dashboard. Administrators can now view submitted payments, inspect transaction details, and prepare payments for verification.
Objective
The primary goal of this lesson was to create an administrator interface that allows the Flipnzee team to review buyer payment submissions before approving website ownership transfers.
By the end of this implementation, administrators could:
- View all submitted payments.
- Open detailed transaction information.
- Review payment metadata.
- Prepare payment status management.
- Lay the foundation for future payment verification.
Step 1 – Creating the Admin Payments Page
A new administrator page was created.
File created
admin/class-admin-payments.php
The page was implemented as a dedicated admin class.
class Flipnzee_Admin_Payments {

    /**
     * Render Payments page.
     *
     * @return void
     */
    public static function render_page() {

        ?>

        <div class="wrap">

            <h1>Buyer Payments</h1>

            <p>

                Review buyer payment submissions before approving
                the transfer of ownership.

            </p>

        </div>

        <?php
    }
}
This provided a clean starting point for the administrator payment workflow.
Step 2 – Registering the Payments Menu
A new submenu was added beneath the Flipnzee Auctions admin menu.
add_submenu_page(
    'flipnzee-auctions',
    'Payments',
    'Payments',
    'manage_options',
    'flipnzee-payments',
    array(
        'Flipnzee_Admin_Payments',
        'render_page',
    )
);
This created a dedicated Payments section for administrators.
Step 3 – Loading Submitted Payments
The Payments page was connected to the transaction table.
global $wpdb;

$table = $wpdb->prefix . 'flipnzee_transactions';

$payments = $wpdb->get_results(
    "
    SELECT *
    FROM {$table}
    WHERE payment_status = 'submitted'
    ORDER BY updated_at DESC
    "
);
Only transactions that had submitted payment proofs were displayed.
Step 4 – Handling Empty Results
Before rendering the table, the plugin checks whether submitted payments exist.
if ( empty( $payments ) ) {

    echo '<p>No payment submissions found.</p>';

} else {

    // Display payment table.

}
This prevents empty tables and provides useful feedback to administrators.
Step 5 – Building the Payments Table
A professional WordPress admin table was introduced.
<table class="widefat striped">

    <thead>

        <tr>

            <th>ID</th>
            <th>Listing</th>
            <th>Buyer</th>
            <th>Amount</th>
            <th>Gateway</th>
            <th>Status</th>
            <th>Submitted</th>
            <th>Actions</th>

        </tr>

    </thead>
The table closely follows the standard WordPress administration interface.
Step 6 – Displaying Submitted Payments
Each submitted payment is displayed using a loop.
<?php foreach ( $payments as $payment ) : ?>

<tr>

    <td><?php echo esc_html( $payment->id ); ?></td>

    <td><?php echo esc_html( $payment->listing_id ); ?></td>

    <td><?php echo esc_html( $payment->buyer_id ); ?></td>

    <td><?php echo esc_html(
        number_format_i18n(
            $payment->winning_bid,
            2
        )
    ); ?></td>

    <td><?php echo esc_html(
        $payment->payment_gateway
    ); ?></td>

    <td><?php echo esc_html(
        ucfirst( $payment->payment_status )
    ); ?></td>

    <td><?php echo esc_html(
        $payment->updated_at
    ); ?></td>

</tr>

<?php endforeach; ?>
The administrator can immediately identify submitted payments requiring review.
Step 7 – Adding the View Details Button
Instead of displaying placeholder text, each payment now links to a detailed transaction page.
<td>

    <a
        class="button button-primary"
        href="<?php echo esc_url(
            admin_url(
                'admin.php?page=flipnzee-transaction-details&transaction_id=' .
                absint( $payment->id )
            )
        ); ?>">

        View Details

    </a>

</td>
This significantly improves navigation between the payment dashboard and transaction details.
Step 8 – Enhancing the Transaction Details Page
The existing transaction details page was expanded with payment information.
Additional rows were added to display:
<tr>
    <th>Payment Status</th>
    <td><?php echo esc_html(
        ucfirst( $transaction['payment_status'] )
    ); ?></td>
</tr>

<tr>
    <th>Payment Gateway</th>
    <td><?php echo esc_html(
        $transaction['payment_gateway']
    ); ?></td>
</tr>

<tr>
    <th>Payment Submitted</th>
    <td><?php echo esc_html(
        $transaction['payment_submitted_at']
    ); ?></td>
</tr>
Administrators can now review payment-specific information alongside the transaction details.
Step 9 – Creating the Payment Management Section
A dedicated Payment Management panel was introduced.
<h2>Payment Management</h2>

<form
    method="post"
    action="<?php echo esc_url(
        admin_url( 'admin-post.php' )
    ); ?>">
This prepares the interface for future payment verification actions.
Step 10 – Securing the Form
The management form was protected using a WordPress nonce.
wp_nonce_field(
    'flipnzee_update_payment_status',
    'flipnzee_payment_nonce'
);
This ensures only legitimate administrators can submit payment updates.
Step 11 – Payment Status Dropdown
Administrators can now select a payment status.
<select
    name="payment_status"
    id="payment_status">

    <option value="pending">Pending</option>

    <option value="processing">Processing</option>

    <option value="paid">Paid</option>

    <option value="completed">Completed</option>

    <option value="cancelled">Cancelled</option>

    <option value="refunded">Refunded</option>

</select>
Although the update handler will be implemented in the next lesson, the interface is now fully prepared.
Challenges Encountered
Several issues arose during development.
Method Name Mismatch
Initially, the Payments submenu referenced render_page(), while the class still used render().
Standardizing on render_page() resolved the fatal error.
PHP and HTML Mixing
While building the Payment Management form, HTML was accidentally placed inside an open PHP block.
Example:
<?php

wp_nonce_field(...);

<input ...>
Closing PHP before the HTML resolved the syntax error.
Duplicate Status Rows
During iterative development, duplicate Payment Status rows were unintentionally introduced.
Cleaning up duplicate markup produced a clearer transaction details page.
Payment vs Transaction Status
One important architectural decision emerged during development.
The plugin now distinguishes between:
status(overall transaction lifecycle)payment_status(buyer payment lifecycle)
This separation prepares the plugin for multiple payment gateways, including Escrow.com, without affecting the broader transaction workflow.
Testing Performed
The implementation was tested by:
- Opening the new Payments admin menu.
- Confirming submitted transactions appear in the table.
- Verifying payment amounts and gateways display correctly.
- Opening transaction details using the View Details button.
- Confirming payment metadata is displayed.
- Checking the Payment Management form renders correctly.
- Validating PHP syntax after each modification.
Lessons Learned
This implementation reinforced several WordPress development practices:
- Separate administrator workflows from buyer workflows.
- Keep transaction management and payment management independent.
- Use dedicated admin pages instead of overloading existing screens.
- Secure administrator forms using nonces.
- Build reusable interfaces that can support additional payment gateways in future.
Download Source Code
Download the starting version of the plugin before the lesson:
Download the completed version after this lesson:
Current Progress
At the end of Lesson 77, the Flipnzee Auctions plugin now includes:
- ✅ Administrator Payments menu
- ✅ Submitted Payments dashboard
- ✅ Payment listing table
- ✅ View Details navigation
- ✅ Enhanced transaction details page
- ✅ Payment metadata display
- ✅ Payment Management interface
- ✅ Secure administrator form ready for processing
The actual processing of payment status updates will be completed in the next lesson.
Next Lesson
Lesson 78: Processing Administrator Payment Status Updates
In the next lesson, we will connect the Payment Management form to the backend by:
- Registering the administrator POST handler.
- Verifying administrator permissions and nonces.
- Updating the
payment_statusfield in the database. - Redirecting administrators with success messages.
- Preparing the workflow for payment approval, rejection, and future Escrow.com integration.
This will complete the first functional administrator payment verification workflow in the Flipnzee Auctions plugin.