Lesson 104: Automatic Auction Closure via WP-Cron

In the previous lesson, we completed the backend workflow that creates a transaction and transfer record immediately after an auction is closed. However, auctions still depend on an administrator manually changing their status from Active to Closed.

In Lesson 104, we will remove this dependency by implementing automatic auction closure.


Objective

Automatically detect auctions whose end time has passed and close them without administrator intervention.

After an auction expires, the plugin should:

Auction End Time Reached
            ↓
WP-Cron Executes
            ↓
Auction Status → Closed
            ↓
Determine Winner
            ↓
Create Transaction
            ↓
Create Transfer
            ↓
Log Activity

This ensures that auctions finish on time even when no administrator is logged into WordPress.


Why This Lesson Is Important

A real auction platform cannot rely on an administrator to manually close every auction.

Without automatic closure:

  • Auctions may remain Active long after expiry.
  • Users can continue placing bids after the deadline.
  • Winners are not declared promptly.
  • Transactions are delayed.
  • Website transfers cannot begin.

Automatic closure solves all of these issues.


Existing Foundation

Fortunately, most of the difficult work has already been completed.

Previous lessons already provide:

  • Auction Manager
  • Bid Manager
  • Winner Determination
  • Transaction Manager
  • Transfer Manager
  • Activity Log
  • Scheduled maintenance hook

Lesson 104 simply connects these components into an automated workflow.


Implementation Plan

Step 1

Review the existing scheduled maintenance hook.

Verify that the plugin activation registers an hourly scheduled event if it is not already present.


Step 2

Create a method that searches for expired auctions.

Conditions:

  • status = Active
  • auction_end <= current WordPress time

Step 3

For every expired auction:

  • Update status to Closed
  • Determine winner
  • Fire the winner-determined action
  • Create transaction
  • Create transfer
  • Write activity log

Step 4

Prevent duplicate processing.

If an auction has already been closed or a transaction already exists, skip it.


Step 5

Add detailed logging.

During development, log events such as:

Cron started

Expired auction found

Auction closed automatically

Winner determined

Transaction created

Transfer created

Cron completed

These logs will help verify the automation before removing or reducing debug output.


Database Impact

The following tables will be updated automatically:

  • wp_flipnzee_auctions
  • wp_flipnzee_transactions
  • wp_flipnzee_transfer_status
  • Activity Log table

No schema changes are expected.


Expected Workflow

Once implemented, administrators will no longer need to manually close auctions.

The complete lifecycle will become:

Create Auction
        ↓
Auction Starts
        ↓
Users Place Bids
        ↓
Auction End Time Reached
        ↓
WP-Cron Detects Expiry
        ↓
Auction Closed Automatically
        ↓
Winner Determined
        ↓
Transaction Created
        ↓
Transfer Created
        ↓
Payment Workflow Begins

Benefits

After completing Lesson 104, Flipnzee Auctions will gain several production-ready capabilities:

  • Automatic auction completion
  • Accurate enforcement of auction end times
  • Immediate winner declaration
  • Automatic transaction generation
  • Automatic transfer initialization
  • Reduced administrator workload
  • Improved marketplace reliability

Learning Outcomes

By the end of this lesson, we will understand:

  • How WordPress WP-Cron works.
  • How to schedule recurring maintenance tasks.
  • How to safely process expired auctions.
  • How to prevent duplicate cron execution.
  • How to automate business workflows using existing plugin components.

Conclusion

Lesson 104 marks the transition from a manually managed auction system to a self-operating marketplace. By leveraging WordPress’s scheduling system, expired auctions will be processed automatically, ensuring that winners, transactions, and transfer records are created without administrator intervention. This is a significant step toward making the Flipnzee Auctions plugin suitable for real-world production use.
Lesson 103 Implementation: Automatic Transaction & Transfer Creation After Auction Closure

After several lessons of building the Flipnzee Auctions plugin, Lesson 103 represents one of the most significant milestones in the project. With this implementation, the auction lifecycle now extends beyond simply determining the winning bidder. Once an auction is closed, the plugin automatically creates the necessary transaction and transfer records that will be used throughout the payment and website transfer process.

This lesson transforms the plugin from an auction system into a complete marketplace workflow.


Objective

The primary goal of this lesson was to automate the actions that occur immediately after an auction closes.

The desired workflow was:

Auction Closed
        ↓
Determine Winner
        ↓
Create Transaction
        ↓
Create Transfer Status
        ↓
Ready for Payment & Website Transfer

Until now, the winning bidder was identified, but the remaining steps had to be handled manually or were not created at all.


Previous Behaviour

Before Lesson 103, when an administrator changed an auction status to Closed, only the auction status was updated.

Although a winning bidder could be determined, there was no automatic creation of:

  • Transaction record
  • Transfer record
  • Payment workflow

As a result, the marketplace process stopped immediately after the auction ended.


New Workflow

The auction lifecycle now continues automatically.

Administrator closes auction
        ↓
Auction updated
        ↓
Winning bidder determined
        ↓
winner_user_id stored
        ↓
Transaction record created
        ↓
Transfer status record created

No manual database operations are required.


Winner Determination

The existing winner determination method was integrated directly into the auction closing workflow.

The method:

  • Finds the highest bid
  • Uses earliest bid as the tiebreaker
  • Updates the auction record
  • Stores:
  • winner_user_id
  • current_bid

Finally it fires the custom action:

do_action(
    'flipnzee_auction_winner_determined',
    $auction_id,
    $winner
);

This makes the winner determination process reusable throughout the plugin.


Automatic Transaction Creation

Once the winner is determined, the Transaction Manager now automatically creates a transaction.

Each transaction stores:

  • Auction ID
  • Listing ID
  • Seller ID
  • Buyer ID
  • Winning bid
  • Initial payment status

Duplicate transactions are prevented by checking whether a transaction already exists for the auction before inserting a new record.


Automatic Transfer Creation

Immediately after creating the transaction, the plugin now creates the corresponding transfer status record.

The transfer contains individual workflow stages including:

  • Payment Status
  • Website Files
  • Database
  • Domain
  • Buyer Confirmation
  • Administrator Notes

This lays the foundation for tracking the complete ownership transfer process.


Improved Logging

During implementation extensive debugging logs were added to trace the execution flow.

Examples included:

Auction was closed.
Looking for winner.

Winner determined.

Transaction created.

Transfer created.

These logs proved invaluable while diagnosing execution order, missing callbacks, and event flow during development.

Once the implementation is fully tested, most temporary debug logs can be removed to keep production logs clean.


Problems Encountered

Several issues were discovered during implementation.

Missing Transaction Creation

Initially, closing an auction only updated the auction record.

No transaction was created because the transaction workflow was never triggered.


Incorrect Method Call

An earlier implementation attempted to call:

Flipnzee_Bid_Manager::get_highest_bid()

The method no longer existed.

It was replaced with the existing:

Flipnzee_Bid_Manager::determine_winner()

which already contained the required business logic.


Undefined Variables

During testing, undefined variables prevented the transaction manager from receiving the correct auction information.

These variables were corrected before invoking the transaction creation process.


Duplicate Protection

The transaction manager now verifies whether a transaction already exists for the auction before creating another one.

This prevents accidental duplicate transactions if an auction is processed more than once.


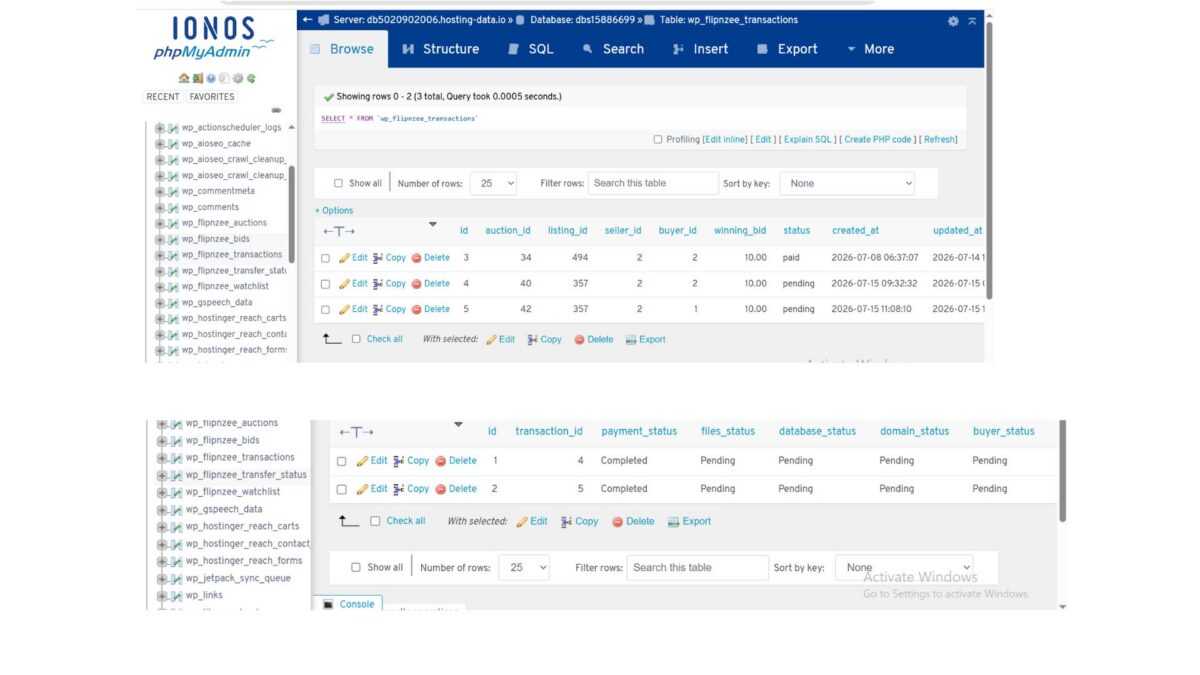
Database Verification

Testing confirmed that all related tables are updated correctly.

Auction Table

The auction now stores:

  • Winner User ID
  • Current Winning Bid
  • Closed Status

Transactions Table

A new transaction record is created containing:

  • Auction ID
  • Listing ID
  • Seller ID
  • Buyer ID
  • Winning Bid
  • Pending Status

Transfer Status Table

A matching transfer record is automatically created with:

  • Payment Completed
  • Files Pending
  • Database Pending
  • Domain Pending
  • Buyer Pending

This confirmed the entire workflow executed successfully from start to finish.


Current Auction Lifecycle

The Flipnzee Auctions plugin now performs the following complete backend workflow:

Create Auction
        ↓
Place Bids
        ↓
Determine Winner
        ↓
Store Winner
        ↓
Create Transaction
        ↓
Create Transfer Status
        ↓
Ready for Payment Workflow

This represents one of the largest functional improvements since development of the plugin began.

Download Source Code

Download the starting version of the plugin before the lesson:

Download the completed version after this lesson:


Lessons Learned

Lesson 103 reinforced several important development principles:

  • Reuse existing business logic instead of creating duplicate methods.
  • Trigger downstream processes through well-defined events.
  • Validate database changes through direct inspection.
  • Protect against duplicate record creation.
  • Use detailed logging while developing complex workflows.
  • Verify every stage of a multi-step process independently.

Conclusion

Lesson 103 completes one of the most important backend milestones of the Flipnzee Auctions plugin. The auction engine no longer stops after identifying a winner. Instead, it automatically generates the transaction and transfer records required for the remainder of the marketplace lifecycle.

With this implementation in place, the plugin now supports a seamless transition from bidding to payment preparation and website transfer management. Future lessons can build upon this solid foundation by adding payment gateway integration, automated notifications, transfer progress tracking, and enhanced post-auction administration.

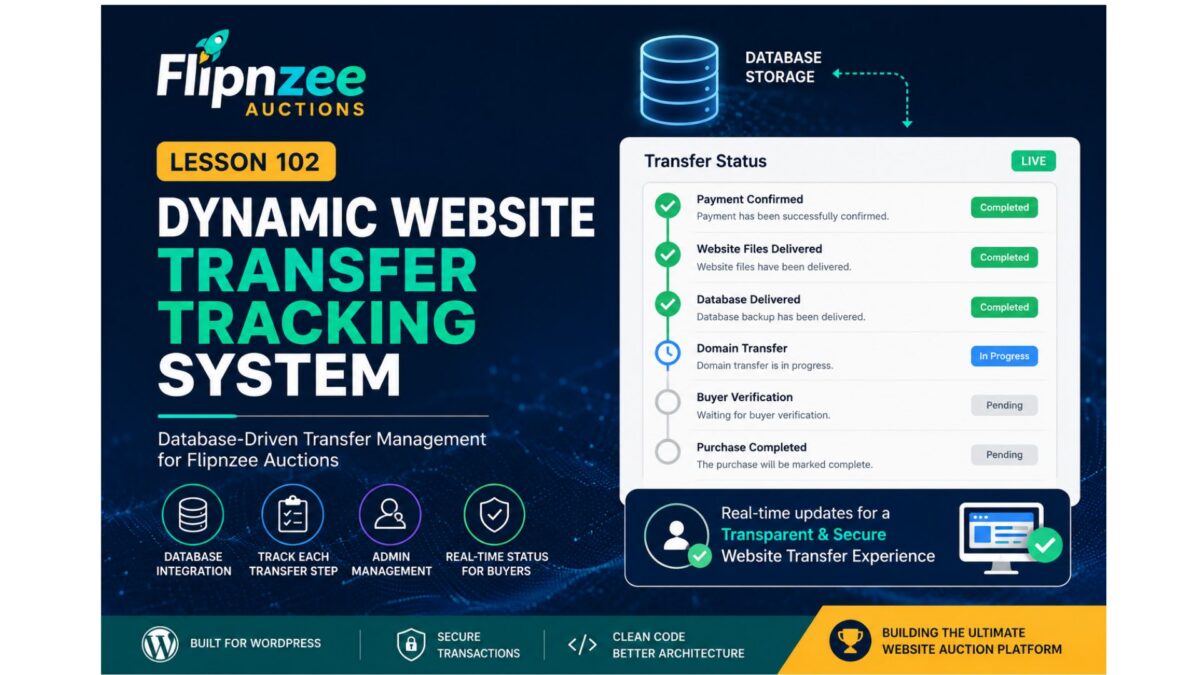
Lesson 102: Dynamic Website Transfer Tracking System

Welcome to Lesson 102 of the Flipnzee Auctions development series.

In Lesson 101, we introduced the Transfer Manager and refactored the Purchase Details page to use centralized transfer data. While the interface became much cleaner, the transfer progress is still based on default placeholder values.

In this lesson, we will transform the transfer system into a real, transaction-specific tracking system.


Lesson Goal

Replace hardcoded transfer progress with database-driven transfer tracking.

Instead of every buyer seeing the same default progress, each completed purchase will have its own transfer record.


Why This Matters

Buying a website involves much more than simply winning an auction.

After payment, several important steps must be completed:

  • Website files delivered
  • Database exported
  • Domain transferred
  • Buyer verifies ownership
  • Purchase completed

Each transaction progresses independently.

Therefore, every purchase requires its own transfer record.


Current Situation

Currently the Transfer Manager returns:

array(

    'payment'  => 'Completed',

    'files'    => 'Pending',

    'database' => 'Pending',

    'domain'   => 'Pending',

    'buyer'    => 'Pending',

);

This means every buyer sees identical transfer progress.


New Architecture

We will introduce a dedicated database table:

wp_flipnzee_transfer_status

Each row represents one website transfer.


Proposed Database Structure

ColumnPurpose
idPrimary Key
transaction_idLinks to transaction
payment_statusPayment confirmation
files_statusWebsite files
database_statusDatabase transfer
domain_statusDomain transfer
buyer_statusBuyer verification
notesAdmin notes
updated_atLast update

One Transfer Per Transaction

Each completed purchase will have exactly one transfer record.

Example:

Transaction

ID = 17

Transfer Record

Transaction ID = 17

Payment = Completed

Files = Completed

Database = Completed

Domain = In Progress

Buyer = Pending

New Transfer Manager Responsibilities

The manager will no longer simply return default arrays.

Instead it will become responsible for:

Create transfer record

Load transfer record

Update transfer record

Return transfer progress

Return status badges

Return workflow steps

New Methods

The Transfer Manager will gradually gain methods such as:

create_transfer()
get_transfer()
update_transfer()
get_transfer_status()

These methods will hide database logic from the user interface.


Purchase Details Improvements

The Purchase Details page will no longer use:

Flipnzee_Transfer_Manager::get_default_status();

Instead it will call:

Flipnzee_Transfer_Manager::get_transfer(
    $transaction['id']
);

This allows every buyer to see their own progress.


Administrator Workflow

After an auction is completed, the administrator will eventually be able to update transfer progress.

Example:

✓ Payment Confirmed

✓ Website Files Delivered

✓ Database Delivered

○ Domain Transfer

○ Buyer Verification

Every update will immediately appear on the buyer’s Purchase Details page.


Designed for Flipnzee.com

Currently Flipnzee.com sells only in-house websites.

Therefore, the administrator controls every transfer.

This makes the workflow straightforward and ensures a consistent buyer experience.


Future Marketplace Compatibility

Although Flipnzee currently sells only its own digital assets, the plugin is fully open source.

Future developers may extend it into a marketplace where multiple sellers manage their own transfers.

Because transfer management is isolated inside the Transfer Manager, those future enhancements can be implemented without redesigning the Purchase Details page.


Benefits

By completing Lesson 102 we will:

  • Replace hardcoded transfer progress.
  • Store transfer records in the database.
  • Display transaction-specific progress.
  • Build the foundation for admin transfer management.
  • Improve scalability.
  • Keep presentation separated from business logic.

Files Expected to Change

includes/
    class-transfer-manager.php

includes/
    class-database-migration.php

includes/
    class-my-purchase-details.php

admin/
    (future admin transfer screen)

flipnzee-auctions.php

Learning Outcomes

After completing Lesson 102 you will understand:

  • Designing relational database tables.
  • One-to-one relationships between transactions and transfers.
  • Encapsulating database operations inside manager classes.
  • Separating business logic from presentation.
  • Building scalable WordPress plugin architecture.

Roadmap

Lesson 102 begins the second phase of the Flipnzee Auctions plugin.

The project is now moving beyond auction bidding into complete post-sale website transfer management, bringing the plugin closer to becoming a full-featured platform for buying and selling websites and digital assets.

The transfer system we build now will serve as the foundation for future features such as administrator dashboards, transfer timelines, notifications, document sharing, and eventual multi-seller marketplace support.

Lesson 101 Implementation: Introducing the Transfer Manager & Refactoring the Purchase Details Page

Welcome to Lesson 101 of the Flipnzee Auctions development series. In this lesson, we take a significant step toward making the website transfer workflow cleaner, more maintainable, and easier to extend in future releases.

Rather than continuing to place transfer-related logic directly inside the Purchase Details page, we introduce a dedicated Transfer Manager class. This refactoring follows object-oriented programming principles and prepares the plugin for a fully dynamic transfer management system.


Lesson Objectives

During this lesson we aimed to:

  • Create a dedicated Transfer Manager class.
  • Centralize transfer workflow data.
  • Refactor the Purchase Details page.
  • Reduce duplicated code.
  • Improve maintainability.
  • Prepare for database-driven transfer tracking.

Why This Refactoring Was Needed

As the Flipnzee Auctions plugin grew, the Purchase Details page gradually became responsible for multiple tasks:

  • Loading transaction information
  • Rendering purchase details
  • Managing transfer progress
  • Displaying status badges
  • Showing buyer guidance

Although functional, this approach mixed business logic with presentation.

To improve long-term maintainability, we extracted the transfer-related functionality into its own manager class.


Introducing Flipnzee_Transfer_Manager

A new class named:

Flipnzee_Transfer_Manager

was introduced.

Its responsibility is to manage all transfer-related information independently from the user interface.

Initially, it provides three centralized methods:

get_default_steps()

Returns the default website transfer workflow.

get_default_status()

Returns the default transfer status values.

get_status_badges()

Returns the CSS classes used for status badges.


Default Transfer Workflow

The transfer manager now defines a standard website transfer process consisting of:

  • Payment Confirmed
  • Website Files Delivered
  • Database Delivered
  • Domain Transfer Completed
  • Buyer Verification
  • Purchase Completed

By centralizing these steps, the Purchase Details page no longer needs to manually construct workflow arrays.


Purchase Details Refactoring

The Purchase Details page was substantially cleaned up.

Instead of containing hardcoded arrays, it now simply requests data from the Transfer Manager.

For example, instead of:

$transfer_steps = array(
    ...
);

the page now uses:

$transfer_steps =
    Flipnzee_Transfer_Manager::get_default_steps();

The same approach is used for transfer statuses and status badges.


Cleaner Separation of Responsibilities

After the refactoring:

Transfer Manager

Responsible for:

  • transfer workflow
  • transfer status
  • badge mappings

Purchase Details

Responsible only for:

  • loading transaction data
  • displaying purchase information
  • rendering the user interface

This greatly improves readability.


Improvements to the Purchase Details Page

Several improvements were made:

  • Purchase Summary Card
  • Purchase Timeline
  • Transaction Details Table
  • Purchase Information
  • Transfer Status
  • Next Steps
  • Purchase Notes
  • Dashboard Action Buttons

Each section is now more clearly organized.


Reduced Code Duplication

Earlier versions contained repeated transfer arrays and duplicated HTML sections.

These duplicates were removed.

The resulting code is significantly cleaner and easier to maintain.


Improved Maintainability

One major advantage of this architecture is that future changes only need to be made in one place.

For example, adding another transfer step later requires modifying only the Transfer Manager rather than every page displaying transfer information.


Foundation for Future Lessons

Although the Transfer Manager currently returns default values, this is only the first stage.

Future lessons will replace these defaults with real database records.

This means the Purchase Details page will automatically display live transfer progress without requiring significant changes to its rendering logic.


Current Flipnzee Workflow

At Flipnzee.com, the auction platform currently sells only in-house websites and digital assets.

The transfer workflow therefore reflects the internal process used by the Flipnzee team after an auction is won.

However, because the plugin is fully open source, developers may extend it into a complete marketplace supporting multiple independent sellers.

The Transfer Manager has been designed with that future flexibility in mind.


Benefits Achieved

By the end of Lesson 101 we have:

  • Introduced a dedicated Transfer Manager class.
  • Improved separation of concerns.
  • Reduced duplicated code.
  • Centralized transfer workflow logic.
  • Simplified the Purchase Details page.
  • Improved WordPress Coding Standards compliance.
  • Established a solid architectural foundation for future transfer features.

Download Source Code

Download the starting version of the plugin before the lesson:

Download the completed version after this lesson:


Looking Ahead

In Lesson 102, we will transform the Transfer Manager from a provider of default values into a fully dynamic transfer tracking system.

Instead of hardcoded statuses, transfer progress will be stored and retrieved from the database, allowing administrators to update website transfers while buyers see real-time progress directly within their Purchase Details page.

This marks the beginning of a much more powerful post-auction management system and moves Flipnzee Auctions closer to becoming a complete website transfer platform.

Lesson 100 Implementation — Building the Website Transfer Workflow Foundation

After completing the buyer purchase dashboard in the previous lessons, the Flipnzee Auctions plugin now enters an important new development phase. While the buyer can already view purchase details, timelines, reference numbers, payment information, and transfer guidance, the transfer process itself is still based on placeholder values.

Lesson 100 focuses on preparing the architecture that will eventually power real website transfers.

Rather than immediately introducing complex database logic, this lesson establishes a clean foundation that future lessons can build upon. The objective is to separate presentation from business logic while keeping the current implementation simple, stable, and easy to understand.

Objectives

During this lesson we improved the purchase details page and prepared it for future dynamic transfer management.

Major goals included:

  • Display a professional purchase summary card
  • Improve the transfer timeline
  • Add transfer status information
  • Display purchase reference number
  • Show purchase date and purchase time separately
  • Display payment method
  • Introduce purchase notes
  • Add buyer guidance cards
  • Create next-step checklist
  • Keep transfer data temporarily hardcoded while backend architecture is being designed

Purchase Summary

The purchase page now begins with a clean summary card displaying important information at a glance.

The buyer can immediately see:

  • Purchased website
  • Current purchase status
  • Winning bid
  • Purchase date
  • Direct link to the listing

This significantly improves usability compared to viewing raw table data first.


Transfer Timeline

A visual timeline was introduced showing the expected stages of a website acquisition.

Current stages include:

  • Payment Confirmed
  • Website Files Delivered
  • Database Delivered
  • Domain Transfer Completed
  • Buyer Verification
  • Purchase Completed

Although currently driven by placeholder values, the interface is now ready for dynamic updates.


Purchase Information Cards

Additional informational panels were added beneath the transaction details.

These explain:

Buyer Protection

How Flipnzee verifies transfers before marking a purchase complete.

Ownership Transfer

Explains that website files, database and domain transfer instructions will be supplied.

Need Help?

Provides guidance if buyers experience issues during the transfer process.

These cards improve transparency while reducing repetitive support questions.


Transfer Status Section

A dedicated Transfer Status card has been introduced.

It currently displays:

  • Payment
  • Website Files
  • Database
  • Domain
  • Buyer Verification

Each value is presently hardcoded using placeholder data such as:

  • Completed
  • Pending

This section will later become fully dynamic.


Purchase Notes

A Purchase Notes section was introduced to provide important reminders to buyers after completing an auction.

Examples include:

  • Verify all transferred assets.
  • Change passwords immediately after receiving the website.
  • Review hosting and registrar access.
  • Contact support if any issue occurs.

This creates a much more professional post-purchase experience.


Next Steps Checklist

The buyer dashboard now includes a clear checklist describing the expected transfer workflow.

Typical items include:

  • ✓ Payment confirmed
  • Receive website files
  • Receive database
  • Receive domain transfer
  • Verify website
  • Change passwords
  • Confirm successful transfer

This checklist prepares buyers for the remaining transfer process instead of leaving them uncertain about what happens after payment.


Purchase Reference Number

A unique purchase reference was added to every transaction.

Example:

FLP-2026-00003

This makes customer support significantly easier since buyers can reference a human-friendly transaction ID instead of an internal database ID.


Purchase Date and Time

Instead of displaying a raw timestamp, the purchase details now separate:

  • Purchase Date
  • Purchase Time

This provides a cleaner and more readable interface while respecting the site’s configured WordPress date and time formats.


Payment Method

The purchase page now displays the payment method used for the transaction.

For current testing this defaults to:

Manual

As additional gateways such as Escrow.com, Stripe, PayPal, Wise and cryptocurrency are implemented, this field will automatically display the correct payment method.


Architecture Decision

One important architectural discussion took place during this lesson.

Initially, transfer progress was considered for storage using WordPress post meta attached to the listing.

However, after reviewing the long-term design, a better approach emerged.

Website transfer progress belongs to an individual transaction—not the listing itself.

A single website may eventually be sold multiple times over its lifetime, especially when the plugin is used as a marketplace by third-party developers.

For that reason, transfer management will be implemented using a dedicated Flipnzee_Transfer_Manager class and transaction-based data in upcoming lessons.

This decision avoids future refactoring while keeping the plugin scalable.


Why Placeholder Data Was Retained

Instead of prematurely introducing backend logic, Lesson 100 intentionally keeps transfer information hardcoded.

For example:

$transfer_status = array(
    'payment' => 'Completed',
    'files' => 'Pending',
    'database' => 'Pending',
    'domain' => 'Pending',
    'buyer' => 'Pending',
);

This allows the frontend interface to be fully designed and tested before connecting it to live transfer data.

Separating interface development from backend implementation results in cleaner, more maintainable code.


Current Status

By the end of Lesson 100, the Flipnzee Auctions buyer purchase page now provides:

  • Professional purchase summary
  • Purchase reference number
  • Purchase date and time
  • Payment method
  • Purchase information cards
  • Transfer timeline
  • Transfer status panel
  • Purchase notes
  • Buyer next-step checklist
  • Improved user experience
  • Clean foundation for future transfer automation

Download Source Code

Download the starting version of the plugin before the lesson:

Download the completed version after this lesson:


What Comes Next?

Lesson 101 will begin implementing the backend transfer architecture by introducing a dedicated Flipnzee_Transfer_Manager class.

This class will eventually become responsible for:

  • Managing website transfer progress
  • Updating transfer stages
  • Storing transaction-specific transfer data
  • Powering dynamic buyer dashboards
  • Supporting future marketplace implementations while remaining fully compatible with Flipnzee.com’s current in-house website sales model.

Lesson 100 therefore marks the transition from building the buyer interface to implementing the business logic that powers a complete website acquisition workflow.

Lesson 100 – Admin Transfer Manager (Transaction Workflow Management)

Objective

In Lesson 99, we created a professional Buyer Purchase Details page. However, the transfer timeline and checklist are still driven by static arrays. In this lesson, we will make the transfer process administrator-controlled, allowing the Flipnzee admin to update website transfer progress directly from the Transaction Details page.

Although Flipnzee.com currently sells only its own in-house websites, this architecture is intentionally designed so that developers using the open-source Flipnzee Auctions plugin can later extend it into a full multi-vendor marketplace.


Why This Lesson?

A completed payment does not mean the transaction is finished.

Website sales typically involve multiple stages:

  • Payment received
  • Website files shared
  • Database delivered
  • Domain transfer initiated
  • Buyer verification
  • Transaction completed

These stages should be manageable from the admin panel rather than being hard-coded.


Objectives

By the end of this lesson we will:

  • Add a Transfer Manager section to Transaction Details.
  • Allow administrators to update transfer progress.
  • Save transfer progress securely.
  • Automatically update the Buyer Purchase Details page.
  • Prepare the plugin for future notifications and email updates.

Current Workflow

Auction Ends
        │
        ▼
Transaction Created
        │
        ▼
Buyer Purchase Page
        │
        ▼
Static Timeline

New Workflow

Auction Ends
        │
        ▼
Transaction Created
        │
        ▼
Admin Transfer Manager
        │
        ▼
Transfer Progress Saved
        │
        ▼
Buyer Purchase Details
        │
        ▼
Dynamic Timeline

Database Strategy

Rather than adding numerous columns to the transactions table, we will use WordPress transaction meta (or a dedicated metadata layer in future lessons).

Each transaction will eventually store values such as:

payment_confirmed

website_files_delivered

database_delivered

domain_transfer_completed

buyer_verified

purchase_completed

This keeps the system extensible without modifying the main transaction table whenever new workflow steps are introduced.


Admin Interface

Inside:

Flipnzee Auctions → Transactions → Transaction Details

we will introduce a new card:

Transfer Manager

☑ Payment Confirmed

☐ Website Files Delivered

☐ Database Delivered

☐ Domain Transfer Completed

☐ Buyer Verified

☐ Purchase Completed

[ Save Progress ]

Only administrators will have permission to modify these values.


Buyer Experience

The buyer page will automatically reflect the saved progress.

Instead of displaying a static checklist, buyers will see:

✓ Payment Confirmed

✓ Website Files Delivered

✓ Database Delivered

○ Domain Transfer Pending

○ Buyer Verification

○ Completed

No manual edits to frontend templates will be required.


Security

This lesson introduces several important security practices:

  • Administrator capability checks
  • Nonce verification
  • Sanitization
  • Validation of transaction IDs
  • Secure saving of transfer data

Only authorized administrators will be able to update transfer progress.


Why This Fits Flipnzee

Because Flipnzee currently sells only its own websites, the transfer workflow is managed entirely by the site administrator.

Typical workflow:

Auction Won
      │
Payment Received
      │
Website ZIP Sent
      │
Database Sent
      │
Domain Transfer
      │
Buyer Confirms
      │
Completed

This closely matches how professional website acquisitions are handled.


Benefits for Marketplace Developers

Developers using the open-source Flipnzee Auctions plugin can later replace the administrator with individual sellers.

The exact same workflow can become:

Seller uploads files

↓

Buyer downloads files

↓

Seller starts domain transfer

↓

Buyer verifies

↓

Transaction completed

No redesign of the buyer interface will be necessary.


Files Planned for Modification

This lesson will primarily work with:

includes/class-transaction-manager.php

includes/class-my-purchase-details.php

includes/class-loader.php

assets/css/admin.css

Additional helper methods may be introduced if required.


Skills Covered

  • WordPress admin forms
  • Secure POST handling
  • Nonce verification
  • Capability checks
  • Updating transaction metadata
  • Dynamic frontend rendering
  • Admin workflow design
  • Separation of presentation and business logic

Expected Outcome

By the end of Lesson 100, administrators will have a dedicated Transfer Manager that controls the progress of every website sale. Buyers will immediately see real-time updates to their purchase page, replacing the static checklist introduced in Lesson 99.

This lesson marks an important transition in the Flipnzee Auctions plugin—from presenting purchase information to actively managing the post-sale website transfer process. It establishes the foundation for future enhancements such as automated notifications, secure file delivery, domain transfer tracking, and Escrow.com integration while remaining fully compatible with Flipnzee’s current in-house sales model and future marketplace implementations.

Lesson 99 Implementation – Buyer Purchase Details Page & Purchase Journey

After completing the Buyer Dashboard in Lesson 98, the next logical step was to provide buyers with a dedicated page where they could review every aspect of a completed purchase. Simply listing purchased websites is not sufficient for a professional auction platform. Buyers need a central place to verify transaction information, monitor transfer progress, understand the next steps, and quickly access important resources.

Lesson 99 focused on designing and implementing a comprehensive Buyer Purchase Details page within the Flipnzee Auctions plugin. The implementation lays the foundation for a transparent website transfer workflow while remaining flexible enough for both Flipnzee’s own business model and future marketplace implementations by other developers.


Objectives

The primary goals of this lesson were:

  • Create a dedicated Purchase Details shortcode.
  • Securely display transaction information only to the purchasing user.
  • Build a professional purchase summary card.
  • Display transaction metadata in an organized table.
  • Introduce a visual purchase timeline.
  • Add buyer guidance and protection information.
  • Present transfer instructions and recommended next steps.
  • Improve overall user experience through frontend styling.

1. Secure Transaction Validation

The Purchase Details page begins by ensuring that only authenticated buyers can access purchase information.

The implementation validates:

  • Logged-in user
  • Transaction ID from the URL
  • Ownership of the transaction
  • Existence of the transaction record

Example:

$transaction_id = isset( $_GET['transaction_id'] )
	? absint( $_GET['transaction_id'] )
	: 0;

if ( ! $transaction_id ) {

	return '<p>No purchase selected.</p>';
}

The database query also confirms that the transaction belongs to the current user before displaying any information.


2. Purchase Summary Card

Instead of immediately showing raw transaction data, the page now opens with a visually appealing purchase summary card containing:

  • Website title
  • Featured image
  • Purchase status badge
  • Winning bid
  • Purchase date
  • Quick “View Listing” button

This provides buyers with an immediate overview of their purchase.


3. Transaction Reference

A unique purchase reference is generated for every completed transaction.

Example:

FLIP-2026-000003

The reference helps buyers and administrators identify transactions during support conversations without relying solely on numeric IDs.


4. Transaction Metadata

Additional metadata was added to make the page feel more professional.

Displayed information includes:

  • Transaction ID
  • Purchase Reference
  • Purchase Date
  • Purchase Time
  • Payment Method
  • Auction Title
  • Winning Bid
  • Purchase Status
  • Original Purchase Timestamp

Dates and times are displayed using WordPress localization functions.


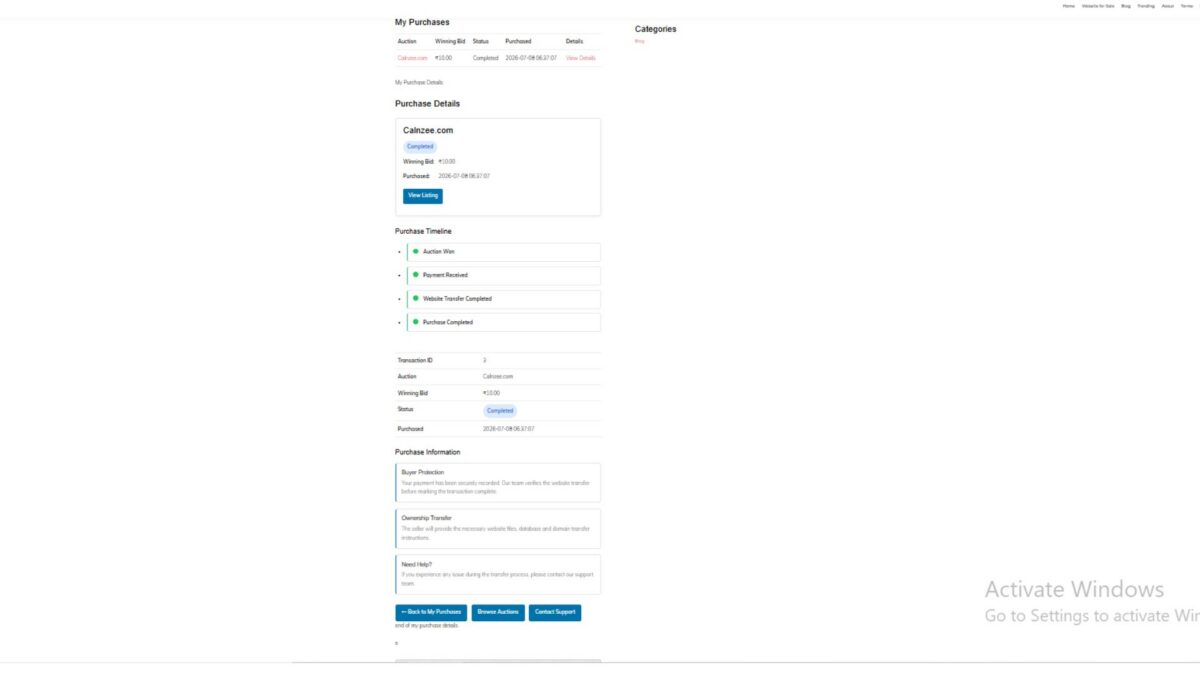
5. Purchase Timeline

A simple timeline visually communicates the major milestones of the purchase process.

Current implementation includes:

  • Auction Won
  • Payment Received
  • Website Transfer Completed
  • Purchase Completed

The timeline prepares the plugin for future workflow automation.


6. Purchase Information Cards

To improve buyer confidence, several informational cards were introduced.

These explain topics such as:

Buyer Protection

Explains that payment has been securely recorded and that the transfer process is monitored.

Ownership Transfer

Provides an overview of the expected transfer of website files, database, and domain ownership.

Need Help?

Directs buyers toward support if they encounter problems during the transfer process.


7. Transfer Checklist

A dedicated “Next Steps” section guides buyers through the website acquisition process.

The current checklist includes items such as:

  • Payment confirmed
  • Receive website files
  • Receive database
  • Domain transfer
  • Verify website
  • Change passwords
  • Confirm successful transfer

Although currently driven by a static array, the structure is intentionally designed so future lessons can connect it to dynamic transaction data managed by administrators.


8. Purchase Action Buttons

Quick navigation buttons were added to improve usability.

Buyers can easily:

  • Return to My Purchases
  • Browse additional auctions
  • Contact Support

This reduces unnecessary navigation and provides convenient access to common actions.


9. Status Badges

Purchase status is displayed using colored badges instead of plain text.

Examples include:

  • Completed
  • Pending
  • Processing

The CSS implementation allows additional statuses to be introduced later without modifying the page layout.


10. Frontend Styling

Several reusable frontend components were added, including:

  • Purchase summary card
  • Timeline styling
  • Information cards
  • Success badges
  • Action buttons
  • Transfer checklist
  • Responsive spacing and typography

The page now matches the overall design language of the Buyer Dashboard introduced in Lesson 98.


Testing Performed

The implementation was tested using completed auction transactions.

The following functionality was verified:

  • Buyer authentication
  • Transaction ownership validation
  • Transaction lookup
  • Purchase summary display
  • Reference generation
  • Timeline rendering
  • Purchase information cards
  • Action buttons
  • Responsive frontend layout
  • URL-based transaction loading

Challenges Encountered

Several development issues were resolved during implementation:

  • Missing shortcode registration
  • Transaction ID validation
  • URL parameter handling
  • Purchase ownership verification
  • PHP syntax errors caused by mixed PHP and HTML
  • Duplicate HTML table elements
  • Status badge styling
  • Responsive layout adjustments
  • Frontend CSS refinements

These debugging sessions significantly improved the overall code quality and reinforced the importance of validating PHP syntax throughout development.


Lessons Learned

Lesson 99 demonstrated that a successful website auction platform requires much more than simply recording completed transactions.

A dedicated Purchase Details page:

  • improves buyer confidence,
  • provides transparency during ownership transfer,
  • reduces support requests,
  • prepares the system for future automation,
  • and creates a professional post-purchase experience comparable to commercial digital asset marketplaces.

The lesson also highlighted the value of separating presentation from future business logic by designing components that can later be connected to dynamic transaction metadata.

Download Source Code

Download the starting version of the plugin before the lesson:

Download the completed version after this lesson:


Looking Ahead

While the Purchase Details page is now functionally complete, several opportunities remain for future enhancements.

Planned improvements include:

  • Dynamic transfer progress managed by administrators
  • Buyer notifications
  • Secure file delivery
  • Domain transfer tracking
  • Private buyer-admin messaging
  • Escrow workflow integration
  • Downloadable purchase documents

These features will gradually transform the Purchase Details page into a complete digital asset transfer portal.


Conclusion

Lesson 99 represents a major milestone in the Flipnzee Auctions plugin. Buyers now have a centralized location where they can review completed purchases, understand the transfer process, and access important transaction information.

Although Flipnzee.com currently sells only in-house websites, the implementation has been designed with extensibility in mind. Developers who adopt the open-source Flipnzee Auctions plugin for marketplace scenarios will be able to build upon this foundation, replacing static workflow elements with dynamic seller-managed processes while retaining the same user experience.

The result is a significantly more polished, trustworthy, and scalable post-purchase system that strengthens both the current Flipnzee platform and the plugin’s long-term roadmap.

Lesson 99: Building the Purchase Details Page

In the previous lesson, we introduced the My Purchases page, allowing buyers to view all the websites they have successfully won through Flipnzee Auctions. While that page provides a useful overview, buyers also need access to detailed information about each individual purchase.

In this lesson, we will build the Purchase Details Page, which will serve as the central location for managing a purchased website throughout its lifecycle—from winning the auction to completing payment and eventually transferring ownership.


Why a Purchase Details Page?

Purchasing a website involves multiple stages beyond simply winning an auction. Buyers often need to review:

  • Winning bid amount
  • Auction information
  • Payment status
  • Transaction details
  • Domain transfer progress
  • Administrative updates

Rather than displaying all this information on the Purchases page, it is better organized within a dedicated details page.

This modular approach keeps the user interface clean while allowing each purchase to have its own management page.


Objectives

At the end of this lesson, buyers should be able to:

  • View detailed information about a purchased website
  • Verify purchase ownership
  • Review transaction information
  • Monitor payment status
  • Access support resources
  • Prepare for future transfer management

Creating a Dedicated Purchase Details Class

A new class will be introduced:

includes/class-my-purchase-details.php

Separating purchase details into its own class keeps the plugin organized and follows the object-oriented architecture established throughout previous lessons.


Registering a New Shortcode

The page will be rendered using a dedicated shortcode.

[flipnzee_purchase_details]

This allows administrators to place the purchase details page anywhere within WordPress while maintaining complete separation between presentation and business logic.


Secure Purchase Validation

Security remains one of the most important aspects of the marketplace.

Before displaying any purchase information, the plugin should verify:

  • The visitor is logged in.
  • A valid purchase ID has been provided.
  • The purchase actually exists.
  • The logged-in user owns that purchase.

If any validation fails, an appropriate message should be displayed instead of exposing sensitive information.

Example:

Purchase not found.

or

You do not have permission to view this purchase.

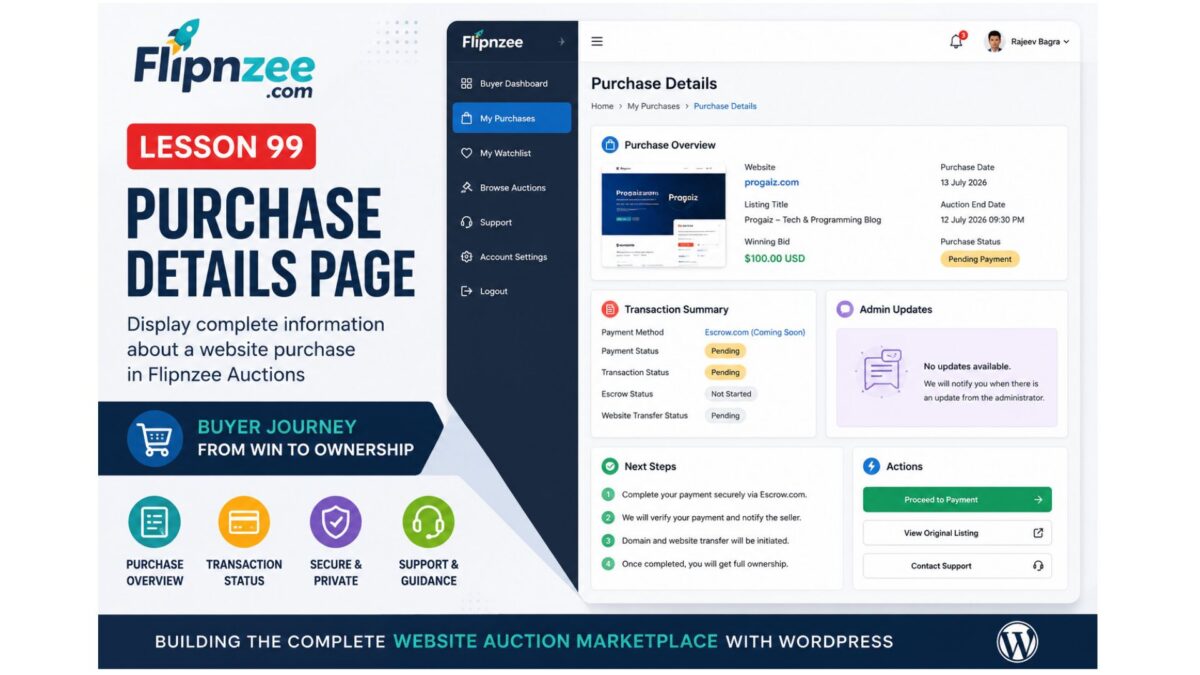
Purchase Overview

The top section of the page will summarize the purchase.

Example fields include:

  • Website Name
  • Listing Title
  • Winning Bid
  • Purchase Date
  • Auction End Date
  • Purchase Status

This provides buyers with an immediate overview without requiring them to search through multiple pages.


Transaction Summary

The page will also display transaction-related information.

Initially, this section will include placeholders for:

  • Payment Method
  • Payment Status
  • Transaction Status
  • Escrow Status
  • Website Transfer Status

As future lessons introduce payment gateways and Escrow.com integration, these fields will automatically become more informative.


Administrative Updates

Marketplace administrators may occasionally need to communicate with buyers regarding:

  • Payment verification
  • Required documents
  • Domain transfer
  • Hosting migration
  • Additional instructions

A dedicated section will be reserved for these updates.

Initially it may simply display:

No updates available.

Later this area will become a communication hub between administrators and buyers.


Buyer Guidance

Many first-time buyers may be unfamiliar with the website acquisition process.

The Purchase Details page will therefore include a brief explanation of the next steps after winning an auction, including:

  • Payment instructions
  • Escrow workflow
  • Domain transfer
  • Website migration
  • Completion of ownership transfer

This reduces buyer confusion while improving the overall marketplace experience.


Action Buttons

To simplify navigation, the page will provide several action buttons.

Examples include:

  • View Original Listing
  • Proceed to Payment
  • Contact Support

These shortcuts eliminate unnecessary navigation and allow buyers to continue their purchase workflow with minimal effort.


Responsive User Interface

The Purchase Details page will continue using the design language introduced in previous lessons.

Features include:

  • Responsive layout
  • Clean information cards
  • Consistent typography
  • Professional spacing
  • Mobile-friendly design

Maintaining a consistent interface improves usability throughout the marketplace.


Preparing for Future Lessons

Although this lesson primarily focuses on displaying purchase information, it also lays the foundation for several important upcoming features.

Future lessons will build upon this page by adding:

  • Escrow.com transaction tracking
  • Online payment processing
  • Transfer progress indicators
  • Buyer notifications
  • Downloadable invoices
  • Ownership confirmation
  • Website migration status
  • Administrative messaging
  • Transaction history

Because all purchase-related functionality will originate from this page, designing it carefully now makes future development significantly easier.


Final Thoughts

Lesson 99 represents another important step toward transforming Flipnzee Auctions into a complete marketplace for buying and selling websites.

With the introduction of a dedicated Purchase Details page, buyers gain a centralized location for reviewing every aspect of a completed auction. Rather than treating a successful bid as the end of the buying journey, Flipnzee now begins supporting the entire post-auction process—from payment and verification to domain transfer and final ownership.

This lesson continues the philosophy of building the marketplace incrementally, ensuring that each new feature integrates naturally with the existing architecture while providing a scalable foundation for future enhancements.

Lesson 98 Implementation: Building the Buyer Dashboard

In this lesson, we introduced the Buyer Dashboard, an important milestone in the Flipnzee Auctions plugin. While the earlier lessons focused on auctions, bidding, payments, and watchlists, this lesson begins building the buyer’s personal workspace after logging into the marketplace.

The Buyer Dashboard serves as the central navigation hub for buyers, allowing them to quickly access their purchases, watchlist, active auctions, and support resources.


Why a Buyer Dashboard?

As Flipnzee grows into a specialized marketplace for buying and selling websites, buyers need a dedicated area where they can manage their activity without navigating through multiple pages.

The dashboard is designed to provide:

  • Quick access to purchased websites
  • Easy navigation to the watchlist
  • Direct access to current auctions
  • Support resources
  • A foundation for future buyer features

This dashboard will continue to evolve in upcoming lessons as more buyer functionality is introduced.


Registering a Dedicated Shortcode

A new shortcode was created for the dashboard:

[flipnzee_buyer_dashboard]

This shortcode allows the dashboard to be embedded on any WordPress page while keeping the implementation modular and reusable.

The dashboard class registers the shortcode during construction using WordPress’ Shortcode API.


Login Protection

Since the dashboard contains user-specific information, it is only available to authenticated users.

If a visitor is not logged in, the shortcode displays a friendly message requesting authentication before accessing buyer features.

This keeps buyer information private while following WordPress best practices.


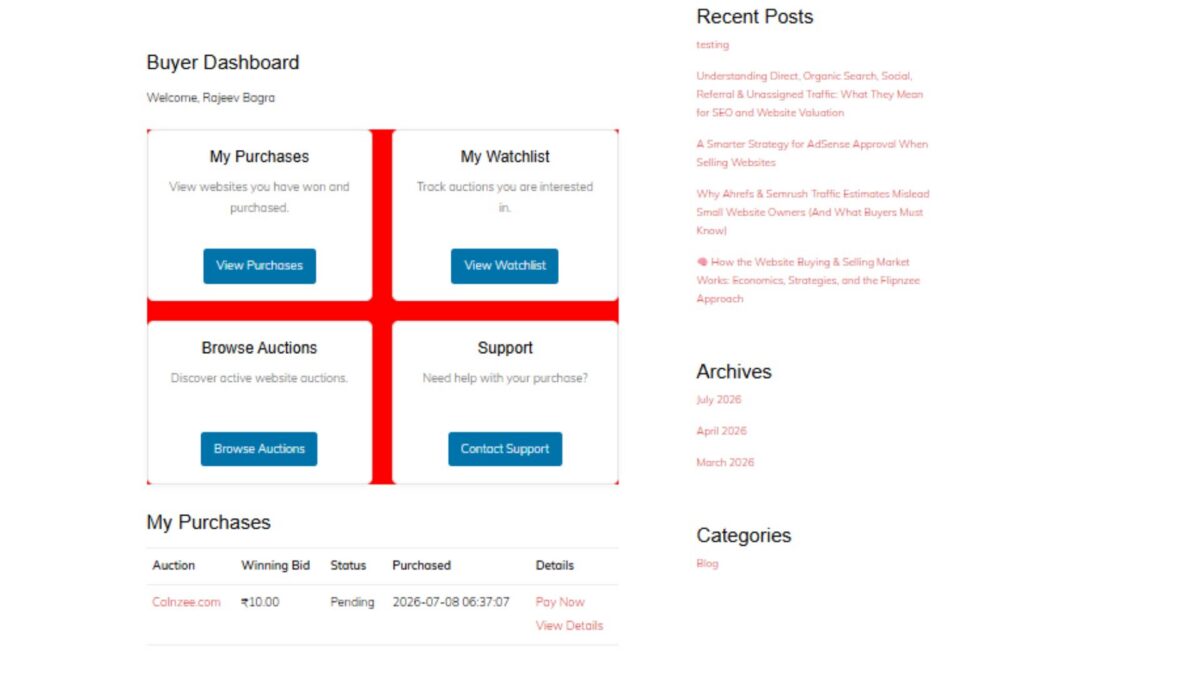
Personalized Welcome Section

The dashboard greets the logged-in buyer using their WordPress display name.

Example:

Buyer Dashboard

Welcome, Rajeev Bagra

Personalization creates a much more user-friendly experience and prepares the dashboard for future account-specific information.


Dashboard Cards

Instead of displaying long navigation menus, the dashboard uses clean responsive cards.

Four primary navigation cards were introduced:

My Purchases

Provides access to websites that the buyer has successfully won and purchased.

Future lessons will display:

  • Purchase history
  • Pending transfers
  • Completed transfers
  • Payment status

My Watchlist

Allows buyers to quickly revisit auctions they are monitoring.

This integrates directly with the Watchlist system developed in previous lessons.


Browse Auctions

Provides a shortcut back to the marketplace so buyers can continue exploring active website auctions.


Support

Offers direct access to marketplace support resources whenever assistance is required during the buying process.


Responsive CSS Grid

A responsive CSS Grid layout was implemented to display the dashboard cards.

Benefits include:

  • Responsive across desktop, tablet, and mobile devices
  • Equal spacing between cards
  • Professional appearance
  • Easy future expansion

Each card includes:

  • Title
  • Description
  • Action button
  • Hover animation
  • Subtle shadows
  • Rounded corners

Modern User Interface

Several interface improvements were added:

  • Soft shadows
  • Rounded card design
  • Smooth hover animations
  • Consistent Flipnzee button styling
  • Responsive spacing
  • Clean typography

The result is a dashboard that feels modern while remaining lightweight.


Reusing Existing Marketplace Pages

Each dashboard card links to an existing or upcoming marketplace page.

Current destinations include:

  • /my-purchases/
  • /watchlist/
  • /listings/
  • /support/

This keeps navigation centralized and reduces unnecessary menu complexity.


Debugging Journey

An interesting challenge during this lesson involved the dashboard layout initially rendering as a vertical list instead of the intended responsive grid.

The issue was systematically investigated by verifying:

  • Shortcode registration
  • HTML structure
  • CSS loading
  • Browser Developer Tools
  • Network requests
  • Stylesheet versions
  • CSS Grid rules

A temporary diagnostic background color confirmed that the correct stylesheet was being loaded, allowing the issue to be isolated and resolved successfully.

This debugging process reinforced the importance of methodical troubleshooting rather than assuming the problem originates in PHP or HTML.


Foundation for Future Lessons

Although the dashboard currently serves as a navigation hub, it lays the groundwork for significantly richer buyer functionality.

Upcoming enhancements will include:

  • Live purchase summaries
  • Recent bidding activity
  • Pending payments
  • Escrow transaction status
  • Website transfer progress
  • Buyer notifications
  • Personalized marketplace insights

The dashboard is intentionally designed to grow alongside the Flipnzee marketplace.

Download Source Code

Download the starting version of the plugin before the lesson:

Download the completed version after this lesson:


Final Thoughts

Lesson 97 marks the beginning of the buyer experience within Flipnzee Auctions. By introducing a dedicated Buyer Dashboard, the plugin now offers a centralized, user-friendly starting point for every buyer after login.

Rather than overwhelming users with scattered pages and menus, the dashboard provides a clean, responsive interface that will gradually evolve into a comprehensive buyer control panel as future lessons expand payment workflows, purchase management, and ownership transfers.

The Buyer Dashboard represents another important step toward transforming Flipnzee Auctions into a professional marketplace specifically built for buying and selling websites and digital assets.

Lesson 98: Buyer Dashboard Statistics & Quick Navigation

Introduction

With the Buyer Dashboard foundation established in Lesson 97, the next step is to transform it into a genuinely useful control panel. A dashboard should provide buyers with an immediate overview of their activity instead of simply displaying a welcome message.

In this lesson, we will enhance the Buyer Dashboard by introducing real-time summary statistics and quick navigation cards. These improvements will allow buyers to instantly understand the status of their account and quickly access the most important sections of the Flipnzee Auctions platform.

This lesson focuses on presenting information already available within the plugin rather than introducing new business logic. It also lays the groundwork for future buyer features such as notifications, invoices, escrow tracking, and messaging.


Objectives

By the end of this lesson we will:

  • Enhance the Buyer Dashboard layout.
  • Display summary statistics for the logged-in buyer.
  • Add navigation cards for common buyer actions.
  • Keep the dashboard responsive and mobile friendly.
  • Reuse existing plugin functionality instead of duplicating code.
  • Prepare the dashboard for future widgets.

Features to Implement

1. Dashboard Summary Cards

Instead of showing only a welcome message, display attractive summary cards.

Example:

----------------------------------------
Buyer Dashboard

Welcome, Rajeev

+-----------------------------+
| Purchased Websites      3   |
+-----------------------------+

+-----------------------------+
| Watchlist Auctions      5   |
+-----------------------------+

+-----------------------------+
| Active Bids            2    |
+-----------------------------+

+-----------------------------+
| Pending Payments       1    |
+-----------------------------+

Each card should display:

  • Icon
  • Title
  • Count
  • Link to detailed page

2. Dynamic Statistics

Retrieve statistics for the current user.

Initially display:

  • Total Purchases
  • Watchlist Count
  • Active Bids
  • Pending Payments

These should be calculated directly from the existing plugin tables.


3. Quick Action Section

Add a dedicated “Quick Actions” area.

Example:

Quick Actions

[ Browse Auctions ]

[ My Purchases ]

[ My Watchlist ]

[ Support ]

This makes navigation significantly faster for buyers.


4. Dashboard Layout Improvements

Organize the page into sections.

Example:

Buyer Dashboard

--------------------------------
Summary Cards
--------------------------------

--------------------------------
Quick Actions
--------------------------------

--------------------------------
My Purchases
--------------------------------

This creates a cleaner visual hierarchy.


5. Responsive Design

Update CSS so cards automatically stack on smaller devices.

Desktop:

[ Purchases ][ Watchlist ]

[ Active ][ Pending ]

Mobile:

[ Purchases ]

[ Watchlist ]

[ Active ]

[ Pending ]

6. Dashboard Icons

Each section should have an icon.

Suggested icons:

  • 📦 Purchases
  • ❤️ Watchlist
  • 🔨 Active Bids
  • 💳 Pending Payments

The icons improve usability without requiring additional plugins.


7. Reuse Existing Components

Do not duplicate functionality.

Continue using:

  • My Purchases shortcode/component
  • Watchlist manager
  • Auction manager
  • Transaction manager

The dashboard should serve as a centralized entry point to these existing features.


Files Expected to Change

includes/
    class-buyer-dashboard.php

assets/css/
    frontend.css

includes/
    class-watchlist-manager.php

includes/
    class-transaction-manager.php

includes/
    class-bid-manager.php

Architecture

Buyer Dashboard

│
├── Welcome
│
├── Statistics
│      ├── Purchases
│      ├── Watchlist
│      ├── Active Bids
│      └── Pending Payments
│
├── Quick Actions
│
└── Existing My Purchases Section

Learning Outcomes

After completing Lesson 98, you will understand how to:

  • Design user dashboards in WordPress.
  • Aggregate data from multiple plugin modules.
  • Build reusable dashboard widgets.
  • Create responsive card layouts.
  • Connect independent plugin components into a unified user experience.
  • Improve usability without introducing duplicate logic.

Conclusion

Lesson 98 transforms the Buyer Dashboard from a simple landing page into a functional command center for buyers. By surfacing key statistics and providing quick access to common actions, the dashboard becomes far more valuable while remaining lightweight and extensible.

This lesson also reinforces an important design principle used throughout the Flipnzee Auctions plugin: reuse existing components whenever possible. Rather than rebuilding purchase, watchlist, or transaction functionality, the dashboard intelligently aggregates information from those modules into a single, cohesive interface.

This architecture will make it straightforward to introduce advanced buyer features in future lessons, including notifications, escrow progress, invoices, messaging, and downloadable receipts.