How Plugin Activation and Deactivation Hooks Work

Series: WordPress Development From Scratch
Level: Beginner to Intermediate
Project Reference: Flipnzee Analytics


Introduction

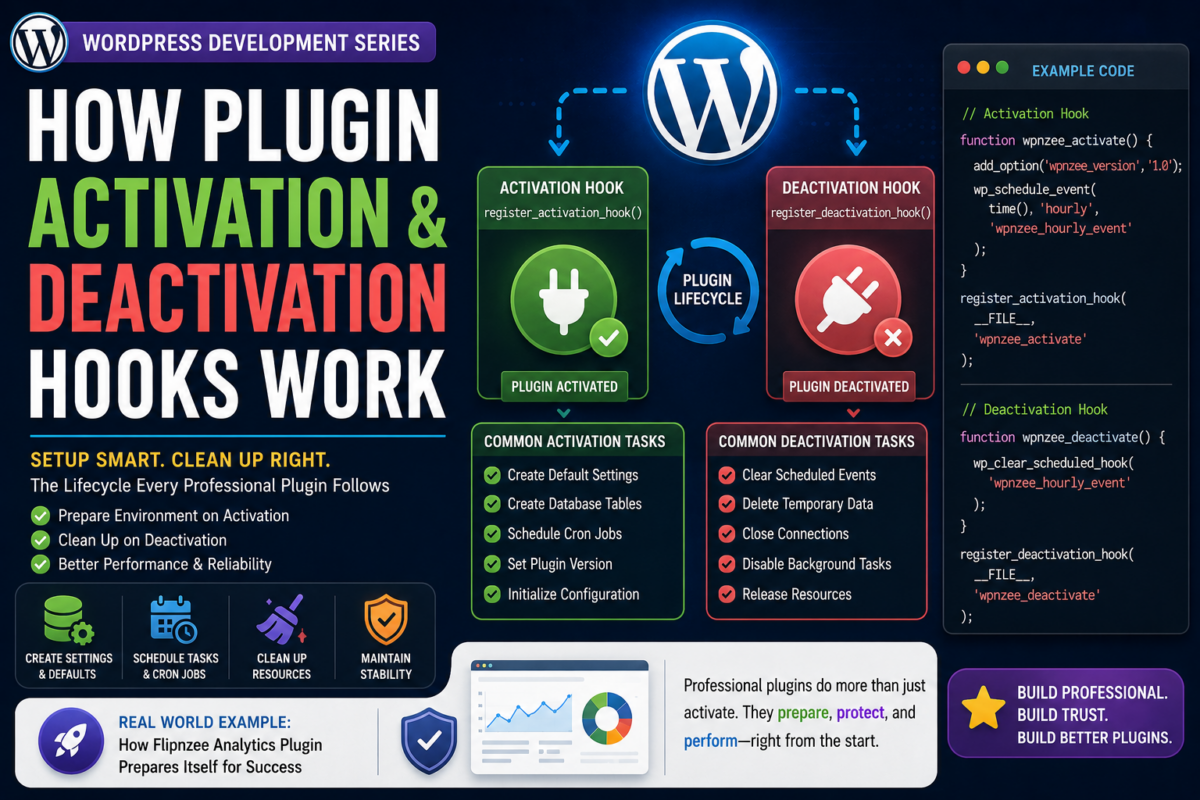
When you activate a WordPress plugin, something special happens behind the scenes.

WordPress doesn’t simply mark the plugin as “active.” Instead, it gives the plugin an opportunity to perform setup tasks before it starts running.

Similarly, when a plugin is deactivated, WordPress allows the plugin to clean up after itself.

This process is handled using Activation Hooks and Deactivation Hooks.

In this tutorial you’ll learn:

  • What activation hooks are
  • What deactivation hooks are
  • Why they are important
  • How WordPress executes them
  • Common setup tasks during activation
  • Common cleanup tasks during deactivation
  • How professional plugins use these hooks
  • How Flipnzee Analytics uses plugin initialization

By the end, you’ll understand one of the most important parts of building production-ready WordPress plugins.


What Happens When You Activate a Plugin?

Imagine installing a plugin that creates:

  • Custom database tables
  • Default settings
  • User roles
  • Scheduled tasks

These things must be created before the plugin can work properly.

WordPress solves this problem using an activation hook.

When a user clicks:

Plugins → Activate

WordPress automatically executes any activation function registered by the plugin.


Activation Hook Syntax

WordPress provides:

register_activation_hook()

Example:

register_activation_hook(
    __FILE__,
    'wpnzee_activate'
);

This tells WordPress:

“Run the function wpnzee_activate() when this plugin is activated.”


Creating Your First Activation Hook

Example:

function wpnzee_activate() {

    update_option(
        'wpnzee_version',
        '1.0.0'
    );

}

register_activation_hook(
    __FILE__,
    'wpnzee_activate'
);

When the plugin activates:

wpnzee_version = 1.0.0

is automatically stored in the database.


Why Store Plugin Settings During Activation?

Many plugins need default configuration values.

Example:

function wpnzee_activate() {

    add_option(
        'wpnzee_show_widget',
        'yes'
    );

}

Now the plugin starts with sensible defaults.

The user doesn’t need to configure everything manually.


What Happens Behind the Scenes?

The activation process looks like:

User clicks Activate
          ↓
WordPress loads plugin
          ↓
Activation Hook Executes
          ↓
Setup Tasks Run
          ↓
Plugin Becomes Active

Common Activation Tasks

Professional plugins often:

Create Default Settings

add_option(
    'plugin_color',
    'blue'
);

Create Database Tables

global $wpdb;

Custom tables are often created here.


Schedule Cron Jobs

wp_schedule_event(
    time(),
    'hourly',
    'my_plugin_event'
);

Create User Roles

add_role(
    'analytics_manager',
    'Analytics Manager'
);

Store Plugin Version

update_option(
    'plugin_version',
    '1.0'
);

This helps future upgrades.


Understanding Deactivation Hooks

Deactivation hooks perform cleanup.

WordPress provides:

register_deactivation_hook()

Example:

register_deactivation_hook(
    __FILE__,
    'wpnzee_deactivate'
);

When a user clicks:

Deactivate

the specified function runs.


Creating Your First Deactivation Hook

Example:

function wpnzee_deactivate() {

    wp_clear_scheduled_hook(
        'wpnzee_hourly_event'
    );

}

register_deactivation_hook(
    __FILE__,
    'wpnzee_deactivate'
);

This removes scheduled events when the plugin is disabled.


Why Deactivation Matters

Imagine a plugin schedules:

Every Hour:
Fetch Analytics Data

If the plugin is deactivated but the scheduled event continues running:

  • Resources are wasted
  • Errors may occur
  • Performance suffers

Deactivation hooks prevent this.


Activation vs Deactivation

ActivationDeactivation
Setup environmentClean up environment
Create settingsRemove temporary processes
Schedule tasksUnschedule tasks
Initialize pluginDisable plugin activity

Think of it like:

Activation   = Setup
Deactivation = Shutdown

What About Uninstall?

Many beginners confuse:

Deactivate

with:

Delete

They are different.

Deactivate

Plugin remains installed.

Delete

Plugin is removed entirely.

For deletion, WordPress provides:

uninstall.php

or

register_uninstall_hook()

These are used to permanently remove data.


Real Example: Analytics Plugin

Imagine Flipnzee Analytics is activated.

Possible activation tasks:

Store Plugin Version
Create Default Settings
Initialize Analytics Configuration
Prepare Cache System
Schedule Data Refresh Jobs

These ensure the plugin is ready before the user starts using it.


Example Plugin with Both Hooks

<?php

function wpnzee_activate() {

    add_option(
        'wpnzee_version',
        '1.0'
    );

}

function wpnzee_deactivate() {

    wp_clear_scheduled_hook(
        'wpnzee_hourly_event'
    );

}

register_activation_hook(
    __FILE__,
    'wpnzee_activate'
);

register_deactivation_hook(
    __FILE__,
    'wpnzee_deactivate'
);

This is a common pattern you’ll see in professional plugins.


Common Beginner Mistakes

Running Setup Code on Every Page Load

Bad:

add_option(
    'plugin_version',
    '1.0'
);

This executes constantly.

Use activation hooks instead.


Forgetting Cleanup

Always remove:

  • Scheduled events
  • Temporary files
  • Cached data

when appropriate.


Deleting User Data on Deactivation

Avoid:

delete_option(...)

during deactivation.

Users may reactivate later.

Save permanent cleanup for uninstall.


Not Checking Existing Settings

Before creating options:

if (!get_option('plugin_version')) {
    add_option(...);
}

Avoid overwriting user settings.


What You’ve Learned

In this tutorial you learned:

✓ What activation hooks are

✓ What deactivation hooks are

✓ How register_activation_hook() works

✓ How register_deactivation_hook() works

✓ Common setup tasks

✓ Common cleanup tasks

✓ The difference between deactivate and uninstall

✓ How professional plugins prepare their environment


Key Takeaway

Activation hooks allow a plugin to prepare itself before use.

Deactivation hooks allow a plugin to shut down gracefully.

Together they help create reliable, professional WordPress plugins that behave correctly throughout their lifecycle.

Every serious WordPress developer should understand these hooks before building larger projects.


Next Lesson

In the next tutorial we’ll explore:

Loading CSS and JavaScript Properly in WordPress

You’ll learn why professional plugins never use raw HTML <script> and <link> tags, how WordPress manages assets using enqueue functions, and how the Flipnzee Analytics plugin loads styles and scripts efficiently across the admin dashboard and frontend.
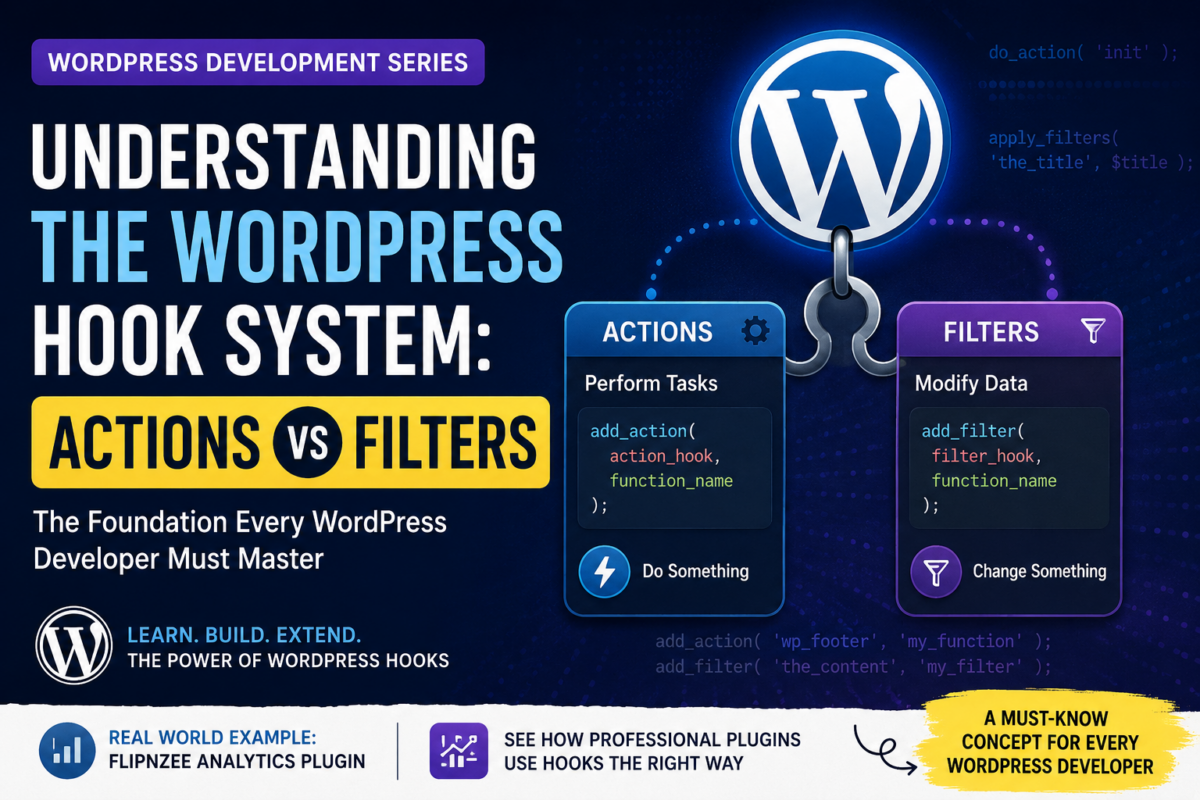
Understanding the WordPress Hook System: Actions vs Filters

Series: WordPress Development From Scratch
Level: Beginner
Project Reference: Flipnzee Analytics


Introduction

If WordPress plugins are the engine that powers customization, then hooks are the fuel that makes everything work.

Virtually every WordPress plugin relies on hooks.

Whether you’re creating:

  • A contact form plugin
  • An SEO plugin
  • An analytics dashboard
  • An eCommerce extension

you’ll be working with hooks every day.

In fact, the Flipnzee Analytics plugin uses numerous hooks to integrate seamlessly with WordPress without modifying any core files.

In this tutorial you’ll learn:

  • What WordPress hooks are
  • Why hooks exist
  • The difference between Actions and Filters
  • How to create your own Action hooks
  • How to create your own Filter hooks
  • How real plugins use hooks

By the end, you’ll understand one of the most important concepts in WordPress development.


What Is a Hook?

A hook is a point in WordPress where developers can attach their own code.

Think of WordPress as a train traveling along a track.

At various stations, WordPress pauses and says:

“Would any plugin like to do something here?”

Those stations are called hooks.

Plugins register functions to run when a specific hook is reached.

This allows developers to extend WordPress without editing core files.


Why Hooks Matter

Without hooks, plugin developers would need to modify WordPress itself.

That would create several problems:

  • Updates would overwrite changes
  • Different plugins would conflict
  • Maintenance would become difficult

Hooks solve these problems by creating a standard extension system.


The Two Types of Hooks

WordPress provides two categories of hooks:

1. Actions

Actions perform tasks.

Examples:

  • Send an email
  • Add a menu
  • Display content
  • Load CSS files

Actions do something.


2. Filters

Filters modify data.

Examples:

  • Change a page title
  • Modify content
  • Adjust a URL
  • Alter settings

Filters change something and return the modified value.


Understanding Actions

An Action allows you to run a function at a specific point in WordPress.

Example:

function wpnzee_footer_message() {
    echo "<p>Learning WordPress Development with WPNzee</p>";
}

add_action('wp_footer', 'wpnzee_footer_message');

When WordPress reaches the footer:

do_action('wp_footer');

your function executes automatically.


How Actions Work Behind the Scenes

WordPress Core:

do_action('wp_footer');

Your Plugin:

add_action('wp_footer', 'wpnzee_footer_message');

Result:

WordPress reaches footer
↓
wp_footer fires
↓
Your function runs
↓
Message appears

Common Action Hooks

Here are some popular action hooks:

HookPurpose
initRun code during WordPress initialization
admin_menuAdd dashboard menus
wp_enqueue_scriptsLoad CSS and JavaScript
wp_footerOutput content in footer
wp_headOutput content in page head
save_postTrigger when a post is saved

Example: Adding an Admin Menu

function wpnzee_admin_menu() {

    add_menu_page(
        'WPNzee Plugin',
        'WPNzee Plugin',
        'manage_options',
        'wpnzee-plugin',
        'wpnzee_page'
    );

}

add_action('admin_menu', 'wpnzee_admin_menu');

This action creates a new menu inside the WordPress dashboard.


Understanding Filters

Filters work differently.

Instead of performing an action, they modify data and return it.

Example:

function wpnzee_change_title($title) {

    return "WPNzee: " . $title;

}

add_filter('the_title', 'wpnzee_change_title');

Original title:

Learning WordPress

Modified title:

WPNzee: Learning WordPress

How Filters Work Behind the Scenes

WordPress:

$title = apply_filters('the_title', $title);

Your Plugin:

add_filter('the_title', 'wpnzee_change_title');

Process:

Original Value
↓
Filter Hook
↓
Your Function
↓
Modified Value

Common Filter Hooks

HookPurpose
the_titleModify titles
the_contentModify content
excerpt_lengthChange excerpt size
body_classAdd CSS classes
widget_titleModify widget titles

Action vs Filter

ActionsFilters
Perform tasksModify data
Usually echo outputMust return value
Trigger eventsChange values
add_action()add_filter()

A simple rule:

Actions do. Filters modify.


Real Example from Flipnzee Analytics

The Flipnzee Analytics plugin relies heavily on action hooks.

Examples include:

add_action('admin_menu', ...);

Used to create plugin dashboard pages.


add_action('wp_enqueue_scripts', ...);

Used to load frontend CSS and JavaScript.


add_action('admin_init', ...);

Used to initialize plugin settings and administrative functionality.


Without hooks, the plugin would not integrate properly with WordPress.


Creating Your Own Custom Action Hook

You can create hooks inside your own plugins.

Example:

do_action('wpnzee_after_report_generated');

Other developers can then hook into it:

function notify_admin() {

    error_log("Report generated");

}

add_action(
    'wpnzee_after_report_generated',
    'notify_admin'
);

This makes your plugin extensible.


Creating Your Own Custom Filter Hook

You can also create filters.

Plugin code:

$title = apply_filters(
    'wpnzee_report_title',
    'Analytics Report'
);

Another plugin:

function custom_report_title($title) {

    return "Monthly Analytics Report";

}

add_filter(
    'wpnzee_report_title',
    'custom_report_title'
);

Output:

Monthly Analytics Report

Common Beginner Mistakes

Forgetting to Return a Value

Incorrect:

function change_title($title) {

    $title = "New Title";

}

Correct:

function change_title($title) {

    return "New Title";

}

Echoing Inside Filters

Avoid:

echo $title;

Filters should return values.


Using Generic Function Names

Bad:

function display_menu()

Good:

function wpnzee_display_menu()

Always use prefixes.


What You’ve Learned

In this tutorial you learned:

✓ What hooks are

✓ Why hooks exist

✓ The difference between Actions and Filters

✓ How add_action() works

✓ How add_filter() works

✓ How WordPress executes hooks

✓ How Flipnzee Analytics uses hooks

✓ How to create custom hooks


Next Lesson

In the next tutorial we’ll explore:

WordPress Plugin File Structure Explained

You’ll learn how professional plugins organize files and how the Flipnzee Analytics plugin structure can help you build scalable WordPress projects.

Kinsta Launches Free AI & Bot Traffic Protection for All Hosting Customers

Published on WPNzee News

The rise of artificial intelligence has brought many benefits to website owners, but it has also introduced a new challenge: AI crawlers and automated bots consuming server resources at an unprecedented scale.

According to Kinsta’s recently released AI & Bot Traffic Report, AI bot traffic increased by more than 300% in just one year, and approximately 1 in every 31 website visits now comes from an AI bot.

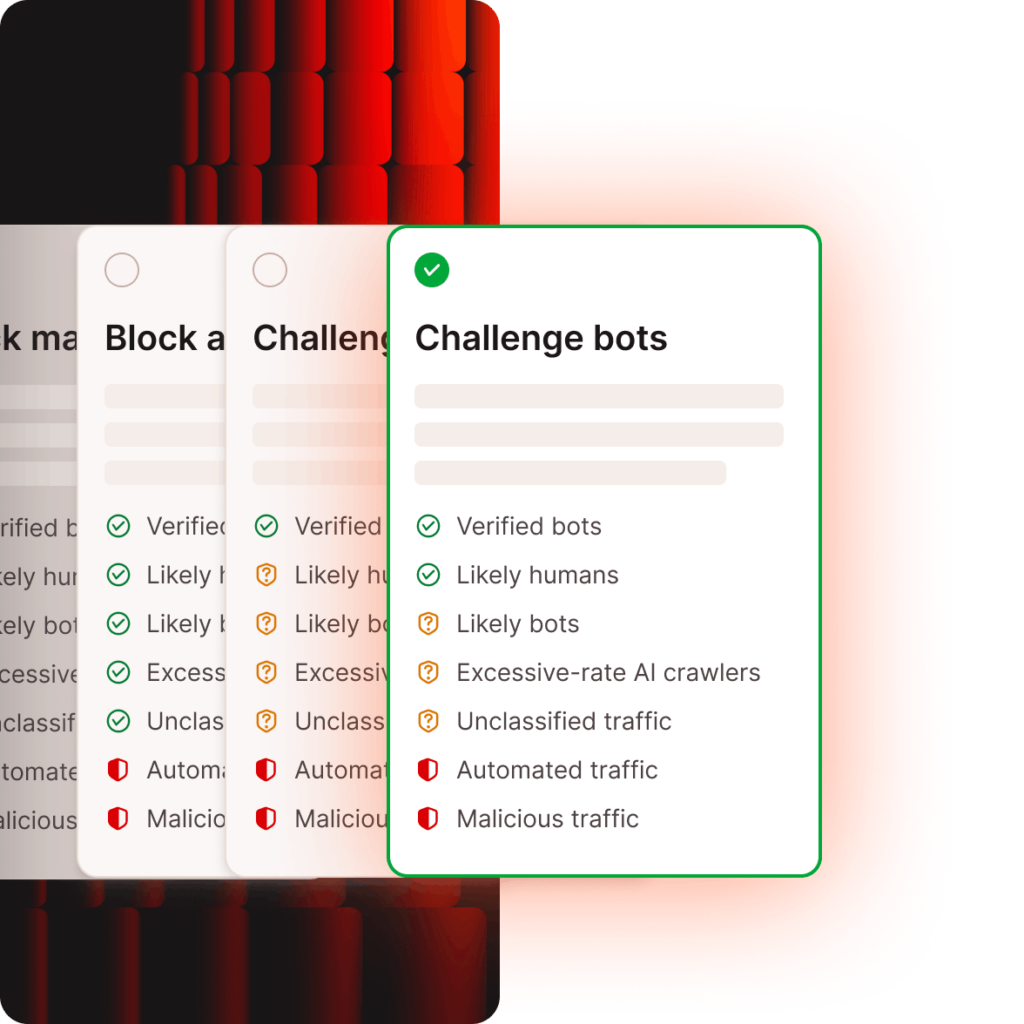
To help website owners regain control over their traffic, Kinsta has announced a new Bot Protection feature inside the MyKinsta dashboard, available to all customers at no additional cost.

Why AI Bot Traffic Matters

Many AI companies deploy crawlers that continuously scan websites to collect information for training models, powering search experiences, and generating AI responses.

While some bots provide value, excessive crawler activity can:

  • Increase server load
  • Consume hosting resources
  • Slow down websites
  • Increase bandwidth usage
  • Affect website performance for real visitors

For website owners running blogs, eCommerce stores, membership sites, and business websites, unmanaged bot traffic can become a hidden cost.

What Is Kinsta’s New Bot Protection?

The new Bot Protection feature gives website owners more control over how automated traffic interacts with their websites.

With Bot Protection enabled, users can:

Control Which Bots Are Allowed

Site owners can decide which bots should be allowed access and which should be blocked or challenged.

Block Resource-Intensive AI Crawlers

The feature specifically helps identify and manage AI crawlers that may consume excessive server resources.

Protect Production and Staging Sites Separately

Different environments can have different protection rules, allowing more flexibility for development and testing.

Automatically Allow Verified Search Bots

Verified search engine bots such as Google Search crawlers can continue accessing websites normally, helping preserve SEO visibility.

Why This Matters for WordPress Users

WordPress powers millions of websites worldwide, making it a major target for automated crawlers.

For WordPress website owners, Bot Protection can help:

  • Improve site performance
  • Reduce unnecessary resource consumption
  • Maintain a better user experience
  • Protect hosting resources from unwanted traffic
  • Simplify bot management without additional plugins

Since the feature is integrated directly into Kinsta’s hosting platform, users do not need to install or configure separate security tools.

A Unique Advantage in the Hosting Market

Many hosting providers offer security features focused on malware, DDoS attacks, and firewalls.

However, dedicated AI crawler management remains relatively uncommon.

Kinsta’s decision to offer Bot Protection free of charge gives customers access to a feature that addresses one of the newest challenges facing website owners in 2026.

As AI adoption continues to grow, tools that help manage automated traffic are likely to become increasingly important.

Our Take

The rapid growth of AI crawlers means website owners need better visibility and control over who is accessing their content.

Kinsta’s new Bot Protection feature is a welcome addition that addresses a real-world problem affecting website performance and hosting resources.

For agencies, bloggers, publishers, eCommerce businesses, and WordPress professionals, this feature adds another layer of protection without requiring additional software or monthly fees.

Learn More About Kinsta

If you’re interested in managed WordPress hosting and want to explore Kinsta’s latest features, you can learn more here:

👉 https://kinsta.com/?kaid=VXFXSHMKFCLQ

Affiliate Disclosure: This article contains affiliate links. If you purchase through these links, WPNzee may earn a commission at no additional cost to you.

What Is a WordPress Plugin? Build Your First Plugin from Scratch

Series: WordPress Development From Scratch
Level: Beginner
Project Reference: Flipnzee Analytics


Introduction

One of the biggest reasons WordPress powers millions of websites worldwide is its plugin ecosystem.

A plugin allows developers to add new functionality to WordPress without modifying the core WordPress files. Whether you want to add contact forms, SEO features, analytics dashboards, membership systems, or eCommerce functionality, there’s usually a plugin available to do the job.

But have you ever wondered how WordPress plugins are built?

In this tutorial, you’ll learn:

  • What a WordPress plugin is
  • How WordPress loads plugins
  • How to create your first plugin
  • How plugin headers work
  • How to add functionality using WordPress hooks
  • How real-world plugins like Flipnzee Analytics are structured

By the end of this guide, you’ll have built your very first WordPress plugin from scratch.


What Is a WordPress Plugin?

A WordPress plugin is a collection of PHP files that extend or modify WordPress functionality.

Think of WordPress as a smartphone.

  • WordPress Core = Operating System
  • Plugins = Mobile Apps

Just as you install apps to add new features to your phone, you install plugins to add new capabilities to WordPress.

Examples include:

  • WooCommerce → Online stores
  • Yoast SEO → Search engine optimization
  • Contact Form 7 → Contact forms
  • MonsterInsights → Analytics reporting
  • Flipnzee Analytics → Google Analytics integration

Why Plugins Exist

Without plugins, every website owner would need to edit WordPress core files to add features.

That creates several problems:

  • Updates would overwrite changes
  • Security risks increase
  • Maintenance becomes difficult

Plugins solve this by providing a standardized way to extend WordPress.

Benefits include:

  • Easy installation
  • Easy updates
  • Better security
  • Modular development
  • Reusability

How WordPress Loads Plugins

When WordPress starts, it scans the:

/wp-content/plugins/

directory.

Every plugin lives inside its own folder.

Example:

wp-content
└── plugins
    ├── hello-dolly
    ├── woocommerce
    └── my-first-plugin

When a plugin is activated, WordPress loads its main PHP file and executes the code.

This process happens automatically during every page load.


Create Your First Plugin

Navigate to:

wp-content/plugins/

Create a folder:

my-first-plugin

Inside the folder create:

my-first-plugin.php

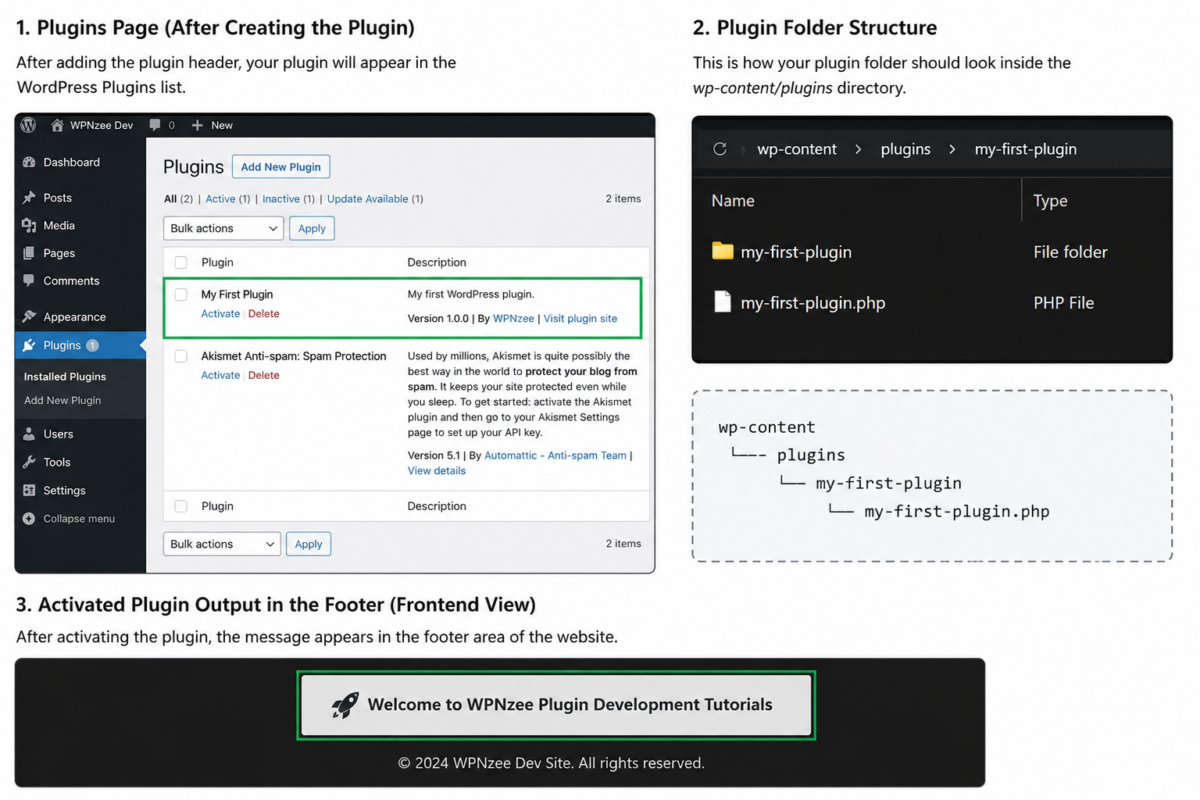
Your structure should look like:

wp-content
└── plugins
    └── my-first-plugin
        └── my-first-plugin.php

Add the Plugin Header

Open:

<?php
/*
Plugin Name: My First Plugin
Plugin URI: https://wpnzee.com
Description: My first WordPress plugin.
Version: 1.0.0
Author: WPNzee
Author URI: https://wpnzee.com
License: GPLv2
*/

Save the file.

Now visit:

Dashboard → Plugins
plugin activated

You’ll see your plugin listed.

Congratulations!

You just created a valid WordPress plugin.


Activate the Plugin

Click Activate.

Nothing will happen visually because our plugin doesn’t do anything yet.

Let’s change that.


Add Your First Function

Below the plugin header, add:

function wpnzee_hello_world() {
    echo '<p>Hello from my first plugin!</p>';
}

This creates a function.

However, WordPress still doesn’t know when to run it.

That’s where hooks come in.


Understanding WordPress Hooks

Hooks allow developers to inject code into WordPress at specific points.

There are two major types:

Actions

Actions perform tasks.

Example:

add_action('wp_footer', 'wpnzee_hello_world');

Filters

Filters modify data.

Example:

add_filter('the_title', 'custom_title');

For now we’ll focus on actions.


Display Content in the Footer

Add:

function wpnzee_hello_world() {
    echo '<p>Hello from my first plugin!</p>';
}

add_action('wp_footer', 'wpnzee_hello_world');

Save the file.

Visit your website frontend.

Scroll to the footer.

You’ll see:

Hello from my first plugin!

Your plugin is now actively extending WordPress.


How the Hook Works

When WordPress reaches the footer section:

do_action('wp_footer');

it checks whether any plugins registered callbacks for that hook.

Our code:

add_action('wp_footer', 'wpnzee_hello_world');

tells WordPress:

“When the wp_footer hook fires, run the function wpnzee_hello_world().”

This is the foundation of plugin development.


Making It Look Better

Update the function:

function wpnzee_hello_world() {
    echo '
    <div style="padding:10px;background:#f5f5f5;text-align:center;">
        Welcome to WPNzee Plugin Development Tutorials
    </div>';
}

add_action('wp_footer', 'wpnzee_hello_world');

Refresh your website.

Now your plugin outputs a styled message.


Real-World Example: Flipnzee Analytics

Professional plugins rarely consist of a single file.

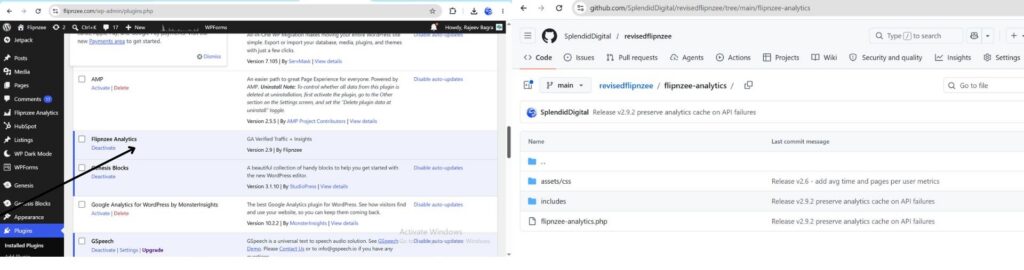
The Flipnzee Analytics plugin uses a more advanced structure:

flipnzee_screenshot
flipnzee-analytics
├── admin
├── assets
├── includes
├── templates
├── frontend
└── flipnzee-analytics.php

The main plugin file acts as the entry point.

It:

  • Loads required files
  • Registers hooks
  • Initializes settings
  • Connects WordPress with plugin components

As your plugins grow, you’ll adopt a similar architecture.


Common Beginner Mistakes

Editing WordPress Core Files

Never modify:

wp-admin
wp-includes

Always use plugins or themes.


Forgetting PHP Opening Tags

Every plugin file should start with:

<?php

Outputting Content Everywhere

Avoid:

echo "Hello";

outside hooks.

Always attach functionality to actions or filters.


Not Using Unique Function Names

Bad:

function display_message()

Good:

function wpnzee_display_message()

Prefixing prevents conflicts with other plugins.


What You’ve Learned

In this tutorial you learned:

✓ What a WordPress plugin is

✓ Why plugins exist

✓ How WordPress loads plugins

✓ How plugin headers work

✓ How hooks connect plugins to WordPress

✓ How to build and activate your first plugin

✓ How real-world plugins like Flipnzee Analytics are structured


Next Lesson

In the next tutorial we’ll explore the most important concept in WordPress development:

Understanding the WordPress Hook System: Actions vs Filters

Once you master hooks, you’ll understand how virtually every plugin in the WordPress ecosystem works.

Happy coding!

Recommended Resources