
Lesson 69: Adding a Payment Page and Payment Links for Auction Winners in the Flipnzee Auctions Plugin

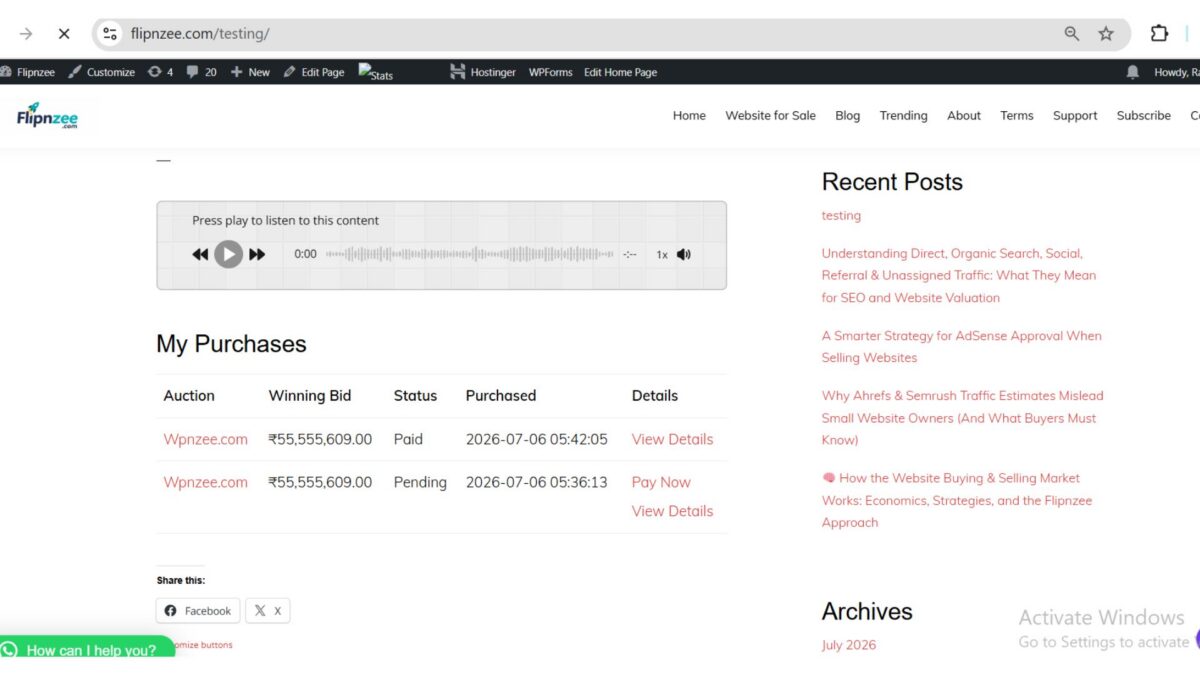
As the Flipnzee Auctions plugin continues to evolve, one of the next logical improvements was to guide auction winners toward completing their purchase. In previous lessons, buyers could view their purchases and transaction details, but there was no dedicated page to begin the payment process.
In this lesson, a frontend payment page was introduced along with contextual payment links, creating a smoother purchasing experience for buyers.
Objective
The goal of this lesson was to:
- Create a dedicated Payment page.
- Add a new payment shortcode.
- Display a Pay Now action for pending purchases.
- Keep View Details available for completed purchases.
- Build the foundation for integrating real payment gateways in future lessons.
Step 1: Created the Payment Page Class
A new file was added:
includes/class-payment-page.php
This class is responsible for rendering the payment page using a shortcode.
It retrieves the transaction ID from the URL, validates the request, and prepares the page for displaying payment-related information.
Step 2: Loaded the New Class
The main plugin file was updated to load the payment page class.
require_once FLIPNZEE_AUCTION_PATH .
    'includes/class-payment-page.php';
This ensures the payment functionality becomes available whenever the plugin loads.
Step 3: Registered a New Shortcode
A new shortcode was registered for the payment page.
Example:
[flipnzee_payment]
This shortcode can be placed on any WordPress page to create a dedicated payment screen.
Step 4: Created the Payment Page
Inside WordPress, a new page named:
Payment
was created.
Its content simply contains:
[flipnzee_payment]
This allows buyers to visit:
https://example.com/payment/
and access their payment page.
Step 5: Added Dynamic Payment Links
The My Purchases table was enhanced with conditional action links.
If a purchase is still pending:
Pay Now
is displayed.
If payment has already been completed:
View Details
is displayed.
This creates a cleaner and more intuitive workflow for buyers.
Step 6: Passed the Transaction ID
When the buyer clicks Pay Now, the transaction ID is automatically included in the URL.
Example:
/payment/?transaction_id=5
The payment page then knows exactly which purchase is being processed.
Step 7: Improved User Experience
Originally, the purchase details shortcode displayed:
Invalid transaction.
when no transaction ID was present.
This was changed so that the shortcode quietly returns nothing instead.
As a result:
- The My Purchases page remains clean.
- Purchase details only appear after selecting a specific transaction.
Step 8: Displayed Both Actions for Pending Purchases
To make the interface more useful, pending purchases now display both actions.
Pay Now

View Details
This allows buyers to review their purchase before completing payment.
Testing Performed
The following scenarios were successfully tested:
- Plugin activation
- Payment page loading
- Payment shortcode rendering
- Pending purchases displaying Pay Now
- Paid purchases displaying View Details
- Purchase Details page opening correctly
- Transaction IDs passed correctly through URLs
- No PHP syntax errors
- No fatal errors after implementation
Result
The buyer journey has now become much more complete.
Auction Listing
        ↓
Place Bid
        ↓
Auction Ends
        ↓
Transaction Created
        ↓
My Purchases
        ↓
Pay Now
        ↓
Purchase Details
Although the payment page currently serves as a placeholder, it establishes the structure required for integrating payment gateways such as Stripe, Razorpay, PayPal, or WooCommerce Payments in future lessons.
Download Source Code
Download the starting version of the plugin before the lesson:
Download the completed version after this lesson:
What I Learned
This lesson demonstrated several important WordPress plugin development concepts:
- Creating additional frontend components using shortcodes.
- Passing data securely through URL parameters.
- Building conditional user interfaces based on transaction status.
- Improving usability by displaying context-sensitive actions.
- Designing a scalable workflow that can later support real payment gateways.
Conclusion
Lesson 69 transformed the Flipnzee Auctions plugin from simply tracking purchases into guiding buyers through the next stage of the auction process. By introducing a dedicated payment page and dynamic action links, the plugin now provides a more complete end-to-end purchasing experience while laying the groundwork for future payment gateway integration.