Lesson 39 Implementation – Display Listing Titles, Featured Images, Placeholder Images & View Listing Button

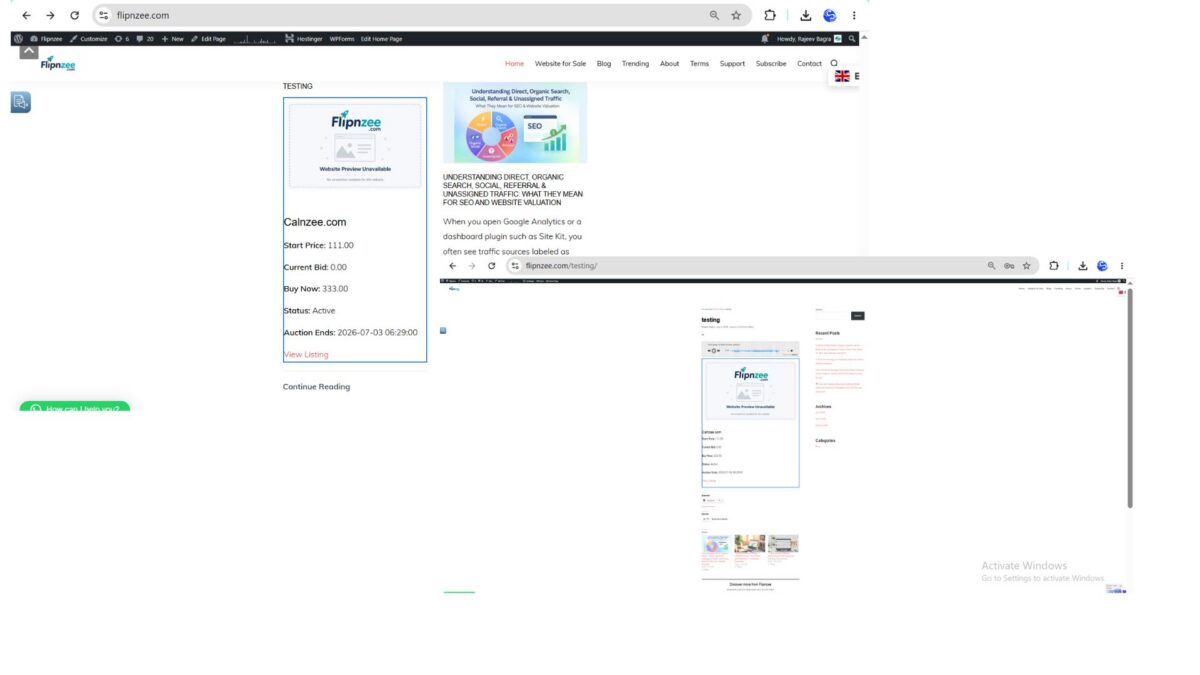
After creating the frontend auction shortcode in Lesson 38, visitors could finally see active auctions on the website. However, each auction was still presented as a simple list of database values. Instead of displaying a meaningful website title and image, the shortcode only showed the Listing ID, making the marketplace feel more like a database report than a professional auction platform.

In this implementation, we significantly improved the frontend by connecting our custom auction records with the existing Listing custom post type. This allows each auction to display the actual website title, featured image, and a direct link to its Listing page. We also laid the groundwork for future frontend styling by introducing a dedicated stylesheet and logical HTML structure.


What We Implemented

During this lesson we completed the following improvements:

  • Retrieved the associated Listing post using listing_id.
  • Verified the Listing exists before displaying it.
  • Replaced the Listing ID with the Listing title.
  • Displayed the Listing’s featured image.
  • Added a branded placeholder image when no featured image exists.
  • Created a dedicated assets/images folder.
  • Created a dedicated assets/css folder.
  • Added a frontend stylesheet.
  • Loaded the stylesheet using wp_enqueue_style().
  • Organized the HTML into thumbnail and content sections.
  • Added a View Listing button linking to the Listing page.

Step 1 – Retrieve the Listing Post

Our auction table stores only the Listing ID. To display information about the website, we first retrieved the corresponding WordPress post.

$listing = get_post( $auction['listing_id'] );

if ( ! $listing ) {
	continue;
}

If the Listing no longer exists, the shortcode simply skips that auction instead of generating errors.


Step 2 – Display the Website Title

Previously the shortcode displayed something similar to:

Listing #2222

We replaced this with:

echo esc_html( get_the_title( $listing ) );

Visitors now see the actual website title, for example:

Calnzee.com

This immediately makes the auction easier to understand.


Step 3 – Display the Featured Image

Each Listing already supports WordPress featured images.

We used:

has_post_thumbnail()

and

get_the_post_thumbnail()

to display the website screenshot above the title.

This transforms the auction from plain text into a visual listing.


Step 4 – Add a Placeholder Image

Not every Listing has a featured image.

Instead of leaving an empty space, we created:

assets/
└── images/
    └── placeholder.png

Whenever no featured image exists, the shortcode now displays this branded placeholder.

This keeps every auction card visually consistent.


Step 5 – Organize the HTML

Rather than placing everything directly inside the auction card, we separated the content into logical sections.

Thumbnail section:

flipnzee-auction-thumbnail

Content section:

flipnzee-auction-content

Although visitors won’t immediately notice this change, it makes future styling much easier.


Step 6 – Create a Frontend Stylesheet

To keep presentation separate from functionality, we created:

assets/
└── css/
    └── frontend.css

Instead of mixing inline styles with PHP, all future frontend styling will now be maintained inside this stylesheet.


Step 7 – Enqueue the Stylesheet

Creating a CSS file alone isn’t enough.

We registered it using:

wp_enqueue_style()

inside the main plugin file.

Because we had already defined:

FLIPNZEE_AUCTION_URL

and

FLIPNZEE_AUCTION_VERSION

loading the stylesheet became straightforward while following WordPress best practices.


Step 8 – Add a View Listing Button
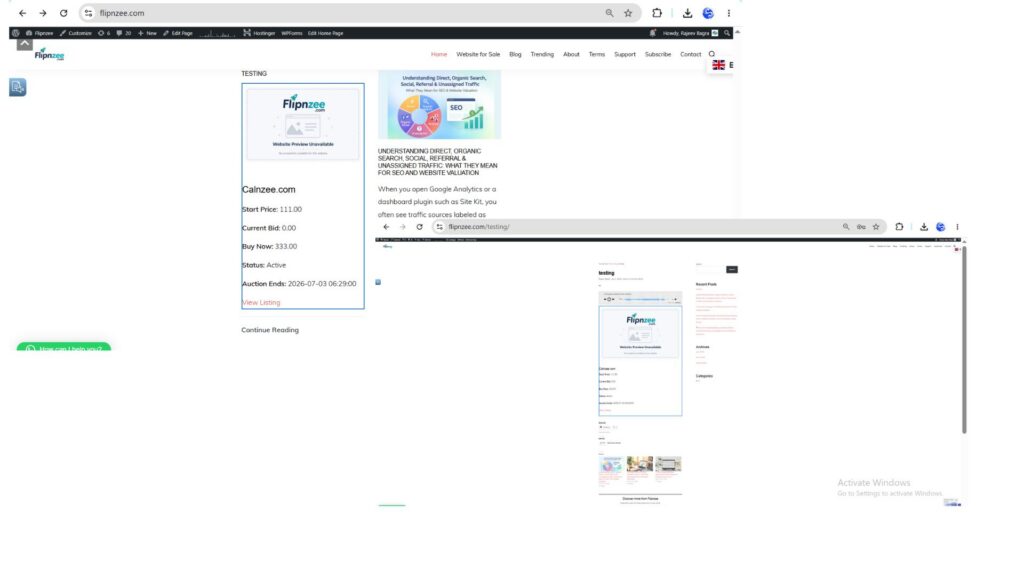
Finally, we connected the Auctions plugin with our Listing pages.

Using:

get_permalink( $listing )

we generated a link directly to the Listing.

Visitors can now move from the auction summary to the complete Listing page where they can view:

  • Website description
  • Screenshots
  • Flipnzee Analytics dashboard
  • Traffic statistics
  • Additional website information

This creates a much smoother browsing experience.


Project Structure After This Lesson

Our plugin now contains the following frontend assets:

flipnzee-auctions/

assets/
│
├── css/
│   └── frontend.css
│
└── images/
    └── placeholder.png

includes/
└── class-shortcodes.php

This organization keeps the plugin scalable and easier to maintain.


Why This Implementation Matters

One of the biggest improvements in this lesson wasn’t simply displaying an image or title—it was establishing the relationship between two independent systems.

Our Auctions plugin stores only the Listing ID in its custom database table. Whenever the shortcode runs, it retrieves the corresponding WordPress Listing post to display additional information.

This approach avoids duplicating data and allows us to take advantage of WordPress features such as:

  • Post titles
  • Featured images
  • Permalinks
  • Future custom fields

By building on top of the Listing custom post type rather than storing duplicate information in the auction table, the plugin remains cleaner, more flexible, and easier to extend.


Tips & Best Practices

  • Store only the Listing ID in the custom auction table.
  • Always verify the Listing exists before displaying it.
  • Escape all output using WordPress escaping functions.
  • Keep images inside the plugin instead of relying on external placeholders.
  • Separate HTML structure from CSS styling.
  • Use WordPress constants for plugin paths and URLs.
  • Organize frontend assets into dedicated css and images folders.

What We Learned

This lesson demonstrated how a custom database table can work together with native WordPress posts.

Instead of treating auctions as isolated records, we linked each auction to its corresponding Listing, allowing us to reuse existing WordPress functionality while keeping the database simple.

The result is a much more professional-looking marketplace and a solid foundation for future enhancements.


Looking Ahead

In the next lesson, we’ll continue improving the frontend by transforming these functional auction cards into a polished marketplace interface. We’ll refine the layout, improve spacing and typography, make the cards responsive, and prepare the design for future features such as bidding buttons, countdown timers, and deeper integration with the Flipnzee Analytics plugin.

Lesson 40 (Implementation): Improving Auction Card Readability with Better Formatting


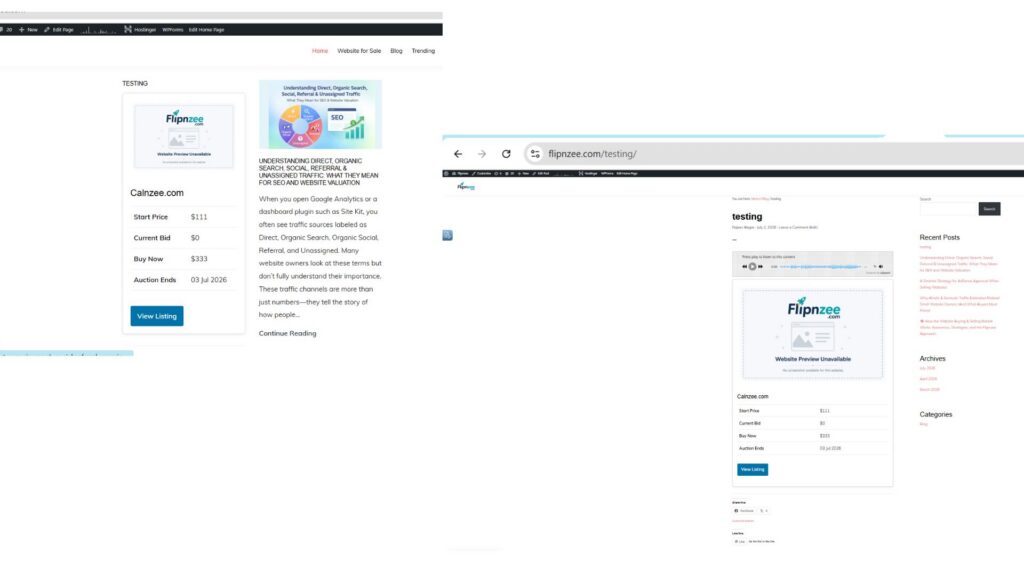
In the previous lesson, the auction card displayed all the required information, but the layout looked more like raw data than a professional marketplace listing. In this implementation, the auction card was refined to improve readability and give visitors a cleaner browsing experience.


What We Wanted to Improve

The original auction card displayed:

  • Prices without a currency symbol
  • Auction end date in raw database format (YYYY-MM-DD HH:MM:SS)
  • Labels and values that were difficult to scan quickly

The objective was to make the card resemble a professional online marketplace.


Step 1: Improve the Auction Details Layout

The auction details were converted into a definition list (<dl>), making the labels and values much easier to align.

Instead of using several independent paragraphs, the HTML now groups related information together.

Example:

<dl class="flipnzee-auction-meta">

    <dt>Start Price</dt>
    <dd>...</dd>

    <dt>Current Bid</dt>
    <dd>...</dd>

    <dt>Buy Now</dt>
    <dd>...</dd>

    <dt>Auction Ends</dt>
    <dd>...</dd>

</dl>

This produces a much cleaner appearance.


Step 2: Format Currency Values

Instead of printing plain numbers such as

111
333
0

the values are now formatted using WordPress’s localization function.

Example:

<?php echo esc_html( '$' . number_format_i18n( $auction['start_price'], 0 ) ); ?>

Similarly,

<?php echo esc_html( '$' . number_format_i18n( $auction['current_bid'], 0 ) ); ?>

and

<?php echo esc_html( '$' . number_format_i18n( $auction['buy_now_price'], 0 ) ); ?>

Now the auction card displays

$111
$0
$333

which immediately looks more professional.


Step 3: Display a Friendly Auction End Date

Previously, the auction end date appeared exactly as stored in the database.

Example:

2026-07-03 06:29:00

A visitor does not need to see the database timestamp.

Instead, the value is formatted before displaying it.

<?php
echo esc_html(
    date_i18n(
        'd M Y',
        strtotime( $auction['auction_end'] )
    )
);
?>

The visitor now sees

03 Jul 2026

which is much easier to read.


Step 4: Style the Definition List

CSS was added to create two neat columns.

Example:

.flipnzee-auction-meta {
    display: grid;
    grid-template-columns: 1fr auto;
    gap: 12px 20px;
}

.flipnzee-auction-meta dt {
    font-weight: 600;
}

.flipnzee-auction-meta dd {
    margin: 0;
    text-align: right;
}

This aligns every label with its corresponding value.


Step 5: Keep the Call-to-Action Prominent

The View Listing button remains at the bottom of the card, giving visitors a clear next step.

The wording is intentional.

Rather than taking users directly to the website being sold, the button takes them to the listing page where they can review:

  • Verified analytics
  • Traffic statistics
  • Pricing
  • Auction details
  • Future bidding functionality

This avoids any confusion about where the visitor is being directed.


Result

The auction card now provides a much cleaner presentation.

Before:

  • Raw prices
  • Raw timestamps
  • Basic formatting

After:

  • Dollar-formatted prices
  • Human-readable auction dates
  • Better aligned labels and values
  • Improved visual hierarchy
  • More professional marketplace appearance

What We Learned

Small formatting improvements can significantly enhance the perceived quality of a marketplace.

Visitors usually decide within a few seconds whether a listing looks trustworthy. Clear prices, readable dates, and a well-organized layout contribute to a better user experience and help build confidence in the platform.


Source Code

The primary changes were made in:

  • includes/class-shortcodes.php
  • assets/css/frontend.css

Download Source Code

Download the completed version after this lesson:


Next Lesson

In Lesson 41, we’ll begin integrating Flipnzee Analytics into the auction cards themselves, displaying key verified metrics such as Users, Sessions, and Google Impressions directly on the marketplace. This will highlight one of Flipnzee’s unique advantages: allowing buyers to evaluate website performance before even opening the full listing page.

Implementing Lesson 38: Creating Your First Frontend Auction Shortcode in the Flipnzee Auctions Plugin

After completing the backend auction management features in previous lessons, it was time to make our auction data visible to website visitors. In this lesson, we created our first frontend shortcode that retrieves active auctions from the database and displays them on any WordPress page or post.

Although the first version is intentionally simple, it establishes the foundation for building a professional auction marketplace.


What We Built

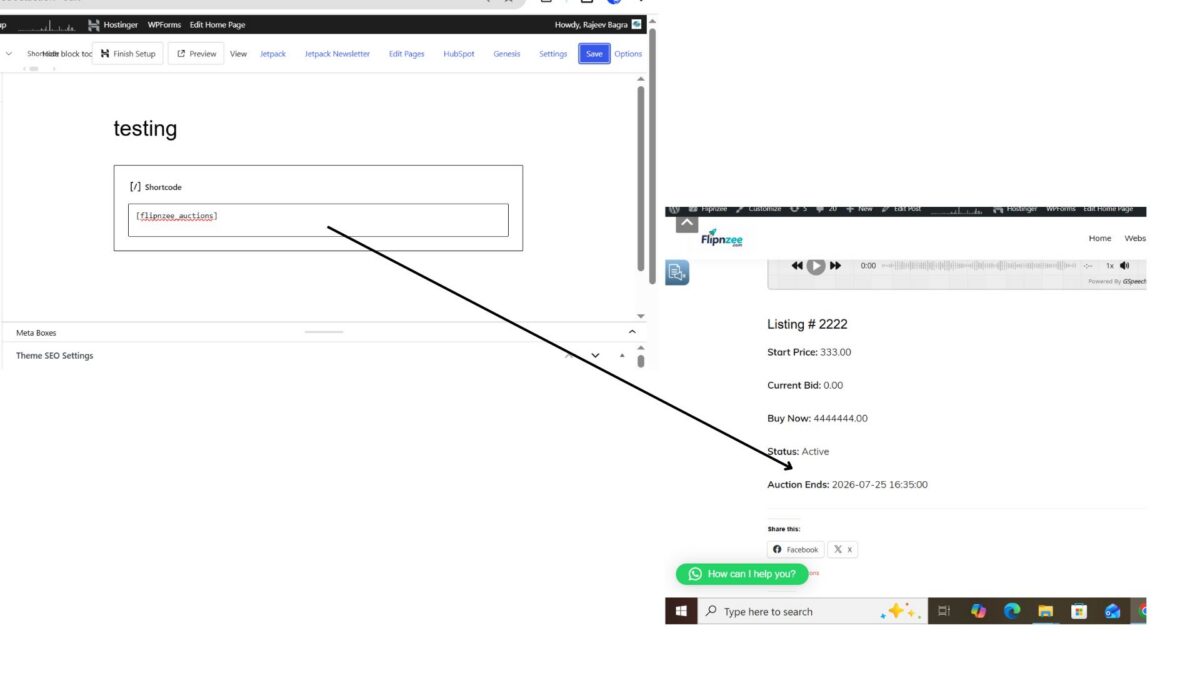
At the end of this lesson, visitors can insert the following shortcode into any page or post:

[flipnzee_auctions]

When the page is viewed, the plugin automatically retrieves all active auctions and displays information such as:

  • Listing ID
  • Start Price
  • Current Bid
  • Buy Now Price
  • Auction Status
  • Auction End Time

Step 1: Create a Shortcodes Class

Instead of placing shortcode logic inside the main plugin file, we created a dedicated class.

File created:

includes/class-shortcodes.php

This keeps the plugin organized and makes future shortcode development much easier.


Step 2: Register the Shortcode

Inside the class constructor we registered our shortcode.

add_shortcode(
    'flipnzee_auctions',
    array( $this, 'auction_list_shortcode' )
);

Now WordPress knows which function to execute whenever it encounters:

[flipnzee_auctions]

Step 3: Load the Shortcodes Class

Next, we loaded the new class from the main plugin file.

require_once FLIPNZEE_AUCTION_PATH . 'includes/class-shortcodes.php';

Then initialized it.

new Flipnzee_Shortcodes();

Without these two steps, WordPress would never register the shortcode.


Step 4: Retrieve Active Auctions

Inside the shortcode callback, we called the Auction Manager.

$auctions = Flipnzee_Auction_Manager::get_active_auctions();

This keeps all database operations inside the Auction Manager instead of mixing SQL with presentation logic.

Keeping responsibilities separate makes the plugin much easier to maintain.


Step 5: Handle Empty Results

If no active auctions exist, the shortcode returns a friendly message.

if ( empty( $auctions ) ) {

    return '<p>No active auctions found.</p>';
}

This provides a much better user experience than displaying an empty page.


Step 6: Loop Through Auctions

The shortcode loops through every active auction.

Example:

foreach ( $auctions as $auction ) {

    // Display auction details.
}

For each auction we displayed several fields stored in the database.


Step 7: Display Auction Information

The first version displays:

  • Listing ID
  • Start Price
  • Current Bid
  • Buy Now Price
  • Status
  • Auction End Date

Although simple, it proves that our shortcode successfully retrieves data from the database.


Step 8: Test the Shortcode

We created a temporary WordPress post named:

testing

Inside the post we inserted:

[flipnzee_auctions]

Initially the page displayed:

No active auctions found.

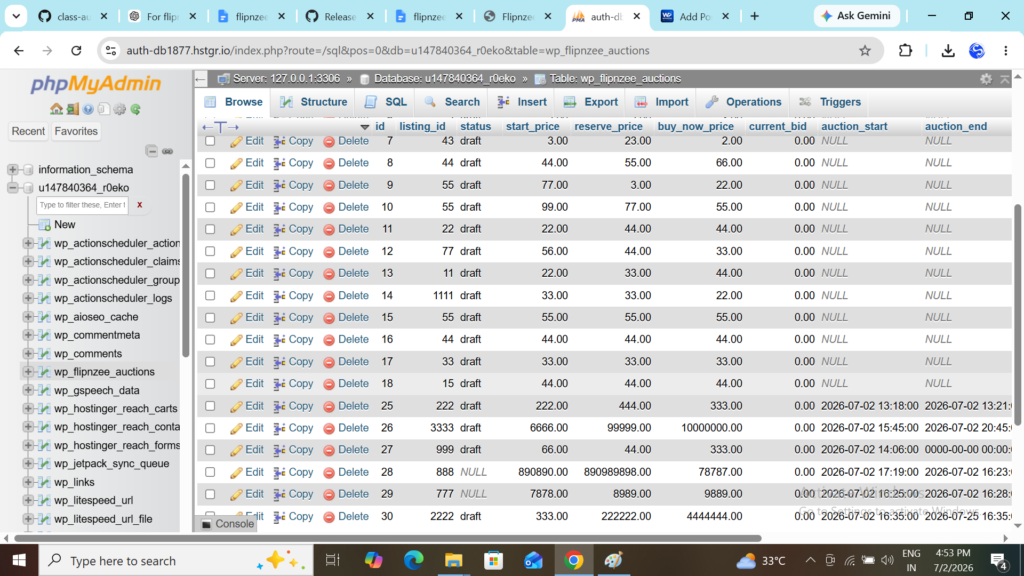
This was expected because every auction in the database still had the status:

draft

Step 9: Activate an Auction

For testing purposes, we manually changed one auction in phpMyAdmin.

status

draft
↓

active

After refreshing the page, the shortcode immediately displayed the auction.

This confirmed that:

  • the shortcode was registered correctly,
  • the database query worked,
  • the Auction Manager returned the correct records,
  • and the frontend output functioned as expected.

Final Result

The completed shortcode successfully displayed information similar to:

Listing #2222

Start Price: 333.00

Current Bid: 0.00

Buy Now: 4444444.00

Status: Active

Auction Ends:
2026-07-25 16:35:00

This marks the first working frontend feature of the Flipnzee Auctions plugin.


Lessons Learned

During this implementation, several important WordPress concepts became clearer:

  • Create dedicated classes for related functionality.
  • Register shortcodes using add_shortcode().
  • Keep database queries inside manager classes.
  • Separate business logic from presentation.
  • Always handle empty results gracefully.
  • Test shortcodes with real database records.

Tips for Beginners

  • Always build the simplest working version before focusing on appearance.
  • Test with actual database records rather than assuming the code is wrong.
  • If a shortcode displays “No active auctions found,” first verify the database contains records with status = 'active'.
  • Keeping your code modular now will make future features much easier to add.

Download Source Code

Download the starting version of the plugin before the lesson:

Download the completed version after this lesson:


What’s Next?

Our shortcode works, but it still displays plain text. In the next lesson, we’ll start transforming this output into attractive auction cards by showing website titles, featured images, and better formatting so the frontend begins to resemble a real website marketplace.

Every professional marketplace starts with a simple data listing. By completing this lesson, you’ve built the foundation on which all future frontend auction features will be added.

Implementation Lesson 35: Manually Activate Scheduled Auctions in the Flipnzee Auctions Plugin

In the previous lesson, we added Auction Start and Auction End scheduling fields to our auctions. However, simply storing these dates in the database is not enough. The plugin also needs a mechanism to activate auctions when their scheduled start time arrives.

In this implementation lesson, we built the first version of that mechanism by adding a Manual Auction Activation feature.

Although the final version will eventually run automatically using WordPress Cron, implementing a manual activation tool first makes development, testing, and debugging much easier.


What We Built

By the end of this lesson, our plugin can:

  • Store scheduled auction start dates.
  • Compare scheduled start dates with the current WordPress time.
  • Activate eligible auctions.
  • Provide an administrator button to run the activation process manually.
  • Lay the foundation for future automation.

Step 1: Create the Activation Function

Inside class-auction-manager.php, we created a new method:

public static function activate_scheduled_auctions()

This method:

  • Retrieves the current WordPress time.
  • Searches for auctions whose:
    • status is draft
    • Auction Start has passed
  • Updates their status to:
active

Step 2: Use a Single SQL UPDATE Query

Instead of loading every auction into PHP, we used one efficient SQL query.

The query updates every matching auction in one operation.

Benefits include:

  • Better performance
  • Cleaner code
  • Easier maintenance
  • Scales well for hundreds or thousands of auctions

Step 3: Add a Dashboard Button

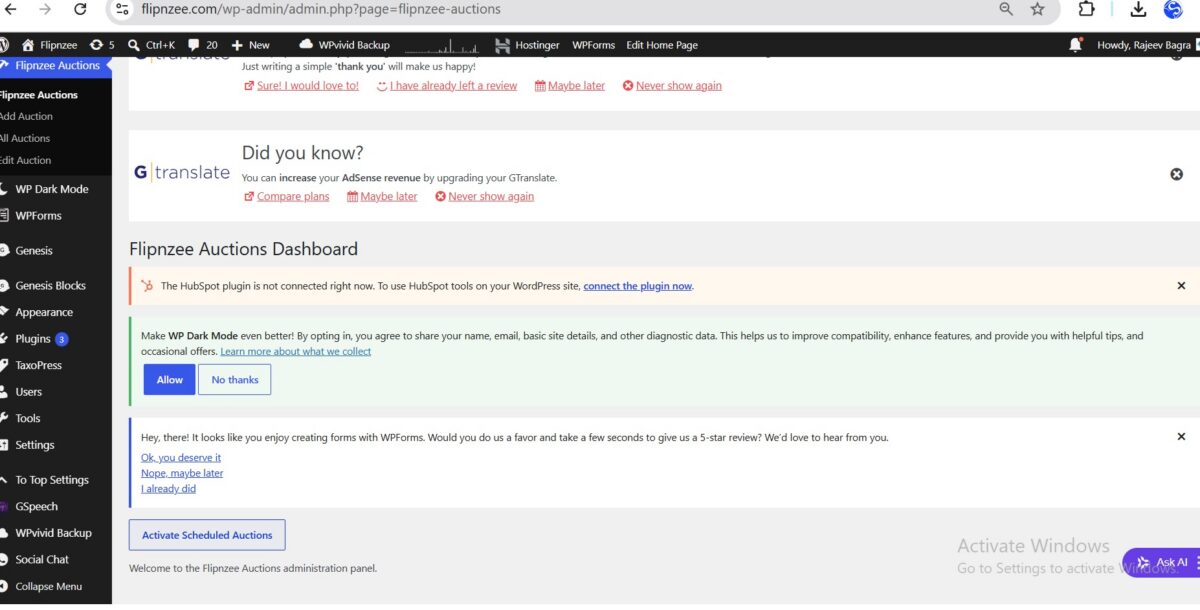
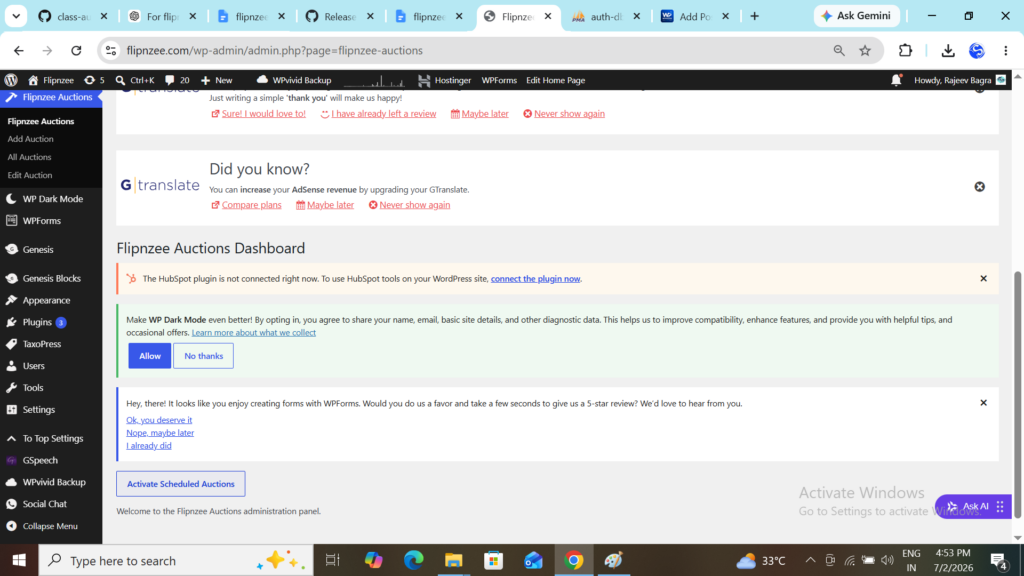
Inside the Flipnzee Auctions dashboard, we added a new button:

Activate Scheduled Auctions

Clicking this button executes the activation process immediately.

This allows us to verify our scheduling logic before introducing automatic background processing.


Step 4: Register a Secure Admin Action

We registered a custom admin action using:

admin_post_flipnzee_activate_scheduled_auctions

The handler performs several important tasks:

  • Capability check
  • Nonce verification
  • Calls the activation function
  • Redirects back to the dashboard

This follows standard WordPress security practices.


Step 5: Add Nonce Protection

Every activation request includes a WordPress nonce.

Before processing, the plugin verifies that the request originated from the WordPress administration area.

This prevents Cross-Site Request Forgery (CSRF) attacks.


Step 6: Test the Feature

Testing involved:

  • Creating multiple auctions
  • Assigning different Auction Start dates
  • Saving them
  • Clicking Activate Scheduled Auctions
  • Verifying database values using phpMyAdmin

This confirmed that our activation logic was executing correctly.


Debugging an Unexpected Issue

During testing, auctions were not changing from Draft to Active, even though their scheduled start times had already passed.

Instead of assuming the SQL query was incorrect, we debugged the process step by step.


Checking the Database

Using phpMyAdmin, we verified that:

  • Auction Start values were stored correctly.
  • Auction End values were stored correctly.
  • Auction status remained draft.

This confirmed that the data itself was not the problem.


Verifying the SQL Logic

Next, we reviewed the SQL UPDATE statement.

The query correctly selected auctions where:

  • status = draft
  • auction_start <= current WordPress time

No issues were found in the SQL itself.


Inspecting the Current WordPress Time

To isolate the issue, we temporarily added:

wp_die( current_time( 'mysql' ) );

This allowed us to display the exact time that WordPress was using during the activation process.

The output revealed that WordPress was using a different timezone than expected.


Root Cause

The activation logic depended on:

current_time( 'mysql' )

while the stored auction schedule had been entered using local time.

As a result:

  • Auction Start appeared to be in the future.
  • The SQL condition never matched.
  • No auctions were activated.

The activation function itself was working correctly.


Lessons Learned

This debugging session reinforced several important development principles.

Instead of immediately changing the SQL query, we:

  • Verified the stored database values.
  • Confirmed the SQL logic.
  • Checked the current application time.
  • Identified the real source of the problem.

This systematic approach saved considerable time and prevented unnecessary code changes.


Why We Built Manual Activation First

Eventually, auctions should activate automatically.

However, during development, a manual activation tool provides several advantages:

  • Easier debugging
  • Immediate testing
  • No dependency on WP-Cron
  • Faster development cycle

Once the activation logic has been thoroughly tested, replacing the manual button with automatic scheduling becomes straightforward.


What’s Next?

In the next lesson, we’ll complete the scheduling workflow by implementing Manual Auction Closing.

Auctions whose scheduled end time has passed will automatically transition from Active to Closed, laying another important foundation for a production-ready auction platform.


Download Source Code

Download the starting version before this lesson:

Download the completed version after implementing this lesson:

Implementation Lesson 34: Display Auction Start and End Dates in the Auctions Table

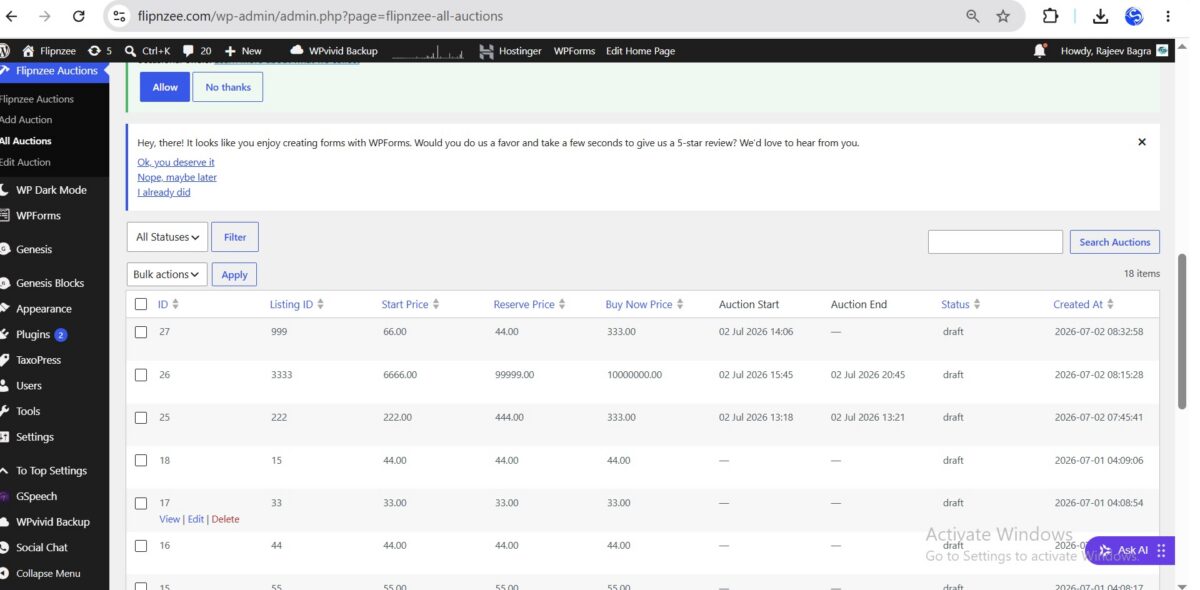
In the previous lesson, we added Auction Start and Auction End fields to the Add Auction and Edit Auction forms. However, administrators still could not see these values from the All Auctions page.

In this implementation lesson, we’ll enhance the auction management table by displaying both dates in a clean, human-readable format. We’ll also ensure that missing or invalid dates are handled gracefully.


What We’ll Build

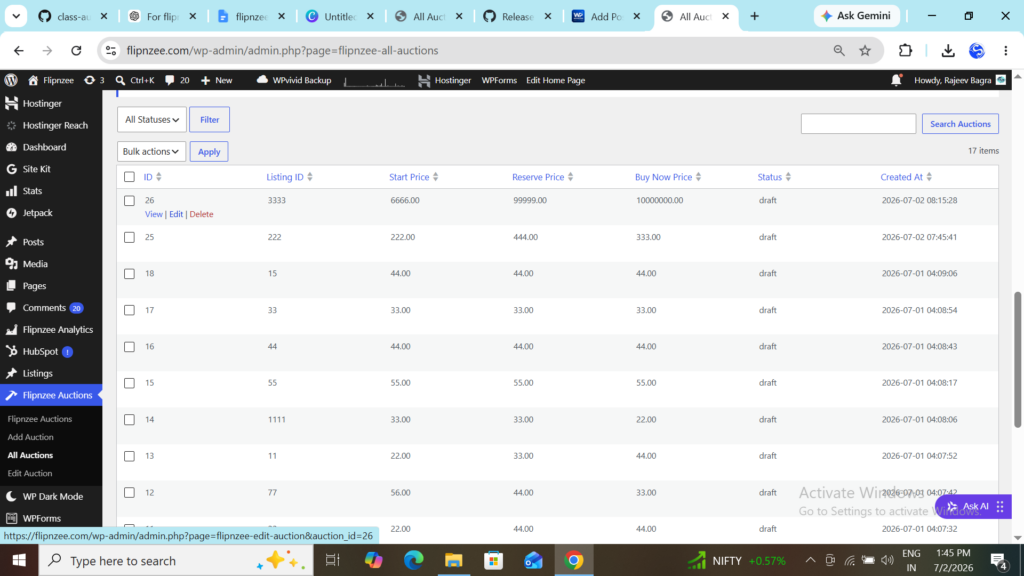
By the end of this lesson, the All Auctions table will display:

  • Auction Start
  • Auction End
  • Properly formatted dates
  • A dash (—) whenever no date has been configured

Instead of displaying raw database values such as:

2026-07-02 14:06:00

the table will display:

02 Jul 2026 14:06

which is much easier for administrators to read.


Step 1: Add the New Columns

Open:

admin/class-auctions-table.php

Locate the get_columns() method.

Add two new columns:

'auction_start' => 'Auction Start',
'auction_end'   => 'Auction End',

Your auctions table will now include two additional headings.


Step 2: Format the Dates

Locate the column_default() method.

Instead of returning the raw database value, we’ll format the dates using WordPress’ wp_date() function.

For the Auction Start column:

case 'auction_start':

    $timestamp = strtotime( $item->auction_start );

    if (
        empty( $item->auction_start ) ||
        '0000-00-00 00:00:00' === $item->auction_start ||
        false === $timestamp
    ) {
        return '—';
    }

    return wp_date(
        'd M Y H:i',
        $timestamp
    );

Repeat the same logic for the Auction End column:

case 'auction_end':

    $timestamp = strtotime( $item->auction_end );

    if (
        empty( $item->auction_end ) ||
        '0000-00-00 00:00:00' === $item->auction_end ||
        false === $timestamp
    ) {
        return '—';
    }

    return wp_date(
        'd M Y H:i',
        $timestamp
    );

Why Use wp_date()?

Although PHP provides the date() function, WordPress recommends using wp_date() because it:

  • Respects the site’s configured timezone
  • Produces consistent output across WordPress
  • Follows WordPress coding standards
  • Makes plugins more portable

Step 3: Handle Missing Dates Gracefully

Many auctions may not yet have a configured start or end time.

Instead of showing confusing values like:

0000-00-00 00:00:00

or

30 Nov -0001 00:00

our implementation simply displays:

—

This creates a much cleaner interface for administrators.


Step 4: Make the Columns Sortable

To improve usability, add the new columns to the sortable columns list.

Inside get_sortable_columns():

'auction_start' => array( 'auction_start', false ),
'auction_end'   => array( 'auction_end', false ),

Then update the list of allowed database columns inside:

includes/class-auction-manager.php

Add:

'auction_start',
'auction_end',

to the $allowed_columns array.

This allows administrators to sort auctions by either start or end date.


Step 5: Test the Implementation

Create a few auctions with different schedules.

Verify that:

  • Auction Start displays correctly.
  • Auction End displays correctly.
  • Empty dates display as —.
  • Clicking the column headings sorts the table.
  • Existing auctions without dates continue to work normally.

Final Result

The All Auctions page now provides administrators with immediate visibility into the auction schedule without opening each auction individually.

The table is easier to scan, easier to sort, and provides a much more professional management experience.


Troubleshooting Tips

If you encounter unexpected date values:

  • Verify that the database contains valid DATETIME values.
  • Use wp_date() instead of date().
  • Check that strtotime() returns a valid timestamp.
  • Display — whenever the date is empty, invalid, or equal to 0000-00-00 00:00:00.

A quick syntax check can also help before packaging the plugin:

php -l admin/class-auctions-table.php

If the command reports:

No syntax errors detected

your PHP syntax is valid.


What We Learned

In this lesson, we learned how to:

  • Extend a custom WP_List_Table
  • Add new columns to an admin table
  • Format database dates for display
  • Use wp_date() following WordPress best practices
  • Handle empty and invalid dates gracefully
  • Make custom columns sortable

These improvements make the Flipnzee Auctions plugin feel much closer to a polished, production-ready WordPress plugin while laying the groundwork for future features such as automatic auction activation, countdown timers, and bid management.

Download Source Code

Download the starting version of the plugin before the lesson:

Download the completed version after this lesson:

Lesson 33 Implementation: Adding Auction Scheduling (Start & End Date/Time)

In Lesson 33, we transformed the Flipnzee Auctions plugin from a basic auction management system into one capable of supporting scheduled auctions.

Instead of auctions existing only in a draft, active, or closed state, administrators can now define exact start and end dates. This lays the foundation for future automation, where auctions will open and close automatically without manual intervention.


What We Implemented

During this lesson we added support for:

  • Auction Start Date & Time
  • Auction End Date & Time
  • Saving schedule information while creating auctions
  • Editing scheduled auctions
  • Updating the schedule after creation
  • Database support for scheduling

This is a major step toward building a production-ready auction platform.


Step 1 – Extend the Database

The first task was updating the auction table to store scheduling information.

Inside includes/class-database.php we added two new columns:

auction_start DATETIME NULL,
auction_end DATETIME NULL,

These fields allow every auction to have:

  • Start date
  • End date

Both fields are optional, making the feature flexible.


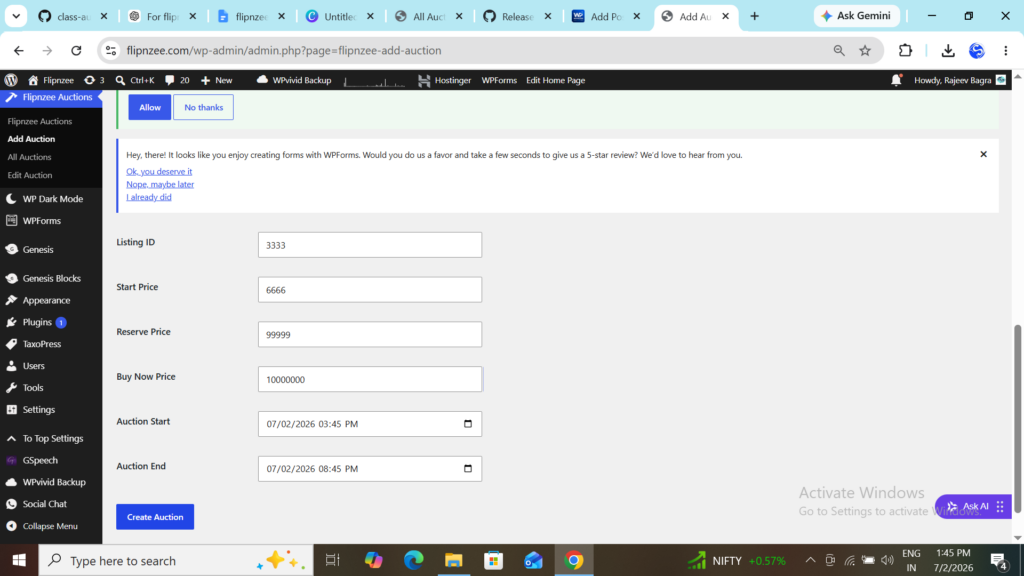
Step 2 – Update the Add Auction Form

Next we modified the Add Auction screen.

Two new fields were added:

  • Auction Start
  • Auction End

Both use HTML5’s built-in datetime picker.

<input type="datetime-local">

Benefits:

  • Native browser calendar
  • Native time selector
  • No JavaScript library required

Step 3 – Save the Schedule

Adding form fields is not enough.

We also updated:

admin/class-admin-posts.php

to read:

$_POST['auction_start']
$_POST['auction_end']

The values are sanitized using:

sanitize_text_field()

before being sent to the Auction Manager.


Step 4 – Update create_auction()

The next task was modifying:

Flipnzee_Auction_Manager::create_auction()

Its function signature changed from:

create_auction(
    $listing_id,
    $start_price,
    $reserve_price,
    $buy_now_price
)

to:

create_auction(
    $listing_id,
    $start_price,
    $reserve_price,
    $buy_now_price,
    $auction_start,
    $auction_end
)

The SQL INSERT statement now stores:

'auction_start'
'auction_end'

alongside the other auction fields.


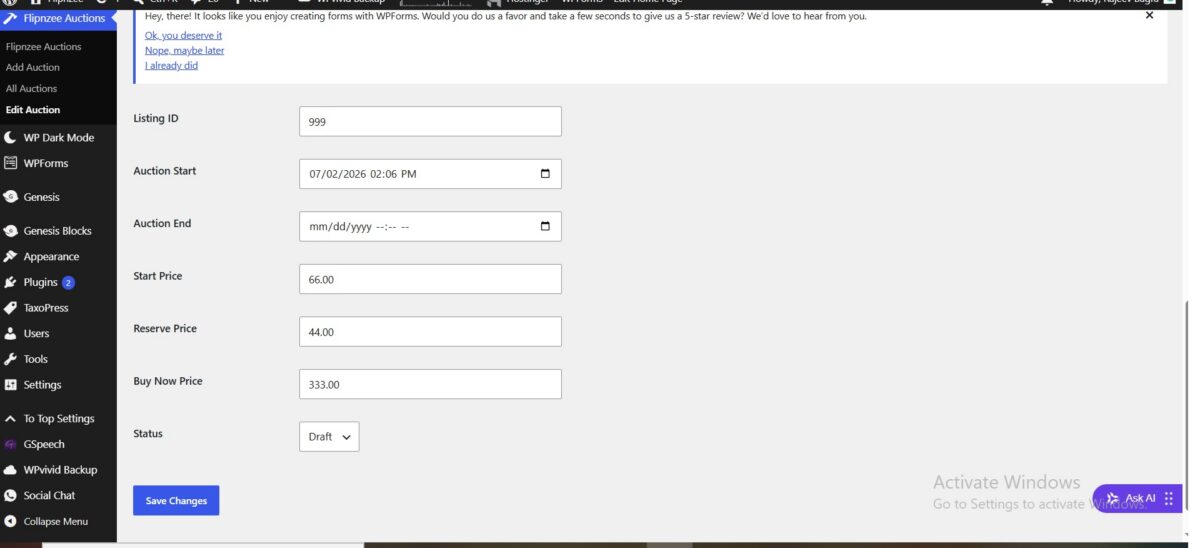
Step 5 – Update the Edit Auction Screen

Once scheduling could be saved, administrators also needed the ability to edit it.

Inside:

admin/class-admin.php

we added two additional form fields:

  • Auction Start
  • Auction End

The stored values are displayed using:

str_replace(
    ' ',
    'T',
    $auction->auction_start
)

This converts the MySQL format:

2026-07-02 14:30:00

into the format expected by HTML5:

2026-07-02T14:30

Without this conversion, the datetime picker would appear empty.


Step 6 – Update update_auction()

The update method also required changes.

Its function signature was expanded to accept:

$auction_start
$auction_end

The SQL UPDATE statement now saves:

'auction_start'
'auction_end'

along with:

  • Listing ID
  • Prices
  • Status

This allows administrators to modify auction schedules after creation.


Step 7 – Verify Everything

After completing the implementation we tested:

Creating Auctions

✔ Auction created successfully.

Editing Auctions

✔ Auction Start displayed correctly.

✔ Auction End displayed correctly.

Saving Changes

✔ Updated schedule persisted successfully.

No PHP syntax errors were reported during testing.


What We Learned

This lesson introduced several useful concepts:

  • Extending existing database tables
  • Working with HTML5 datetime inputs
  • Handling date/time values safely
  • Updating SQL INSERT statements
  • Updating SQL UPDATE statements
  • Passing additional parameters between classes
  • Displaying MySQL datetime values inside HTML forms

Current Progress

The plugin now supports:

  • Creating auctions
  • Editing auctions
  • Searching auctions
  • Sorting auctions
  • Status filtering
  • Bulk deletion
  • Auction scheduling

The scheduling functionality is now fully functional from an administrator’s perspective.

Download Source Code

Download the starting version of the plugin before the lesson:

Download the completed version after this lesson:

What’s Next?

In the next lesson, we’ll complete the scheduling feature by displaying Auction Start and Auction End directly in the All Auctions table. This will allow administrators to view an auction’s schedule at a glance without opening the edit screen.

After that, we’ll be ready to begin implementing automatic auction opening and closing, bringing the plugin one step closer to a production-ready auction platform.

Lesson 32 Implementation – Adding a Fully Functional Status Filter to the Auctions Table

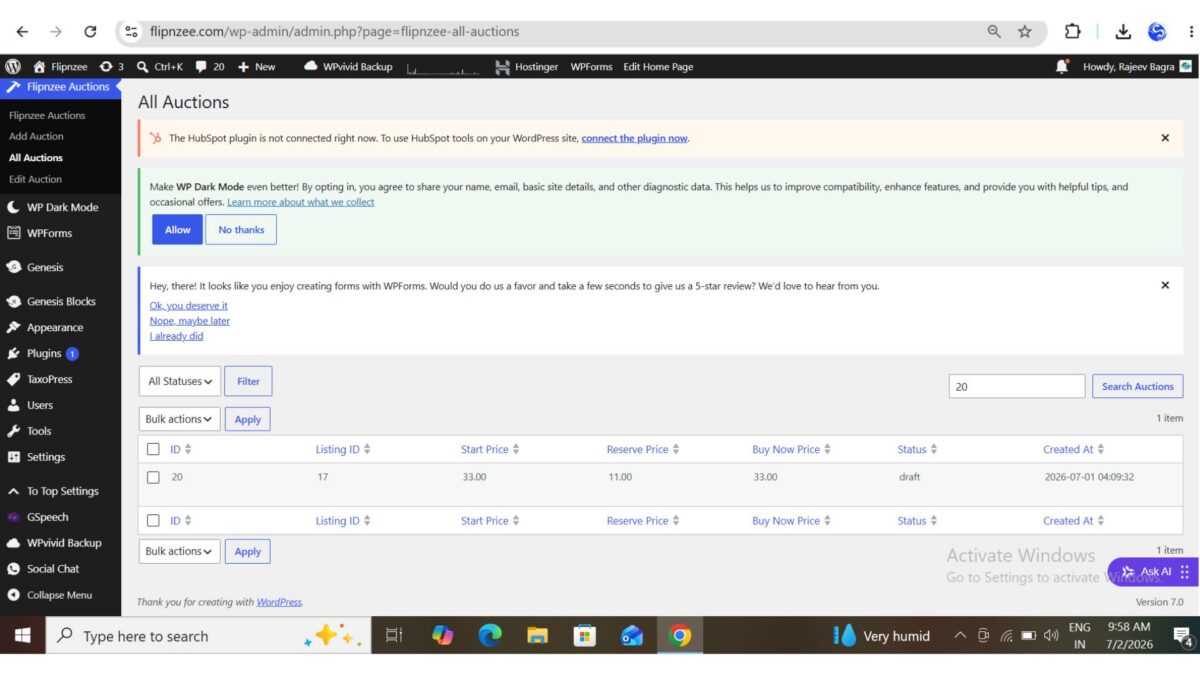
In the previous lesson, we added the Status dropdown above the auctions table. Although the user interface looked complete, the filter was only partially functional. Selecting a status displayed filtered results, but the search box and pagination count did not always stay synchronized.

In this lesson, we’ll complete the implementation by making the Status Filter, Search Box, and Pagination work together seamlessly.


Prerequisites

Before starting, ensure you have completed:

  • Lesson 29 – Bulk Actions
  • Lesson 30 – Bulk Delete
  • Lesson 31 – Adding a Status Filter Dropdown

Step 1 – Read the Selected Status

Open:

admin/class-auctions-table.php

Inside the prepare_items() method, read the selected status.

$status = isset( $_GET['status'] )
	? sanitize_text_field(
		wp_unslash( $_GET['status'] )
	)
	: '';

Using sanitize_text_field() and wp_unslash() follows WordPress coding standards and safely processes user input.


Step 2 – Pass the Status to the Count Query

Previously we counted auctions using only the search keyword.

Replace:

$total_items = Flipnzee_Auction_Manager::count_auctions(
	$search
);

with:

$total_items = Flipnzee_Auction_Manager::count_auctions(
	$search,
	$status
);

Now the pagination count knows which status is currently selected.


Step 3 – Pass Status to get_all_auctions()

Next, update the method call that loads auction records.

Replace:

$this->items = Flipnzee_Auction_Manager::get_all_auctions(
	$per_page,
	$offset,
	$search,
	$orderby,
	$order
);

with:

$this->items = Flipnzee_Auction_Manager::get_all_auctions(
	$per_page,
	$offset,
	$search,
	$status,
	$orderby,
	$order
);

The status value is now available inside the database query.


Step 4 – Update get_all_auctions()

Open:

includes/class-auction-manager.php

Modify the function signature.

Replace:

public static function get_all_auctions(
	$per_page = 20,
	$offset = 0,
	$search = '',
	$orderby = 'created_at',
	$order = 'DESC'
)

with:

public static function get_all_auctions(
	$per_page = 20,
	$offset = 0,
	$search = '',
	$status = '',
	$orderby = 'created_at',
	$order = 'DESC'
)

The function can now receive the selected status.


Step 5 – Filter by Status

Inside get_all_auctions(), add SQL logic that filters records when a status is selected.

For example:

  • Draft → Draft auctions only
  • Active → Active auctions only
  • Closed → Closed auctions only

When no status is selected, the original query continues to return all auctions.


Step 6 – Support Search and Status Together

One important improvement is allowing both filters to work simultaneously.

Instead of choosing between Search or Status, the query now supports both.

Example:

SearchStatusResult
20DraftDraft auction containing “20”
LaptopActiveActive Laptop auctions
EmptyClosedAll Closed auctions
EmptyEmptyAll auctions

This creates a much better user experience.


Step 7 – Update count_auctions()

Next, update the counting method.

Change the function signature from:

public static function count_auctions(
	$search = ''
)

to:

public static function count_auctions(
	$search = '',
	$status = ''
)

Now the counting function receives the selected status as well.


Step 8 – Count Filtered Records Correctly

Update the SQL inside count_auctions() so it supports:

  • Search only
  • Status only
  • Search + Status
  • No filters

This ensures the total number of auctions displayed above the table always matches the records shown.

Without this change, the table could display five Draft auctions while the pagination still reported the total number of auctions in the database.


Step 9 – Test the Feature

Verify the following scenarios:

  • All Statuses
  • Draft
  • Active
  • Closed
  • Search only
  • Search + Draft
  • Search + Active
  • Search + Closed

Also verify that pagination continues to display the correct number of filtered records.


Final Result

After completing this lesson, the Auctions table supports:

  • ✅ Status filtering
  • ✅ Search
  • ✅ Search + Status
  • ✅ Pagination
  • ✅ Sorting
  • ✅ Bulk Actions
  • ✅ Bulk Delete

The Auctions management screen now behaves much more like WordPress core list tables, providing administrators with a smoother and more intuitive experience.


What We Learned

In this lesson, we learned how to:

  • Read filter values securely from the URL.
  • Pass filter values through multiple application layers.
  • Extend database methods with additional parameters.
  • Combine multiple filtering conditions safely.
  • Keep pagination synchronized with filtered data.
  • Build a more professional WordPress admin experience.

Download Source Code

Download the starting version of the plugin before the lesson:

Download the completed version after this lesson:

Next Lesson

In Lesson 33, we’ll extend our auction system by adding Start Date/Time and End Date/Time fields. These scheduling options will become the foundation for many future features, including countdown timers, automatic activation, automatic closing, winner selection, and Escrow.com integration.

Lesson 31 Implementation: Adding Status Filters to the Flipnzee Auctions Plugin

In the previous lessons, we enhanced the auction management table with searching, pagination, sortable columns, and bulk actions. As the number of auctions grows, administrators need an easier way to view only auctions in a particular state.

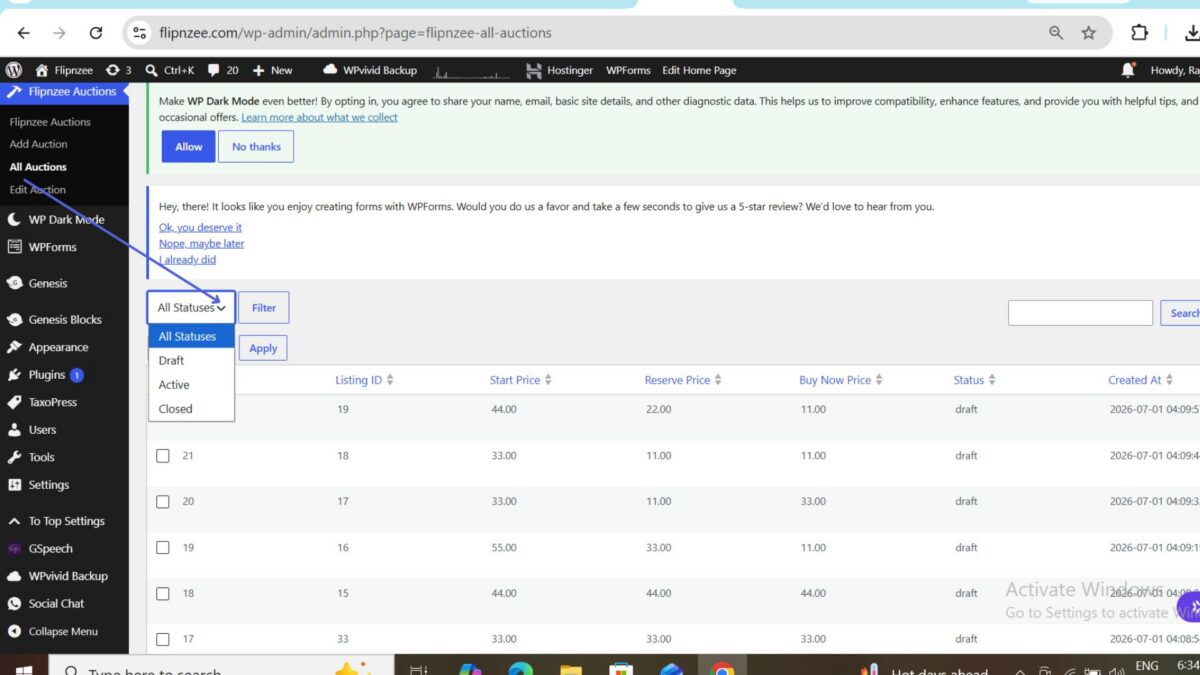
In this lesson, we’ll add a Status Filter that allows administrators to display only Draft, Active, or Closed auctions.


Step 1: Add a Status Filter Dropdown

The first step is to add a filter control above the auction table.

Open:

admin/class-admin.php

Locate the all_auctions_page() method and add a dropdown before the search box.

$status = isset( $_GET['status'] )
	? sanitize_text_field(
		wp_unslash( $_GET['status'] )
	)
	: '';
?>

<select name="status">

	<option value="">All Statuses</option>

	<option
		value="draft"
		<?php selected( $status, 'draft' ); ?>
	>
		Draft
	</option>

	<option
		value="active"
		<?php selected( $status, 'active' ); ?>
	>
		Active
	</option>

	<option
		value="closed"
		<?php selected( $status, 'closed' ); ?>
	>
		Closed
	</option>

</select>

<?php

submit_button(
	'Filter',
	'secondary',
	'',
	false
);

This creates a familiar WordPress-style filter that remembers the selected option after the page reloads.


Step 2: Read the Selected Status

Next, the selected status needs to be available while preparing the table data.

Open:

admin/class-auctions-table.php

Inside the prepare_items() method, read the selected status.

$status = isset( $_REQUEST['status'] )
	? sanitize_text_field(
		wp_unslash( $_REQUEST['status'] )
	)
	: '';

The filter value is sanitized before being used anywhere else in the plugin.


Step 3: Pass the Filter to the Manager Class

The manager class is responsible for retrieving auction records from the database.

Update the method calls inside prepare_items().

$total_items = Flipnzee_Auction_Manager::count_auctions(
	$search,
	$status
);

Likewise, update the method that retrieves the auction list.

$this->items = Flipnzee_Auction_Manager::get_all_auctions(
	$per_page,
	$offset,
	$search,
	$status,
	$orderby,
	$order
);

This allows the selected filter to travel from the user interface to the database layer.


Step 4: Update the Manager Method Signatures

Open:

includes/class-auction-manager.php

Update the method definitions to accept the new $status parameter.

public static function get_all_auctions(
	$per_page = 20,
	$offset = 0,
	$search = '',
	$status = '',
	$orderby = 'created_at',
	$order = 'DESC'
)

Similarly, update the counting method.

public static function count_auctions(
	$search = '',
	$status = ''
)

Step 5: Apply the Status Filter to Database Queries

Modify the SQL queries so that they include the selected status whenever a filter has been chosen.

For example, if the administrator selects Draft, only auctions whose status is draft should be returned.

If All Statuses is selected, the query should continue returning every auction.

This approach keeps the filtering logic entirely inside the manager class.


Step 6: Update the Pagination Count

Pagination should display the number of filtered results instead of the total number of auctions.

For example:

  • 8 Draft auctions
  • 5 Active auctions
  • 12 Closed auctions

Each filtered view should have its own correct page count.


Step 7: Test the Feature

After uploading the updated plugin:

  1. Open Flipnzee Auctions → All Auctions.
  2. Select Draft from the Status dropdown.
  3. Click Filter.
  4. Confirm that only Draft auctions appear.
  5. Repeat the process for Active and Closed.
  6. Finally, choose All Statuses to display every auction again.

Also verify that:

  • Searching continues to work.
  • Sorting still functions correctly.
  • Pagination remains accurate.
  • Bulk actions continue working as expected.

Final Result

The auction management screen now includes a convenient Status filter that allows administrators to quickly narrow the list of auctions.

Instead of manually searching through every record, administrators can instantly display:

  • Draft auctions
  • Active auctions
  • Closed auctions
  • All auctions

This greatly improves usability, especially as the number of auction records grows.


What We Learned

In this lesson, we learned how to:

  • Add a custom filter control to a WordPress admin page.
  • Read filter values from user input safely.
  • Pass filter values through different layers of the plugin.
  • Update manager methods to support filtering.
  • Modify database queries based on selected filters.
  • Keep pagination accurate when filters are applied.
  • Preserve compatibility with searching, sorting, and bulk actions.

The Flipnzee Auctions plugin now provides an even more professional administration experience by allowing auction records to be filtered by status with just a few clicks.

Download Source Code

Download the starting version of the plugin before the lesson:

Download the completed version after this lesson:

Lesson 30 Implementation: Adding Bulk Delete Functionality to the Flipnzee Auctions Plugin

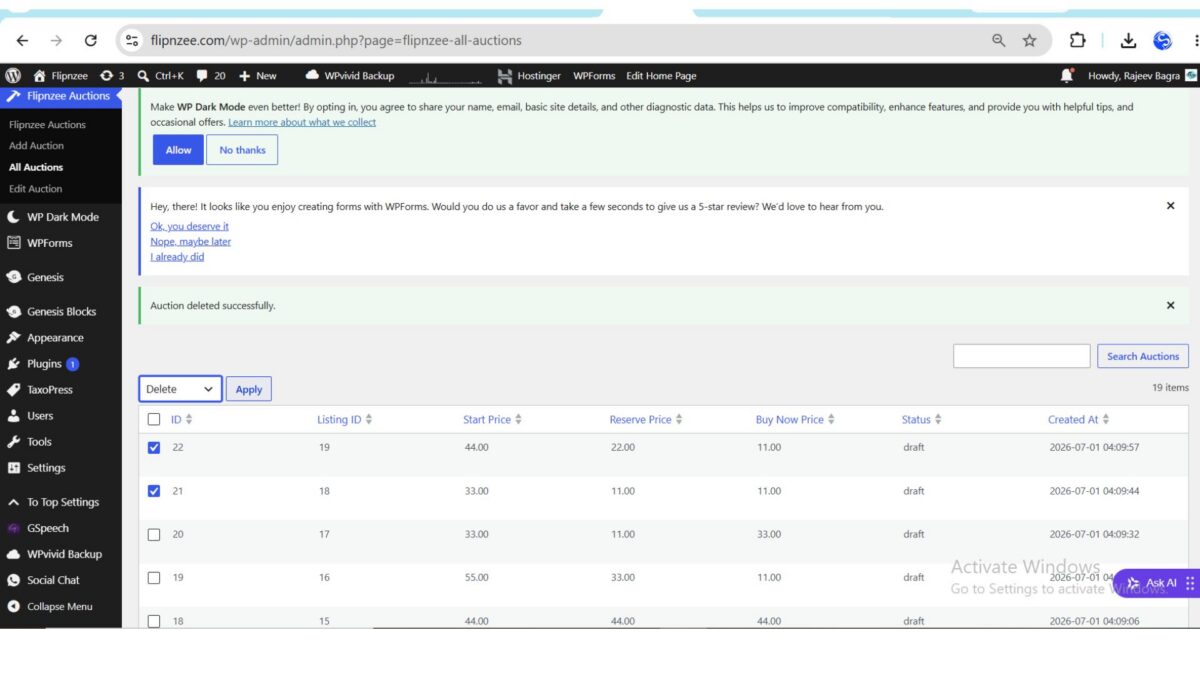
In Lesson 29, we added checkboxes and a Bulk Actions dropdown to the auction management table. Although the interface looked complete, selecting auctions and clicking Apply did not actually perform any action.

In this implementation, we’ll connect the user interface to the database so administrators can securely delete multiple auction records with a single click.


Step 1: Create a Method to Delete Multiple Auctions

The first task was to create a reusable method responsible for deleting multiple auction records from the database.

Inside includes/class-auction-manager.php, a new method named delete_multiple_auctions() was added.

public static function delete_multiple_auctions( $auction_ids ) {

	global $wpdb;

	$table = $wpdb->prefix . 'flipnzee_auctions';

	foreach ( $auction_ids as $auction_id ) {

		$wpdb->delete(
			$table,
			array(
				'id' => absint( $auction_id ),
			),
			array( '%d' )
		);
	}
}

Each submitted auction ID is sanitized using absint() before being passed to $wpdb->delete(), ensuring only valid numeric IDs are processed.


Step 2: Register a Bulk Action Processor

Next, the plugin needed a way to detect when an administrator clicks the Apply button.

Inside the constructor of admin/class-admin.php, a new action hook was registered.

add_action(
	'admin_init',
	array( $this, 'process_bulk_actions' )
);

The admin_init hook executes during every admin request, making it an ideal place to process submitted bulk actions before the page is rendered.


Step 3: Create the Bulk Action Handler

A new method named process_bulk_actions() was then added to the admin class.

The method performs several validation checks before deleting any records.

It verifies:

  • The current user has permission to manage auctions.
  • A bulk action has actually been submitted.
  • The selected action is Delete.
  • At least one auction has been selected.

If any of these conditions fail, the method immediately exits without making changes.


Step 4: Protect the Request with a WordPress Nonce

Security is an essential part of WordPress plugin development.

A nonce field was added to the bulk action form.

wp_nonce_field(
	'flipnzee_bulk_delete',
	'flipnzee_bulk_nonce'
);

This hidden field generates a unique security token that WordPress can later verify.


Step 5: Verify the Nonce

Inside process_bulk_actions(), the submitted nonce is validated before processing any deletion.

if (
	! isset( $_POST['flipnzee_bulk_nonce'] ) ||
	! wp_verify_nonce(
		sanitize_text_field(
			wp_unslash( $_POST['flipnzee_bulk_nonce'] )
		),
		'flipnzee_bulk_delete'
	)
) {
	return;
}

This prevents Cross-Site Request Forgery (CSRF) attacks by ensuring the request originated from the plugin’s own administration page.


Step 6: Retrieve the Selected Auction IDs

The selected auction IDs are submitted as an array.

Each value is sanitized before use.

$auction_ids = array_map(
	'absint',
	wp_unslash( $_POST['auction_ids'] )
);

Using array_map() ensures every submitted value becomes a valid integer.


Step 7: Delete the Selected Auctions

After validation, the manager method is called.

Flipnzee_Auction_Manager::delete_multiple_auctions(
	$auction_ids
);

This loops through every selected auction and removes it from the custom database table.


Step 8: Redirect Back to the Auction List

After completing the deletion, the administrator is redirected back to the auction listing page.

wp_safe_redirect(
	admin_url(
		'admin.php?page=flipnzee-all-auctions&message=deleted'
	)
);

exit;

Using wp_safe_redirect() prevents accidental duplicate submissions if the page is refreshed.


Step 9: Display a Success Message

The existing success notification on the All Auctions page automatically detects the message=deleted query parameter and displays a confirmation message.

Auction deleted successfully.

This provides immediate feedback that the operation completed successfully.


Step 10: Test the Feature

After rebuilding and uploading the plugin, the feature was tested by:

  1. Selecting multiple auctions.
  2. Choosing Delete from the Bulk Actions dropdown.
  3. Clicking Apply.
  4. Confirming that the selected auctions disappeared.
  5. Verifying that the success message appeared.

The implementation worked exactly as expected.


Final Result

The auction management screen now supports professional bulk operations similar to WordPress core.

Administrators can:

  • Select one or many auctions.
  • Delete multiple records with a single action.
  • Receive immediate confirmation after deletion.
  • Benefit from WordPress nonce protection against unauthorized requests.

Combined with pagination, searching, sorting, and row actions implemented in previous lessons, the auction management screen now offers a polished administrative experience.


What We Learned

By completing this implementation, we learned how to:

  • Create reusable database methods for bulk operations.
  • Process submitted bulk actions in the WordPress admin area.
  • Register custom admin hooks.
  • Secure forms using WordPress nonces.
  • Sanitize arrays of submitted IDs.
  • Delete multiple database records safely.
  • Redirect after processing to prevent duplicate submissions.
  • Display success notifications following bulk operations.

With bulk deletion complete, the Flipnzee Auctions plugin now includes one of the most commonly used productivity features found in professional WordPress plugins.

Download Source Code

Download the starting version of the plugin before the lesson:

Download the completed version after this lesson:


Lesson 29 Implementation: Bulk Actions with WP_List_Table

Implementation Walkthrough

In this lesson, the goal was to allow administrators to select multiple auctions at once using checkboxes and prepare the table for bulk operations such as deleting multiple auctions simultaneously. WordPress provides built-in support for bulk actions in WP_List_Table, making this feature straightforward to implement.

Step 1: Add a Checkbox Column

The first step was to add a new checkbox column to the table.

Inside the get_columns() method of admin/class-auctions-table.php, a new column named cb was added as the first column.

public function get_columns() {

	return array(
		'cb'             => '<input type="checkbox" />',
		'id'             => 'ID',
		'listing_id'     => 'Listing ID',
		'start_price'    => 'Start Price',
		'reserve_price'  => 'Reserve Price',
		'buy_now_price'  => 'Buy Now Price',
		'status'         => 'Status',
		'created_at'     => 'Created At',
	);
}

The header checkbox allows administrators to quickly select or deselect every row displayed on the current page.


Step 2: Register the Bulk Actions

Next, the available bulk actions were registered by creating the get_bulk_actions() method.

public function get_bulk_actions() {

	return array(
		'delete' => 'Delete',
	);
}

At this stage only one action—Delete—was added, but additional actions such as Activate, Close Auction, or Export could easily be added later.


Step 3: Display a Checkbox for Every Auction

After registering the bulk actions, a new column_cb() method was added.

public function column_cb( $item ) {

	return sprintf(
		'<input type="checkbox" name="auction_ids[]" value="%d" />',
		absint( $item->id )
	);
}

This method tells WP_List_Table how to render the checkbox for each auction row.

Each checkbox stores the auction’s database ID, making it available when the administrator submits the bulk action form.


Step 4: Verify the Table Still Works

Before uploading the plugin, the PHP syntax was checked.

php -l admin/class-auctions-table.php

The output confirmed that no syntax errors existed.


Step 5: Upload the Updated Plugin

The plugin ZIP was rebuilt and uploaded to WordPress.

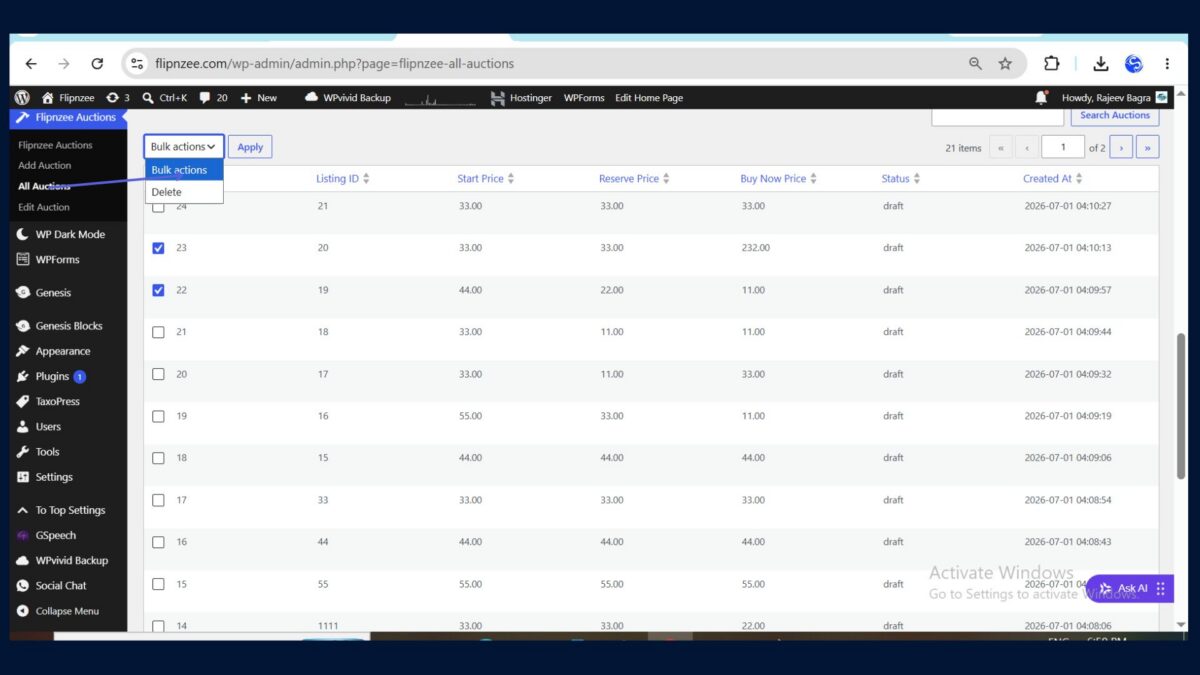
After activation, the All Auctions page immediately displayed:

  • A checkbox beside every auction
  • A “Select All” checkbox in the table header
  • A Bulk Actions dropdown
  • An Apply button

At this stage the Delete action did not yet perform any operation—it simply prepared the interface for the next lesson.


Result

The auction management screen now behaves much more like WordPress’ built-in Posts, Pages, and Media screens.

Administrators can:

  • Select one auction
  • Select multiple auctions
  • Select all auctions on the current page
  • Choose a bulk action from the dropdown
  • Prepare to process multiple records with a single click

Although the Delete option is not functional yet, the user interface is now fully prepared for implementing bulk deletion in the next lesson.


What We Learned

By completing this lesson, we learned how to:

  • Add a checkbox column to a WP_List_Table
  • Register custom bulk actions
  • Create row checkboxes with column_cb()
  • Integrate WordPress’ built-in Bulk Actions dropdown
  • Prepare an admin table for processing multiple records efficiently

With this foundation in place, the next lesson will focus on processing the selected auctions and implementing a secure Bulk Delete feature using WordPress nonces and best practices.

Download Source Code

Download the starting version of the plugin before the lesson:

Download the completed version after this lesson: