Lesson 77 Implementation: Building the Administrator Payment Review Dashboard for Flipnzee Auctions

In the previous lesson, buyers were able to upload payment proof securely through the payment page, with uploaded receipts stored in the WordPress Media Library and linked to the corresponding transaction.

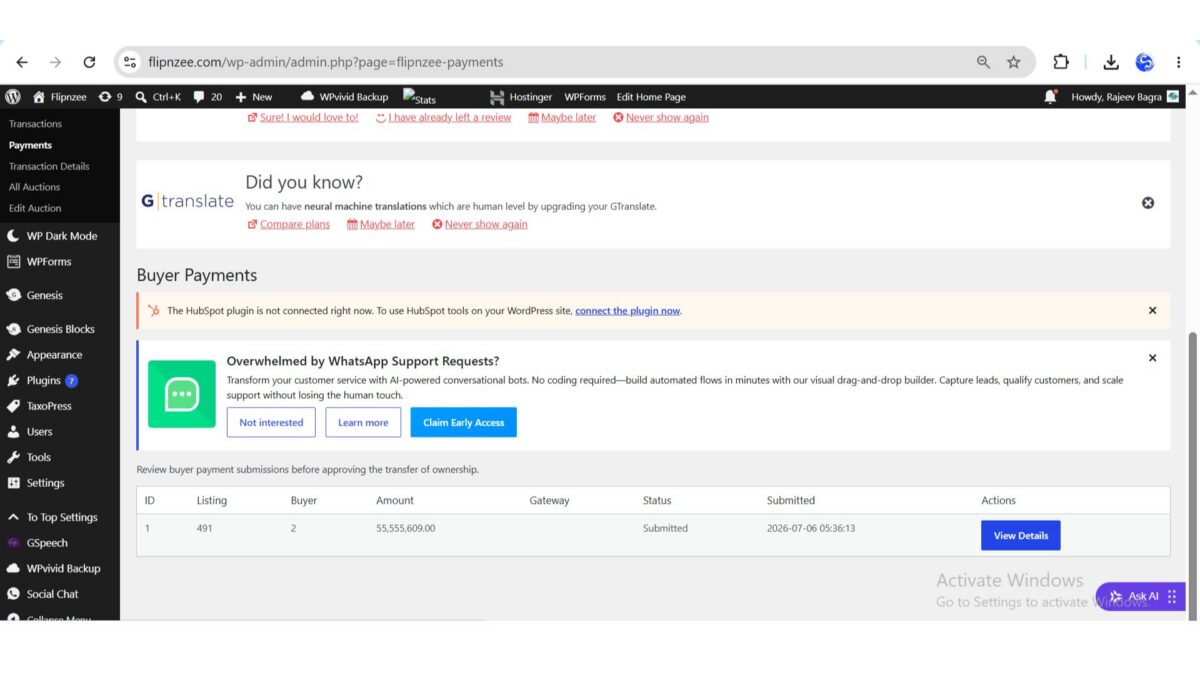
This lesson shifted focus from the buyer to the administrator by introducing a dedicated payment review dashboard. Administrators can now view submitted payments, inspect transaction details, and prepare payments for verification.


Objective

The primary goal of this lesson was to create an administrator interface that allows the Flipnzee team to review buyer payment submissions before approving website ownership transfers.

By the end of this implementation, administrators could:

  • View all submitted payments.
  • Open detailed transaction information.
  • Review payment metadata.
  • Prepare payment status management.
  • Lay the foundation for future payment verification.

Step 1 – Creating the Admin Payments Page

A new administrator page was created.

File created

admin/class-admin-payments.php

The page was implemented as a dedicated admin class.

class Flipnzee_Admin_Payments {

    /**
     * Render Payments page.
     *
     * @return void
     */
    public static function render_page() {

        ?>

        <div class="wrap">

            <h1>Buyer Payments</h1>

            <p>

                Review buyer payment submissions before approving
                the transfer of ownership.

            </p>

        </div>

        <?php
    }
}

This provided a clean starting point for the administrator payment workflow.


Step 2 – Registering the Payments Menu

A new submenu was added beneath the Flipnzee Auctions admin menu.

add_submenu_page(
    'flipnzee-auctions',
    'Payments',
    'Payments',
    'manage_options',
    'flipnzee-payments',
    array(
        'Flipnzee_Admin_Payments',
        'render_page',
    )
);

This created a dedicated Payments section for administrators.


Step 3 – Loading Submitted Payments

The Payments page was connected to the transaction table.

global $wpdb;

$table = $wpdb->prefix . 'flipnzee_transactions';

$payments = $wpdb->get_results(
    "
    SELECT *
    FROM {$table}
    WHERE payment_status = 'submitted'
    ORDER BY updated_at DESC
    "
);

Only transactions that had submitted payment proofs were displayed.


Step 4 – Handling Empty Results

Before rendering the table, the plugin checks whether submitted payments exist.

if ( empty( $payments ) ) {

    echo '<p>No payment submissions found.</p>';

} else {

    // Display payment table.

}

This prevents empty tables and provides useful feedback to administrators.


Step 5 – Building the Payments Table

A professional WordPress admin table was introduced.

<table class="widefat striped">

    <thead>

        <tr>

            <th>ID</th>
            <th>Listing</th>
            <th>Buyer</th>
            <th>Amount</th>
            <th>Gateway</th>
            <th>Status</th>
            <th>Submitted</th>
            <th>Actions</th>

        </tr>

    </thead>

The table closely follows the standard WordPress administration interface.


Step 6 – Displaying Submitted Payments

Each submitted payment is displayed using a loop.

<?php foreach ( $payments as $payment ) : ?>

<tr>

    <td><?php echo esc_html( $payment->id ); ?></td>

    <td><?php echo esc_html( $payment->listing_id ); ?></td>

    <td><?php echo esc_html( $payment->buyer_id ); ?></td>

    <td><?php echo esc_html(
        number_format_i18n(
            $payment->winning_bid,
            2
        )
    ); ?></td>

    <td><?php echo esc_html(
        $payment->payment_gateway
    ); ?></td>

    <td><?php echo esc_html(
        ucfirst( $payment->payment_status )
    ); ?></td>

    <td><?php echo esc_html(
        $payment->updated_at
    ); ?></td>

</tr>

<?php endforeach; ?>

The administrator can immediately identify submitted payments requiring review.


Step 7 – Adding the View Details Button

Instead of displaying placeholder text, each payment now links to a detailed transaction page.

<td>

    <a
        class="button button-primary"
        href="<?php echo esc_url(
            admin_url(
                'admin.php?page=flipnzee-transaction-details&transaction_id=' .
                absint( $payment->id )
            )
        ); ?>">

        View Details

    </a>

</td>

This significantly improves navigation between the payment dashboard and transaction details.


Step 8 – Enhancing the Transaction Details Page

The existing transaction details page was expanded with payment information.

Additional rows were added to display:

<tr>
    <th>Payment Status</th>
    <td><?php echo esc_html(
        ucfirst( $transaction['payment_status'] )
    ); ?></td>
</tr>

<tr>
    <th>Payment Gateway</th>
    <td><?php echo esc_html(
        $transaction['payment_gateway']
    ); ?></td>
</tr>

<tr>
    <th>Payment Submitted</th>
    <td><?php echo esc_html(
        $transaction['payment_submitted_at']
    ); ?></td>
</tr>

Administrators can now review payment-specific information alongside the transaction details.


Step 9 – Creating the Payment Management Section

A dedicated Payment Management panel was introduced.

<h2>Payment Management</h2>

<form
    method="post"
    action="<?php echo esc_url(
        admin_url( 'admin-post.php' )
    ); ?>">

This prepares the interface for future payment verification actions.


Step 10 – Securing the Form

The management form was protected using a WordPress nonce.

wp_nonce_field(
    'flipnzee_update_payment_status',
    'flipnzee_payment_nonce'
);

This ensures only legitimate administrators can submit payment updates.


Step 11 – Payment Status Dropdown

Administrators can now select a payment status.

<select
    name="payment_status"
    id="payment_status">

    <option value="pending">Pending</option>

    <option value="processing">Processing</option>

    <option value="paid">Paid</option>

    <option value="completed">Completed</option>

    <option value="cancelled">Cancelled</option>

    <option value="refunded">Refunded</option>

</select>

Although the update handler will be implemented in the next lesson, the interface is now fully prepared.


Challenges Encountered

Several issues arose during development.

Method Name Mismatch

Initially, the Payments submenu referenced render_page(), while the class still used render().

Standardizing on render_page() resolved the fatal error.


PHP and HTML Mixing

While building the Payment Management form, HTML was accidentally placed inside an open PHP block.

Example:

<?php

wp_nonce_field(...);

<input ...>

Closing PHP before the HTML resolved the syntax error.


Duplicate Status Rows

During iterative development, duplicate Payment Status rows were unintentionally introduced.

Cleaning up duplicate markup produced a clearer transaction details page.


Payment vs Transaction Status

One important architectural decision emerged during development.

The plugin now distinguishes between:

  • status (overall transaction lifecycle)
  • payment_status (buyer payment lifecycle)

This separation prepares the plugin for multiple payment gateways, including Escrow.com, without affecting the broader transaction workflow.


Testing Performed

The implementation was tested by:

  • Opening the new Payments admin menu.
  • Confirming submitted transactions appear in the table.
  • Verifying payment amounts and gateways display correctly.
  • Opening transaction details using the View Details button.
  • Confirming payment metadata is displayed.
  • Checking the Payment Management form renders correctly.
  • Validating PHP syntax after each modification.

Lessons Learned

This implementation reinforced several WordPress development practices:

  • Separate administrator workflows from buyer workflows.
  • Keep transaction management and payment management independent.
  • Use dedicated admin pages instead of overloading existing screens.
  • Secure administrator forms using nonces.
  • Build reusable interfaces that can support additional payment gateways in future.

Download Source Code

Download the starting version of the plugin before the lesson:

Download the completed version after this lesson:


Current Progress

At the end of Lesson 77, the Flipnzee Auctions plugin now includes:

  • ✅ Administrator Payments menu
  • ✅ Submitted Payments dashboard
  • ✅ Payment listing table
  • ✅ View Details navigation
  • ✅ Enhanced transaction details page
  • ✅ Payment metadata display
  • ✅ Payment Management interface
  • ✅ Secure administrator form ready for processing

The actual processing of payment status updates will be completed in the next lesson.


Next Lesson

Lesson 78: Processing Administrator Payment Status Updates

In the next lesson, we will connect the Payment Management form to the backend by:

  • Registering the administrator POST handler.
  • Verifying administrator permissions and nonces.
  • Updating the payment_status field in the database.
  • Redirecting administrators with success messages.
  • Preparing the workflow for payment approval, rejection, and future Escrow.com integration.

This will complete the first functional administrator payment verification workflow in the Flipnzee Auctions plugin.
Lesson 74 Implementation: Displaying Professional Manual Payment Instructions on the Payment Page

After completing the payment gateway selection workflow in the previous lessons, the next improvement was making the payment page more informative for buyers who choose Manual Payment.

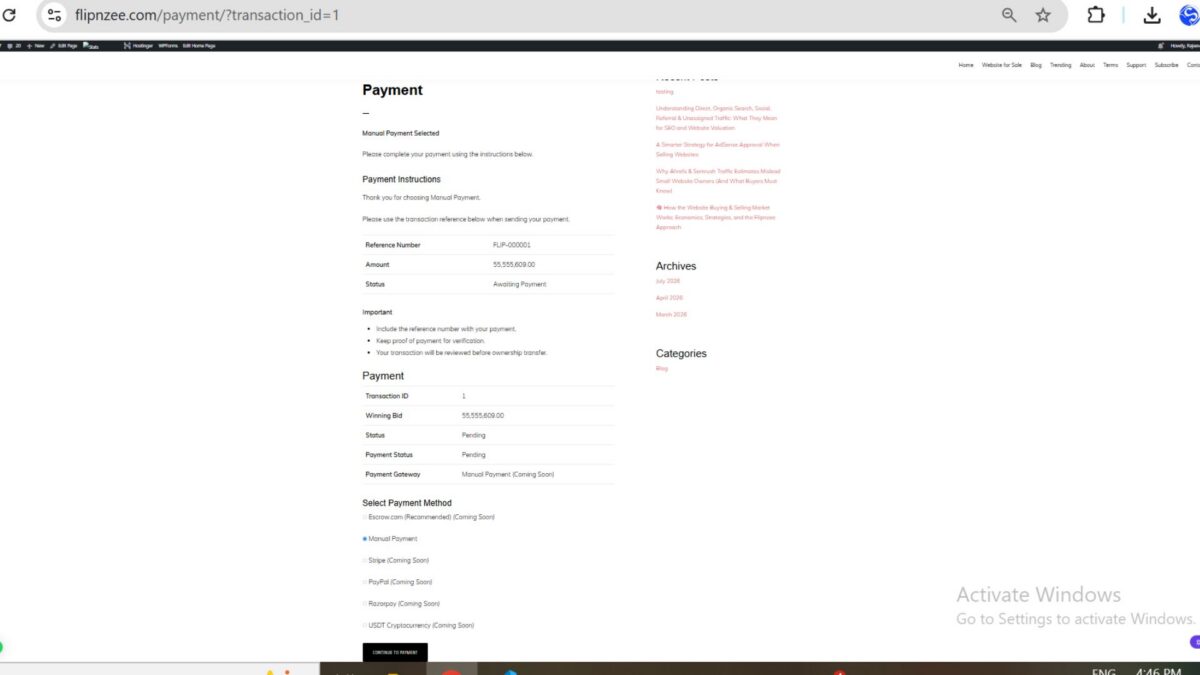
Previously, selecting Manual Payment only displayed a simple confirmation message. In this lesson, the payment page was enhanced to show a professional payment instruction section containing a unique payment reference, payment amount, current status, and important guidance for the buyer.


What We Built

The payment page now displays a dedicated Payment Instructions section whenever the buyer selects Manual Payment.

The section includes:

  • Unique payment reference number
  • Winning bid amount
  • Current payment status
  • Important payment instructions
  • Existing transaction details remain visible below

This provides buyers with the information they need before sending payment.


Step 1 – Detect Manual Payment Selection

After validating the form submission and selected gateway, the payment page checks which payment method the buyer selected.

switch ( $selected_gateway ) {

    case 'manual':

        // Display manual payment instructions.

        break;

    default:

        // Unsupported gateway.

        break;
}

This structure prepares the plugin for adding more gateways like Escrow.com, Stripe, PayPal and USDT in future lessons.


Step 2 – Create the Manual Payment Instruction Section

Inside the Manual Payment case, a dedicated container was added.

<div class="flipnzee-manual-payment">

    <h3>Payment Instructions</h3>

    <p>
        Thank you for choosing Manual Payment.
    </p>

    <p>
        Please use the transaction reference below when sending your payment.
    </p>

</div>

This creates a clear visual separation between payment instructions and transaction information.


Step 3 – Generate a Unique Payment Reference

Instead of using only the transaction ID, a formatted payment reference was generated.

<?php

echo esc_html(

    'FLIP-' . str_pad(

        $transaction->id,

        6,

        '0',

        STR_PAD_LEFT

    )

);

?>

Example:

FLIP-000001

Using a formatted reference looks much more professional and is easier for buyers to include in payment notes.


Step 4 – Display Important Payment Information

A table was created to display the essential payment information.

<table class="widefat striped">

<tr>

    <th>Reference Number</th>

    <td>

        <?php

        echo esc_html(
            'FLIP-' . str_pad(
                $transaction->id,
                6,
                '0',
                STR_PAD_LEFT
            )
        );

        ?>

    </td>

</tr>

<tr>

    <th>Amount</th>

    <td>

        <?php

        echo esc_html(
            number_format_i18n(
                $transaction->winning_bid,
                2
            )
        );

        ?>

    </td>

</tr>

<tr>

    <th>Status</th>

    <td>

        Awaiting Payment

    </td>

</tr>

</table>

This gives buyers an organized summary before making payment.


Step 5 – Add Important Buyer Instructions

An instruction list was added below the payment summary.

<h4>Important</h4>

<ul>

    <li>
        Include the reference number with your payment.
    </li>

    <li>
        Keep proof of payment for verification.
    </li>

    <li>
        Your transaction will be reviewed before ownership transfer.
    </li>

</ul>

These reminders help reduce payment mistakes and prepare buyers for the verification process.


Final Result

After selecting Manual Payment, buyers now see:

  • Professional payment instruction heading
  • Payment reference number
  • Winning amount
  • Awaiting payment status
  • Important payment reminders
  • Original transaction details below

The payment page now feels much closer to a production-ready marketplace instead of a placeholder page.


What I Learned

This lesson demonstrated that payment pages should do much more than simply display transaction details. Buyers need clear instructions, a recognizable payment reference, and confirmation of the amount and status before making payment.

Generating a formatted reference number and presenting information in a structured table significantly improves usability and prepares the payment workflow for future enhancements.

Download Source Code

Download the starting version of the plugin before the lesson:

Download the completed version after this lesson:


What’s Next?

In Lesson 75, we will build the Payment Proof Upload feature, allowing buyers to submit proof of payment after completing a manual transfer. This will move the Flipnzee payment workflow one step closer to a complete marketplace transaction process.

Lesson 69: Adding a Payment Page and Payment Links for Auction Winners in the Flipnzee Auctions Plugin

As the Flipnzee Auctions plugin continues to evolve, one of the next logical improvements was to guide auction winners toward completing their purchase. In previous lessons, buyers could view their purchases and transaction details, but there was no dedicated page to begin the payment process.

In this lesson, a frontend payment page was introduced along with contextual payment links, creating a smoother purchasing experience for buyers.


Objective

The goal of this lesson was to:

  • Create a dedicated Payment page.
  • Add a new payment shortcode.
  • Display a Pay Now action for pending purchases.
  • Keep View Details available for completed purchases.
  • Build the foundation for integrating real payment gateways in future lessons.

Step 1: Created the Payment Page Class

A new file was added:

includes/class-payment-page.php

This class is responsible for rendering the payment page using a shortcode.

It retrieves the transaction ID from the URL, validates the request, and prepares the page for displaying payment-related information.


Step 2: Loaded the New Class

The main plugin file was updated to load the payment page class.

require_once FLIPNZEE_AUCTION_PATH .
    'includes/class-payment-page.php';

This ensures the payment functionality becomes available whenever the plugin loads.


Step 3: Registered a New Shortcode

A new shortcode was registered for the payment page.

Example:

[flipnzee_payment]

This shortcode can be placed on any WordPress page to create a dedicated payment screen.


Step 4: Created the Payment Page

Inside WordPress, a new page named:

Payment

was created.

Its content simply contains:

[flipnzee_payment]

This allows buyers to visit:

https://example.com/payment/

and access their payment page.


Step 5: Added Dynamic Payment Links

The My Purchases table was enhanced with conditional action links.

If a purchase is still pending:

Pay Now

is displayed.

If payment has already been completed:

View Details

is displayed.

This creates a cleaner and more intuitive workflow for buyers.


Step 6: Passed the Transaction ID

When the buyer clicks Pay Now, the transaction ID is automatically included in the URL.

Example:

/payment/?transaction_id=5

The payment page then knows exactly which purchase is being processed.


Step 7: Improved User Experience

Originally, the purchase details shortcode displayed:

Invalid transaction.

when no transaction ID was present.

This was changed so that the shortcode quietly returns nothing instead.

As a result:

  • The My Purchases page remains clean.
  • Purchase details only appear after selecting a specific transaction.

Step 8: Displayed Both Actions for Pending Purchases

To make the interface more useful, pending purchases now display both actions.

Pay Now

View Details

This allows buyers to review their purchase before completing payment.


Testing Performed

The following scenarios were successfully tested:

  • Plugin activation
  • Payment page loading
  • Payment shortcode rendering
  • Pending purchases displaying Pay Now
  • Paid purchases displaying View Details
  • Purchase Details page opening correctly
  • Transaction IDs passed correctly through URLs
  • No PHP syntax errors
  • No fatal errors after implementation

Result

The buyer journey has now become much more complete.

Auction Listing
        ↓
Place Bid
        ↓
Auction Ends
        ↓
Transaction Created
        ↓
My Purchases
        ↓
Pay Now
        ↓
Purchase Details

Although the payment page currently serves as a placeholder, it establishes the structure required for integrating payment gateways such as Stripe, Razorpay, PayPal, or WooCommerce Payments in future lessons.

Download Source Code

Download the starting version of the plugin before the lesson:

Download the completed version after this lesson:


What I Learned

This lesson demonstrated several important WordPress plugin development concepts:

  • Creating additional frontend components using shortcodes.
  • Passing data securely through URL parameters.
  • Building conditional user interfaces based on transaction status.
  • Improving usability by displaying context-sensitive actions.
  • Designing a scalable workflow that can later support real payment gateways.

Conclusion

Lesson 69 transformed the Flipnzee Auctions plugin from simply tracking purchases into guiding buyers through the next stage of the auction process. By introducing a dedicated payment page and dynamic action links, the plugin now provides a more complete end-to-end purchasing experience while laying the groundwork for future payment gateway integration.

Lesson 68 Implementation: Building a Secure Buyer Purchase Details Page in Flipnzee Auctions

In the previous lesson, buyers gained access to a My Purchases dashboard where they could see every website they had won through Flipnzee Auctions. While that was a major improvement, buyers still had no way to inspect an individual transaction.

Lesson 68 addresses this by introducing a dedicated Purchase Details page. Buyers can now click a transaction from their purchase history and securely view its complete details.


What We Built

During this lesson, a new frontend component was created specifically for buyers.

The new class:

Flipnzee_My_Purchase_Details

is responsible for displaying the details of a single purchase.

The page is powered by a new shortcode:

[flipnzee_purchase_details]

Creating the Purchase Details Class

A new file was added to the plugin:

includes/class-my-purchase-details.php

Initially, the class simply:

  • Prevented direct access.
  • Checked whether the visitor was logged in.
  • Displayed a placeholder heading.

Building the page incrementally allowed each stage to be tested before adding more functionality.


Loading the Class

The new class was loaded inside the main plugin file.

require_once FLIPNZEE_AUCTION_PATH .
	'includes/class-my-purchase-details.php';

After every modification, syntax was verified using:

php -l flipnzee-auctions.php

Registering the Shortcode

Next, the shortcode was registered inside the shortcode manager.

[flipnzee_purchase_details]

This allows the purchase details page to be inserted on any WordPress page using a shortcode, keeping the implementation flexible and reusable.


Reading the Transaction ID

Unlike the purchase history page, the details page must know which transaction to display.

The transaction ID is retrieved from the URL.

Example:

https://flipnzee.com/purchase-details/?transaction_id=2

The value is sanitised using:

absint()

If no transaction ID is supplied, a friendly error message is shown instead of attempting a database query.


Secure Database Lookup

One of the most important parts of this lesson was securing access to transaction data.

Instead of loading a transaction using only its ID, the query verifies both:

  • Transaction ID
  • Logged-in Buyer ID

The SQL query therefore ensures buyers can only access their own purchases.

Even if someone manually changes:

?transaction_id=1

to

?transaction_id=50

they cannot view another user’s transaction unless they are the rightful buyer.

This is an essential security practice for any marketplace application.


Building the Purchase Details Page

Once the transaction is retrieved successfully, the page displays a professional summary.

Information shown includes:

  • Transaction ID
  • Auction Title
  • Winning Bid
  • Transaction Status
  • Purchase Date

Instead of returning plain HTML strings, PHP output buffering was used.

ob_start();
...
return ob_get_clean();

This keeps the template much easier to read and maintain.


Adding Navigation from My Purchases

The purchase history table was then enhanced with a brand new Details column.

Each purchase now contains a View Details link.

Clicking the link automatically opens the Purchase Details page for the selected transaction.

The navigation flow now becomes:

My Purchases
      │
      ▼
View Details
      │
      ▼
Purchase Details

This creates a far more natural user experience than requiring buyers to manually edit URLs.


Testing

Several scenarios were tested during implementation.

Missing Transaction ID

Without a transaction ID:

/testing/

the page correctly displayed:

Invalid transaction.

Valid Transaction

When a valid transaction was supplied:

/testing/?transaction_id=2

the page successfully displayed the transaction details.


Invalid Transaction

Using an invalid transaction ID correctly returned:

Transaction not found.

This confirms the validation logic is working correctly.


Final Result

The completed Purchase Details page now displays information similar to:

FieldValue
Transaction ID2
AuctionWpnzee.com
Winning Bid₹55,555,609.00
StatusPaid
Purchased2026-07-06 05:42:05

The page is accessible directly from the buyer’s purchase history through the View Details link.


Lessons Learned

This lesson reinforced several important WordPress development concepts.

  • Building reusable shortcode-based pages.
  • Reading and sanitising URL parameters.
  • Using $wpdb->prepare() for secure database queries.
  • Verifying ownership before displaying private information.
  • Using output buffering to generate HTML templates.
  • Creating navigation between frontend pages.
  • Improving usability through contextual links.

Download Source Code

Download the starting version of the plugin before the lesson:

Download the completed version after this lesson:


Why This Feature Matters

Lesson 68 completes the buyer transaction workflow within Flipnzee Auctions.

Previously, buyers could only see a list of purchases. They can now drill down into individual transactions and review important information without needing administrator assistance.

Combined with the My Purchases dashboard introduced in Lesson 67, buyers now have a professional frontend experience that mirrors the functionality commonly found in commercial marketplace platforms.

As Flipnzee evolves, this page can be expanded further with payment confirmations, downloadable invoices, escrow status, support requests, digital asset delivery, and other post-purchase features. It provides a strong and secure foundation for the buyer experience while bringing the Flipnzee Auctions plugin another significant step closer to a production-ready Version 1 release.

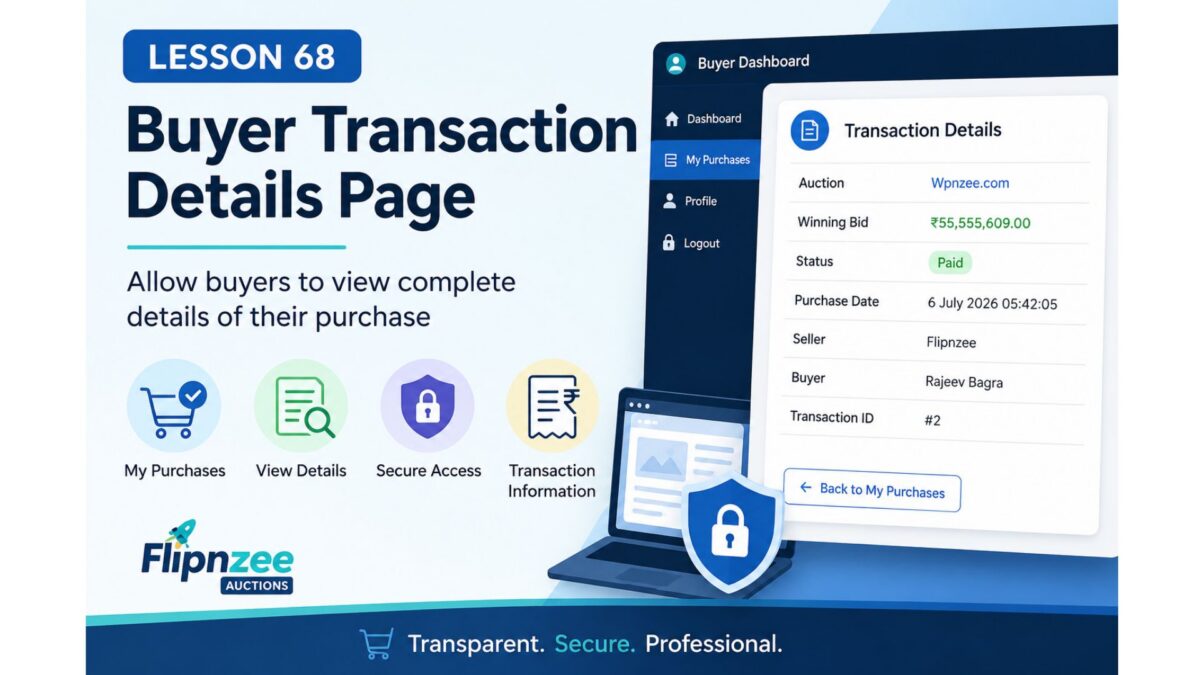
Lesson 68: Build the Buyer Transaction Details Page


Why This Lesson?

In Lesson 67, buyers gained a My Purchases dashboard listing all their purchased websites.

The next logical step is allowing buyers to click a purchase and view complete transaction information, just as administrators can from the WordPress dashboard.

This improves transparency and prepares the platform for payment confirmation, invoices, and future escrow integration.


What We Will Build

Instead of showing only:

AuctionWinning BidStatusPurchased

buyers will be able to click View Details and see a dedicated transaction page.

Example:

Transaction Details

Auction:
Wpnzee.com

Winning Bid:
₹55,555,609.00

Status:
Paid

Purchase Date:
6 July 2026

Seller:
Flipnzee

Buyer:
Rajeev Bagra

Transaction ID:
#2

Features

During this lesson we will:

  • Create a Buyer Transaction Details shortcode.
  • Pass the transaction ID securely.
  • Verify that the logged-in user owns the transaction.
  • Retrieve the transaction from the database.
  • Display all transaction information.
  • Prevent unauthorized users from viewing someone else’s purchases.

Files Expected to Change

includes/class-my-purchases.php
includes/class-my-purchase-details.php
includes/class-shortcodes.php
flipnzee-auctions.php

New Shortcode

[flipnzee_purchase_details]

New Workflow

Buyer Login
      │
      ▼
My Purchases
      │
      ▼
View Details
      │
      ▼
Purchase Details

Skills You’ll Learn

  • Passing IDs through URLs
  • Secure ownership verification
  • Database lookups using $wpdb->prepare()
  • Protecting private user data
  • Building frontend detail pages
  • Creating reusable shortcode-based pages

Expected Outcome

By the end of Lesson 68, every buyer will have:

  • A purchase history page (completed in Lesson 67).
  • A dedicated page for each purchase.
  • Secure access limited to their own transactions.
  • A foundation for future features such as payment receipts, invoices, escrow updates, download links, and support requests.

Why this is a better priority than a Seller Dashboard

Since Flipnzee Version 1 will only list websites sold by your own business, you already manage sales through the WordPress admin:

  • Listings
  • Bids
  • Transactions
  • Transaction Details
  • Activity Log

Your buyers, however, have no admin access. Enhancing their experience adds more value for Version 1 and lays the groundwork for future marketplace capabilities.

Lesson 67 Implementation: Building the Buyer Dashboard with the My Purchases Shortcode


One of the first features buyers expect after winning an auction is the ability to review their purchases. In Lesson 67, the Flipnzee Auctions plugin gained a dedicated buyer dashboard through a new shortcode called My Purchases.

Instead of forcing buyers to contact the administrator or search through emails, they can now view their completed and pending purchases directly from a WordPress page.


What We Built

During this lesson, a new class named Flipnzee_My_Purchases was created to handle the buyer dashboard.

The class:

  • Checks whether the visitor is logged in.
  • Retrieves transactions belonging to the current buyer.
  • Displays a friendly message if there are no purchases.
  • Outputs a purchase table using a shortcode.

The new shortcode is:

[flipnzee_my_purchases]

This allows the dashboard to be placed on any WordPress page.


Loading the New Class

A new file was created:

includes/class-my-purchases.php

The class was then loaded inside the main plugin file using require_once, ensuring it is available whenever the plugin loads.

As always, syntax was verified after making the change using:

php -l includes/class-my-purchases.php

Registering the Shortcode

The shortcode was registered inside the shortcode manager.

This makes the following shortcode available throughout WordPress:

[flipnzee_my_purchases]

From this point onwards, any page can become a buyer dashboard simply by inserting this shortcode.


Retrieving Buyer Transactions

The next task was querying the custom transactions table.

Only transactions belonging to the currently logged-in buyer are retrieved.

The query filters records using the current WordPress user ID and orders them from newest to oldest.

If no purchases exist, a friendly message is displayed instead of an empty table.


Displaying Purchase Information

Once the data was retrieved successfully, a responsive HTML table was generated.

Initially the table displayed:

  • Listing ID
  • Winning Bid
  • Status
  • Purchase Date

Testing confirmed that multiple purchases were displayed correctly.


Improving the User Experience

The Listing ID was later replaced with the actual listing title using WordPress functions.

Instead of displaying:

491

buyers now see something like:

Wpnzee.com

This makes the dashboard far easier to understand.


Making Listings Clickable

The listing title was then converted into a hyperlink.

Buyers can now click directly on the purchased website to revisit the listing page.

This small enhancement greatly improves navigation throughout the marketplace.


Formatting Currency

Winning bid values were originally displayed as raw numbers:

55555609.00

The output was improved using PHP’s number_format() function together with the Rupee symbol.

The dashboard now displays:

₹55,555,609.00

which is much more readable and professional.


Final Result

The completed buyer dashboard now displays:

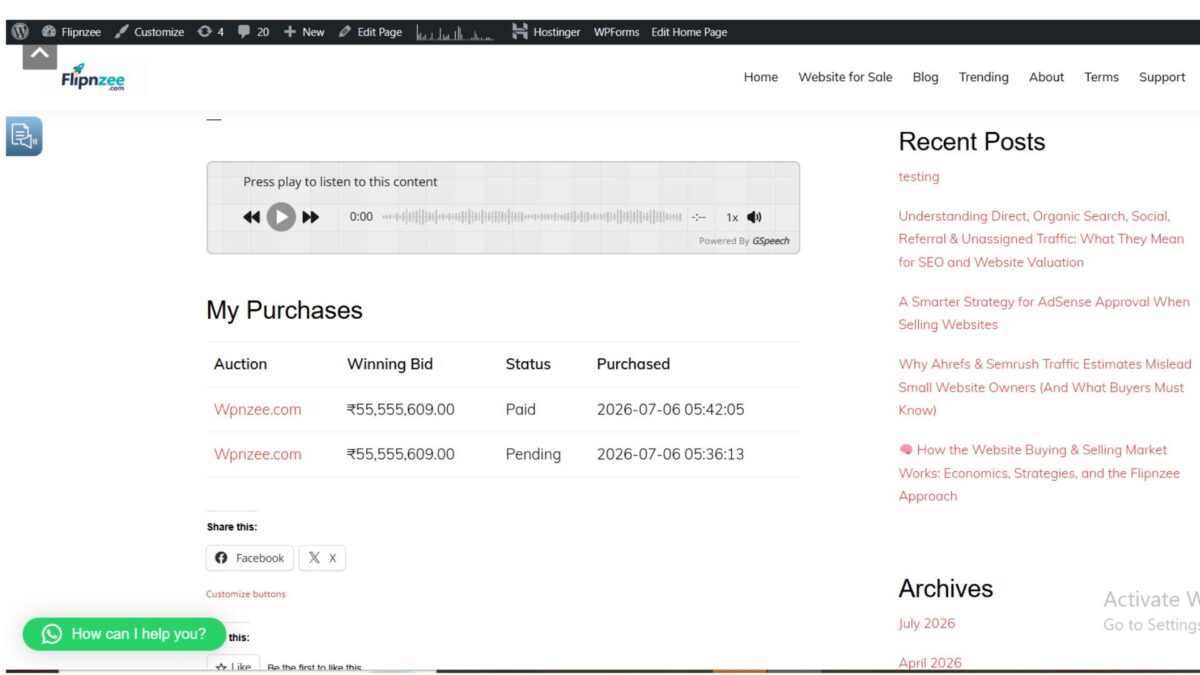
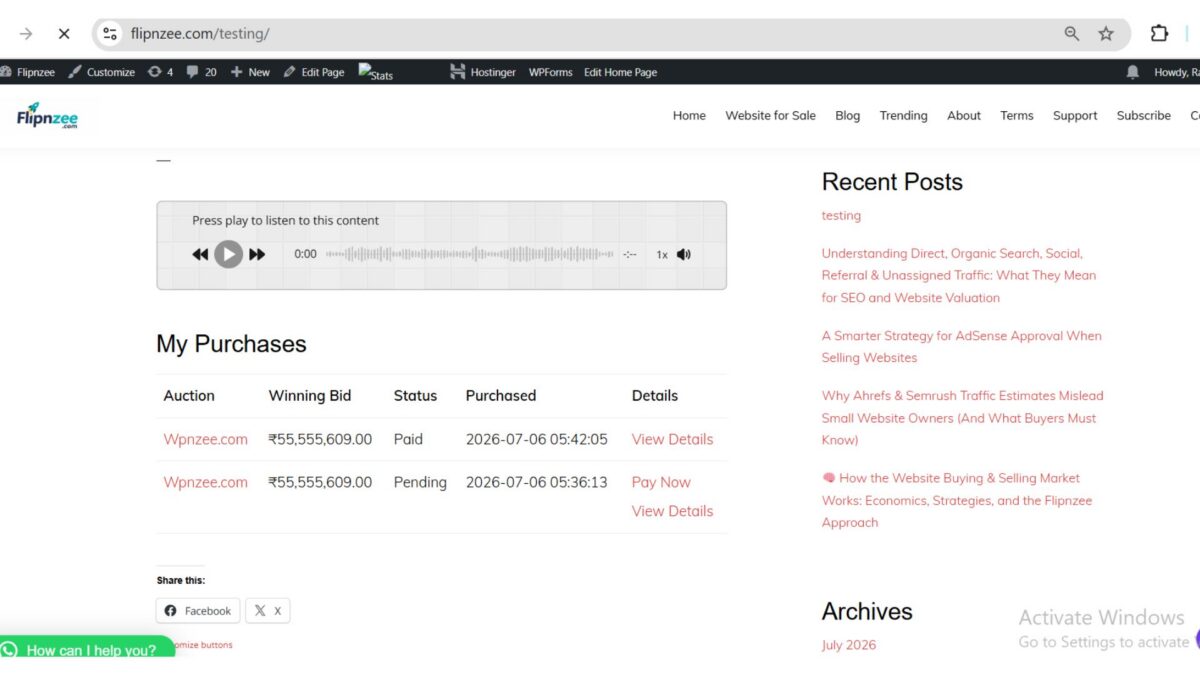
AuctionWinning BidStatusPurchased
Wpnzee.com₹55,555,609.00Paid2026-07-06 05:42:05
Wpnzee.com₹55,555,609.00Pending2026-07-06 05:36:13

Each listing title links directly to its auction page.


Lessons Learned

A few important development practices were reinforced during this lesson:

  • Separate business logic into dedicated classes.
  • Keep database queries limited to the logged-in user.
  • Escape all displayed output using esc_html() and esc_url().
  • Prefer meaningful titles over internal database IDs.
  • Format monetary values for readability.
  • Test every incremental change before moving to the next step.

Download Source Code

Download the starting version of the plugin before the lesson:

Download the completed version after this lesson:


Why This Feature Matters

This lesson marks an important milestone for Flipnzee Auctions.

Until now, most development focused on the administrator’s workflow—creating auctions, recording bids, generating transactions, and managing activity logs.

Lesson 67 introduces the first dedicated buyer-facing dashboard, allowing users to monitor their purchases without administrator assistance.

As the platform grows, this dashboard can be expanded with payment history, downloadable invoices, escrow updates, transaction completion status, and buyer support tools.

Even in its current form, it provides a solid foundation for a professional auction marketplace and brings Flipnzee one step closer to a production-ready Version 1 release.

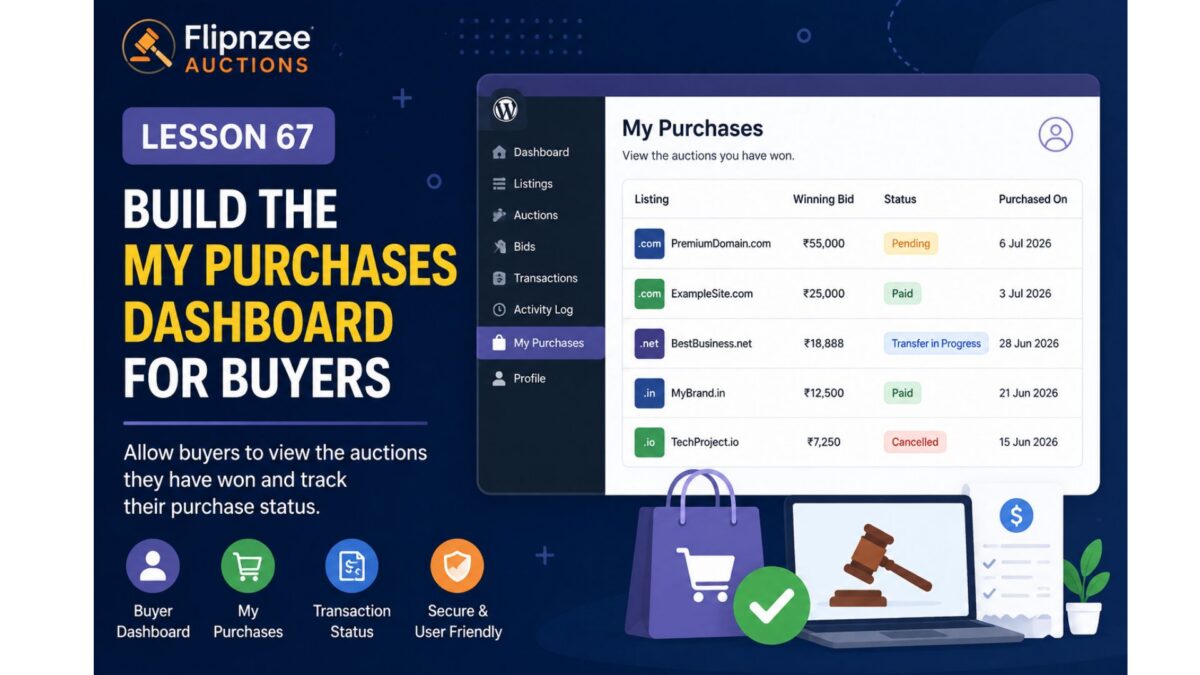
Lesson 67: Building the “My Purchases” Dashboard for Buyers


Overview

In the previous lessons, we completed the backend transaction workflow:

  • Auctions close automatically.
  • Winners are determined.
  • Transactions are created.
  • Administrators can manage transactions.
  • Administrators can inspect detailed transaction information.

However, buyers currently have no way to see the auctions they have won.

In this lesson, we will build the first user-facing transaction dashboard by introducing a My Purchases page.


Why This Lesson Matters

Imagine winning an auction on Flipnzee.com.

After placing the winning bid, you naturally expect to see:

  • What did I buy?
  • What was my winning bid?
  • Has the seller been notified?
  • Has payment been received?
  • Has the domain transfer started?

Without a buyer dashboard, users would need to contact support for every update.

The My Purchases page solves this problem.


Current Workflow

Auction

↓

Winner

↓

Transaction

↓

Administrator

New Workflow

Auction

↓

Winner

↓

Transaction

↓

Buyer Dashboard

What We’ll Build

A new shortcode:

[flipnzee_my_purchases]

When a logged-in buyer visits the page, they’ll see:

AuctionWinning BidStatusPurchased
PremiumDomain.com₹55,000Pending6 Jul 2026
ExampleSite.com₹25,000Paid3 Jul 2026

If the visitor is not logged in, they’ll see a friendly message asking them to sign in.


Files We’ll Modify

New

includes/class-my-purchases.php

Modify

flipnzee-auctions.php

Modify

includes/class-shortcodes.php

Reuse

includes/class-transaction-manager.php

Features

Step 1

Create the My Purchases class.


Step 2

Register the shortcode.


Step 3

Verify the user is logged in.


Step 4

Retrieve transactions where:

buyer_id = current_user_id()

Step 5

Display purchases in a WordPress table.


Step 6

Show:

  • Listing
  • Winning Bid
  • Status
  • Purchase Date

Step 7

Handle empty results gracefully.

Example:

You haven't purchased any auctions yet.

Expected Result

Logged-in buyers will see:

My Purchases

------------------------------------------------

Listing

PremiumDomain.com

Winning Bid

₹55,555

Status

Paid

Purchased

6 July 2026

------------------------------------------------

ExampleSite.com

Winning Bid

₹10,000

Status

Pending

Purchased

5 July 2026

Guests will see:

Please log in to view your purchases.

Future Enhancements

This page is intentionally designed to grow over time. Future lessons can extend it with:

  • View Transaction link
  • Escrow progress
  • Payment confirmation
  • Domain transfer status
  • Seller contact (when appropriate)
  • Transaction timeline
  • Download invoice
  • Email history

Skills You’ll Practice

  • WordPress shortcodes
  • User authentication
  • Current user retrieval
  • Database queries with prepared statements
  • Frontend table rendering
  • Secure output escaping
  • User dashboard design

Difficulty Level

Intermediate

This lesson introduces the first buyer-facing dashboard in the Flipnzee Auctions plugin. It connects the backend transaction system to the frontend, giving buyers immediate visibility into their purchases while establishing a reusable pattern for future user dashboards such as My Sales, My Auctions, and My Bids.
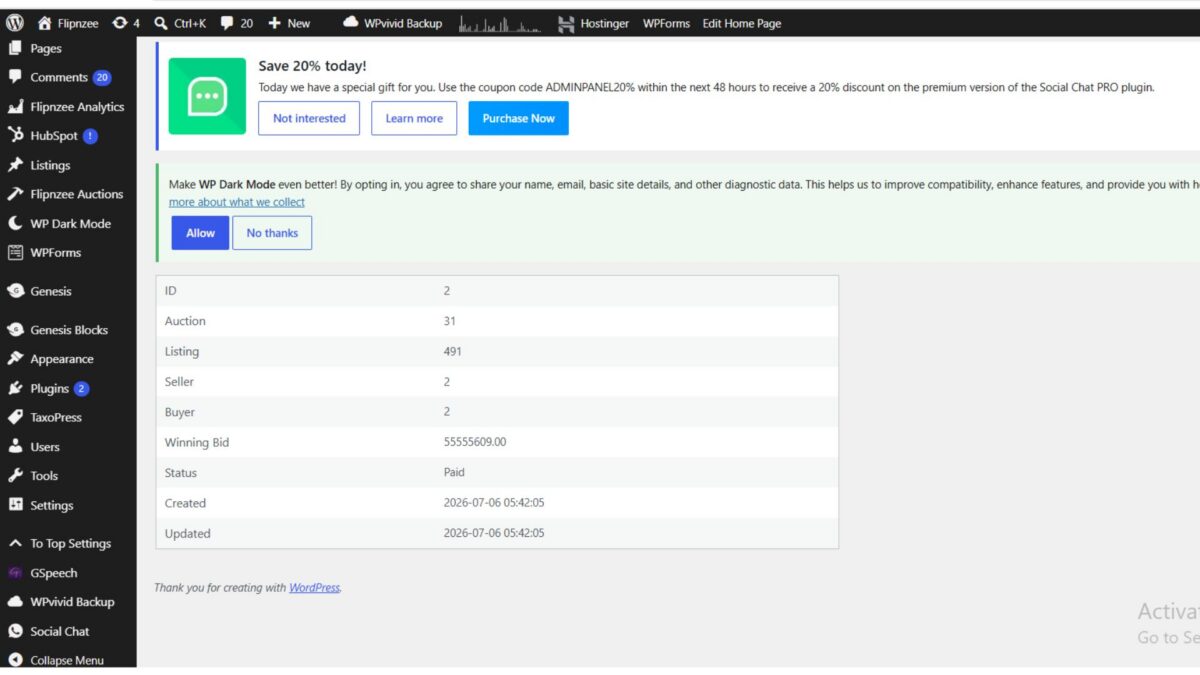

Why This Is the Right Next Step

From a marketplace perspective, this lesson provides immediate value to end users. Administrators already have the tools to manage auctions and transactions, but buyers need confidence that the platform is tracking their purchases. By introducing My Purchases, Flipnzee becomes more than an admin-managed auction system—it begins to function as a true online marketplace where users can monitor their own activity. This also lays the groundwork for future escrow updates, payment tracking, and ownership transfer notifications.

Lesson 66 Implementation: Building a Transaction Details Page for Completed Auctions

One of the biggest advantages of developing your own WordPress plugin is that you can continuously improve the user experience. In the previous lessons, the Flipnzee Auctions plugin was already creating transactions automatically after an auction ended and displaying them in a Transactions table. However, there was no way to inspect a transaction in detail.

In this lesson, a dedicated Transaction Details page was introduced. This page provides administrators with complete information about an individual auction transaction and lays the foundation for future features such as escrow management, payment verification, domain transfer tracking, and audit logs.


What We Built

Instead of only viewing a transaction inside a table, administrators can now click a View action to open a dedicated page displaying all transaction information.

Current information displayed includes:

  • Transaction ID
  • Auction ID
  • Listing ID
  • Seller ID
  • Buyer ID
  • Winning Bid
  • Transaction Status
  • Created Date
  • Updated Date

This provides a much cleaner workflow compared to searching through database records manually.


Step 1 – Creating the Transaction Details Admin Page

A new admin class was created:

admin/class-admin-transaction-details.php

This class is responsible for rendering the Transaction Details screen inside the WordPress admin dashboard.

Initially, the page only displayed a placeholder message while the routing and menu registration were tested.


Step 2 – Registering the Admin Page

The new page was registered inside the plugin’s admin menu.

Unlike normal menu pages, this page is hidden from the sidebar because it is accessed directly from the Transactions table using a URL similar to:

admin.php?page=flipnzee-transaction-details&transaction_id=2

This keeps the admin menu clean while still allowing administrators to access detailed information.


Step 3 – Loading Transaction Data

Inside the render_page() method, the transaction ID is safely retrieved using:

$transaction_id = isset( $_GET['transaction_id'] )
	? absint( $_GET['transaction_id'] )
	: 0;

Using absint() ensures only valid numeric IDs are accepted.

The transaction is then retrieved from the custom database table using a prepared SQL query.

This protects the plugin against SQL injection while ensuring the correct transaction is loaded.


Step 4 – Handling Invalid Transactions

Good plugins never assume that data always exists.

If an invalid transaction ID is supplied, the plugin now displays an error message instead of generating PHP warnings or fatal errors.

Example:

Transaction not found.

This small validation greatly improves the robustness of the plugin.


Step 5 – Displaying Transaction Information

After confirming that the transaction exists, the placeholder content was replaced with a professional information table.

The page now displays:

FieldDescription
IDInternal transaction ID
AuctionAuction record ID
ListingWordPress listing ID
SellerSeller user ID
BuyerBuyer user ID
Winning BidFinal auction amount
StatusCurrent transaction status
CreatedCreation timestamp
UpdatedLast update timestamp

This information is presented using a WordPress widefat striped table for a consistent admin experience.


Step 6 – Troubleshooting During Development

Like most real-world development sessions, implementation was not completely straightforward.

Several issues were encountered, including:

  • PHP parse errors caused by misplaced braces.
  • Accidental duplication of an if statement during copy-and-paste.
  • Mixed HTML and PHP tags while replacing placeholder content.
  • Leftover placeholder code causing unexpected output.
  • Additional syntax validation before uploading the plugin.

Each issue was resolved by:

  • Running PHP syntax checks:
php -l admin/class-admin-transaction-details.php
  • Carefully reviewing opening and closing braces.
  • Replacing only the affected code block instead of rewriting the entire file.
  • Testing after every small change.

This incremental debugging approach made it much easier to locate and resolve problems.


Final Result

The Flipnzee Auctions plugin now includes a dedicated Transaction Details page.

Administrators can:

  • Open a completed transaction
  • View all important transaction information
  • Verify buyer and seller IDs
  • Review the winning bid
  • Check the current transaction status
  • See creation and update timestamps

The page is now ready for future enhancements without requiring any structural redesign.


Why This Matters

Although this page currently displays basic information, it establishes the foundation for a complete transaction management system.

Future lessons can build upon this page by adding:

  • Buyer profile links
  • Seller profile links
  • Listing title instead of ID
  • Auction title
  • Escrow status
  • Payment history
  • Domain transfer progress
  • Shipping information (for physical products)
  • Internal administrator notes
  • Activity timeline
  • Email history
  • Downloadable invoices

Because the framework is already in place, adding these features will be much easier.

Download Source Code

Download the starting version of the plugin before the lesson:

Download the completed version after this lesson:


Lessons Learned

During this implementation, several important development practices were reinforced:

  • Build features incrementally rather than all at once.
  • Validate user input before querying the database.
  • Always use prepared SQL statements.
  • Check for missing records gracefully.
  • Run PHP syntax checks before uploading changes.
  • Test every modification immediately to catch errors early.
  • Use dedicated detail pages instead of overcrowding list tables.

Conclusion

Lesson 66 significantly improves the administrative experience of the Flipnzee Auctions plugin. Instead of viewing transactions only in a summary table, administrators can now inspect individual transactions on a dedicated page with all essential details.

More importantly, this page serves as the foundation for advanced transaction management features planned for future lessons, bringing the plugin another step closer to a production-ready auction platform.

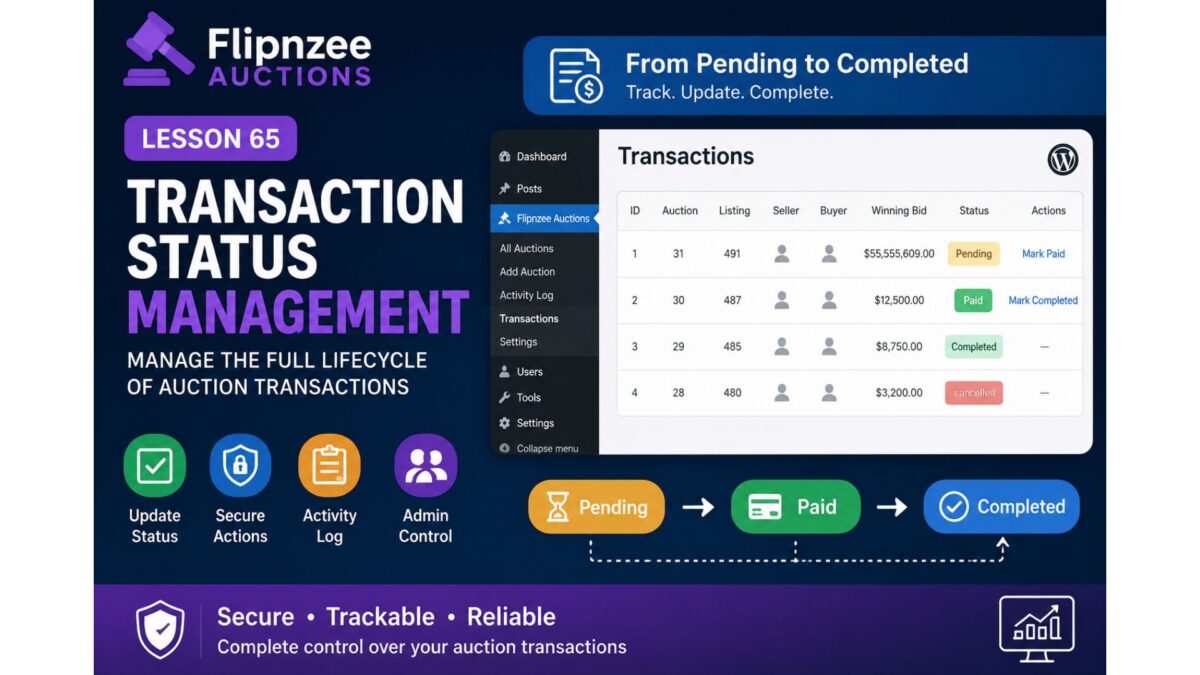
Lesson 65 Implementation: Adding Transaction Status Management to Flipnzee Auctions

After building the Transactions dashboard in the previous lesson, the next improvement was to make the transactions interactive. Instead of simply displaying transaction records, administrators should be able to manage the progress of each transaction as the auction moves through its post-sale lifecycle.

In this lesson, we implemented the foundation for transaction status management, allowing administrators to update transaction statuses securely from the WordPress admin area while recording every status change in the activity log.


Objective

The goal of this lesson was to transform the Transactions page from a read-only report into the beginning of a transaction management system.

Instead of every transaction remaining permanently in a Pending state, administrators can now move transactions through different stages.


Initial Workflow

Before this lesson, every completed auction produced a transaction like this:

TransactionStatus
#1Pending
#2Pending

Although transactions were stored correctly, there was no mechanism to update their progress.


Step 1 — Extend the Transaction Manager

The first task was adding a reusable method responsible for updating transaction status.

File modified:

includes/class-transaction-manager.php

Method added:

/**
 * Update a transaction status.
 *
 * @param int    $transaction_id Transaction ID.
 * @param string $status         New status.
 * @return bool
 */
public static function update_status(
	$transaction_id,
	$status
) {

	global $wpdb;

	$table = $wpdb->prefix . 'flipnzee_transactions';

	$updated = $wpdb->update(
		$table,
		array(
			'status' => sanitize_text_field( $status ),
		),
		array(
			'id' => absint( $transaction_id ),
		),
		array(
			'%s',
		),
		array(
			'%d',
		)
	);

	if ( class_exists( 'Flipnzee_Activity_Log' ) ) {

		Flipnzee_Activity_Log::log(
			'transaction_status_updated',
			0,
			get_current_user_id(),
			sprintf(
				'Transaction #%d marked as %s.',
				$transaction_id,
				$status
			)
		);
	}

	return false !== $updated;
}

This method centralizes all transaction status updates in one location.


Step 2 — Register an Admin Action

To process status changes securely, a new WordPress admin action was registered.

File modified:

flipnzee-auctions.php

Code added:

add_action(
	'admin_post_flipnzee_update_transaction_status',
	array(
		'Flipnzee_Transaction_Manager',
		'handle_status_update',
	)
);

This allows WordPress to execute a custom handler whenever an administrator clicks a transaction action link.


Step 3 — Handle Status Updates Securely

Next, a dedicated handler method was implemented.

public static function handle_status_update() {

	if ( ! current_user_can( 'manage_options' ) ) {
		wp_die( 'Permission denied.' );
	}

	check_admin_referer(
		'flipnzee_update_transaction'
	);

	$transaction_id = isset( $_GET['transaction_id'] )
		? absint( $_GET['transaction_id'] )
		: 0;

	$status = isset( $_GET['status'] )
		? sanitize_text_field(
			wp_unslash( $_GET['status'] )
		)
		: '';

	if ( $transaction_id && $status ) {

		self::update_status(
			$transaction_id,
			$status
		);
	}

	wp_safe_redirect(
		admin_url(
			'admin.php?page=flipnzee-transactions'
		)
	);

	exit;
}

The handler performs several important tasks:

  • verifies administrator permissions,
  • validates the WordPress nonce,
  • sanitizes user input,
  • updates the transaction,
  • redirects back to the Transactions page.

Step 4 — Add Status Action Links

The Transactions table was enhanced by creating a custom renderer for the Status column.

File modified:

admin/class-transactions-table.php

Method added:

public function column_status( $item ) {

	$status = esc_html( ucfirst( $item['status'] ) );

	$actions = array();

	if ( 'pending' === $item['status'] ) {

		$url = wp_nonce_url(
			admin_url(
				'admin-post.php?action=flipnzee_update_transaction_status'
				. '&transaction_id=' . $item['id']
				. '&status=paid'
			),
			'flipnzee_update_transaction'
		);

		$actions['paid'] =
			'<a href="' . esc_url( $url ) . '">Mark Paid</a>';

	} elseif ( 'paid' === $item['status'] ) {

		$url = wp_nonce_url(
			admin_url(
				'admin-post.php?action=flipnzee_update_transaction_status'
				. '&transaction_id=' . $item['id']
				. '&status=completed'
			),
			'flipnzee_update_transaction'
		);

		$actions['completed'] =
			'<a href="' . esc_url( $url ) . '">Mark Completed</a>';
	}

	return sprintf(
		'%1$s %2$s',
		$status,
		$this->row_actions( $actions )
	);
}

This introduces workflow-oriented actions directly into the Transactions page.


Step 5 — Testing the Workflow

After uploading the updated plugin, several scenarios were tested.

Successful observations included:

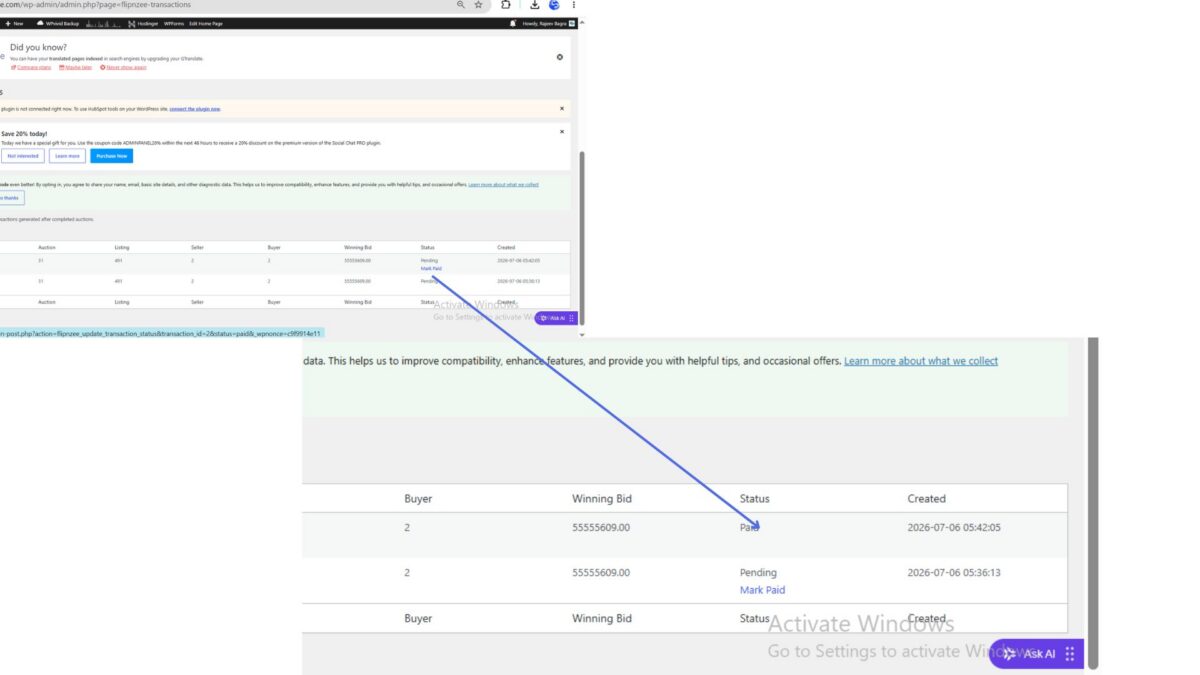
  • Transaction status changed from Pending to Paid.
  • The database updated correctly.
  • The Activity Log recorded the status change.
  • Administrators were redirected back to the Transactions page after the update.

This confirmed that the backend workflow was functioning as intended.


Challenges Encountered

During implementation, several issues arose that provided valuable learning opportunities.

Duplicate Methods

While extending the Transaction Manager, a duplicate update_status() method was accidentally created, resulting in a fatal PHP error. Removing the duplicate resolved the issue and reinforced the importance of keeping classes organized.

PHP Syntax Errors

While adding new methods, braces were temporarily misplaced, causing syntax errors. Incremental syntax checking with:

php -l includes/class-transaction-manager.php

helped identify and correct these mistakes before deployment.

Transactions Table Rendering

The custom Transactions table successfully displayed transaction data and action links. Status updates from Pending to Paid worked correctly, and the database reflected the changes. However, the “Mark Completed” action did not appear after a transaction entered the Paid state.

This did not affect the underlying transaction workflow or status updates, but highlighted a rendering issue within the current WP_List_Table implementation. Since the core transaction management functionality was already operational, further refinement of the table interface was deferred to a future lesson focused on polishing the admin experience.


Lessons Learned

This lesson demonstrated several important WordPress development practices:

  • Separate business logic from user interface rendering.
  • Protect administrative actions with nonces.
  • Verify user capabilities before processing requests.
  • Centralize database updates inside dedicated manager classes.
  • Record important business events in an activity log.
  • Test functionality incrementally after every major change.

Download Source Code

Download the starting version of the plugin before the lesson:

Download the completed version after this lesson:

Final Outcome

By the end of Lesson 65, the Flipnzee Auctions plugin evolved beyond simply storing transactions. Administrators can now begin managing the transaction lifecycle by updating statuses securely through the WordPress admin interface. Although some interface refinements remain for future lessons, the underlying architecture for transaction status management is now in place.

This implementation provides a solid foundation for the next phase of development, where transaction status changes will be connected to buyer and seller notifications, escrow integration, payment workflows, and ownership transfer processes, bringing the plugin closer to supporting real-world online auctions on Flipnzee.com.

Lesson 65: Adding Transaction Status Management to Flipnzee Auctions


What You’ll Learn

In this lesson, you’ll enhance the Transactions page by allowing administrators to change the status of auction transactions directly from the WordPress dashboard.

By the end of this lesson, you’ll be able to:

  • Display transaction status as a clickable action
  • Add row actions to each transaction
  • Update transaction status securely
  • Use WordPress nonces for protection
  • Process admin actions with custom handlers
  • Record status changes in the activity log

Why This Matters

Currently every transaction is stored like this:

IDStatus
1pending
2pending

Once payment is received or the website/domain has been transferred, an administrator needs a way to mark the transaction as:

  • Pending
  • Paid
  • Completed
  • Cancelled
  • Refunded (future lesson)

Without this capability, the transaction system is read-only.


What We’ll Build

We’ll transform this:

Status
pending

into something like:

Status
Pending

[Mark Paid]

Later:

Status
Paid

[Mark Completed]

Finally:

Status
Completed

Files We’ll Modify

  • admin/class-admin-transactions.php
  • includes/class-transaction-manager.php
  • includes/class-activity-log.php
  • flipnzee-auctions.php

Features We’ll Implement

Step 1

Create transaction status update method.


Step 2

Add admin action handler.


Step 3

Verify WordPress nonce.


Step 4

Update transaction status in database.


Step 5

Write activity log entry.


Step 6

Display success notice.


Step 7

Add “Mark Paid” row action.


Step 8

Add “Mark Completed” row action.


Step 9

Hide actions once transaction is completed.


Step 10

Test the complete workflow.


Expected Result

Instead of only viewing transactions, administrators will be able to manage their progress:

Transaction #5

Status: Pending

Actions:
✓ Mark Paid

Status: Paid

Actions:
✓ Mark Completed

Status: Completed

Skills You’ll Learn

  • WordPress admin action handlers
  • Secure nonce verification
  • Updating custom database tables
  • Admin notices
  • Row actions in WP_List_Table
  • Activity logging
  • Transaction workflow design

End Result

After Lesson 65, the Flipnzee Auctions plugin will evolve from simply recording transactions to managing the full transaction lifecycle. Administrators will be able to move transactions through meaningful stages—such as Pending, Paid, and Completed—while every status change is securely processed and automatically recorded in the activity log. This creates a practical workflow for handling completed auctions and prepares the plugin for future enhancements like payment gateway integration, downloadable invoices, email notifications, refunds, and commission tracking.